| User's Manual |
| Adding Event |
Step 1. Click  button. button.
Click |
 |
||||||||||||||||||||||||||||||||||
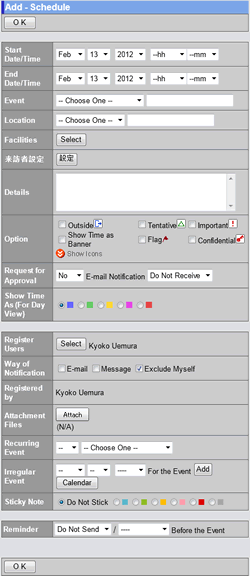
Step 2. Enter Event Information
* Be sure to enter [Event], [Location], [Details] or [Option] (except banner fields). Step 3. Click . Click this button to add the event. |
 |
||||||||||||||||||||||||||||||||||
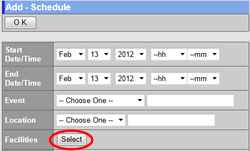
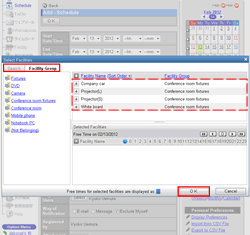
| To Select Facilities to be Reserved When [Use JavaScript] in [General Design Preferences] is set to "Use". Step 1. Click in [Facilities]. Click in [Facilities] on the Add Event screen. Step 2. Check Facilities You choose a group from [Group] to change the view. Step 3. Click [OK] Click this button to add the facilities. They are displayed in [Facilities]. |
  |
||||||||||||||||||||||||||||||||||
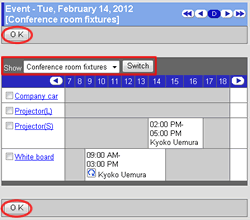
| To Select Facilities to be Reserved When [Use JavaScript] in [General Design Preferences] is set to "Do Not Use". Step 1. Click in [Facilities]. Click in [Facilities] on the Add Event screen. Step 2. Check Facilities You choose a group from [Group] to change the view. Step 3. Click . Click this button to add the facilities. They are displayed in [Facilities]. |
  |
||||||||||||||||||||||||||||||||||
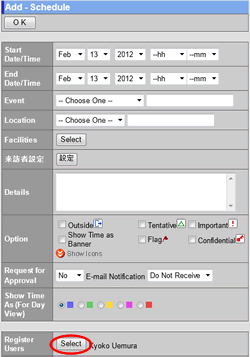
| To Select Users When [Use JavaScript] in [General Design Preferences] is set to "Use". Step 1. Click in [Register Users] Click in [Register Users] on the Add Event screen. |
 |
||||||||||||||||||||||||||||||||||
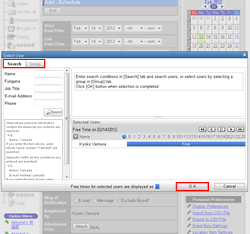
Step 2. Select Users
Select users to whom you want to add the event. Step 3. Click [OK] Click this button to add the users. They are displayed in [Register Users]. |
 |
||||||||||||||||||||||||||||||||||
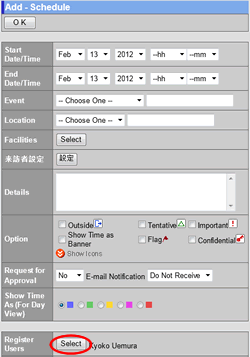
| To Select Users When [Use JavaScript] in [General Design Preferences] is set to "Do Not Use". Step 1. Click in [Register Users] Click in [Register Users] on the Add Event screen. |
 |
||||||||||||||||||||||||||||||||||
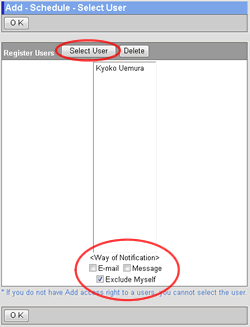
Step 2. Select Users
Click this button to display the user selection screen. Step 3. Click . Click this button to add the users. They are displayed in [Register Users]. |
 |
||||||||||||||||||||||||||||||||||
Request for Approval Function
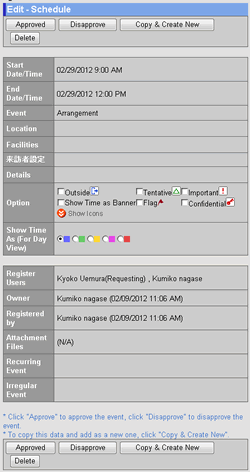
When you add an event, you can request for approval to other users. |
|||||||||||||||||||||||||||||||||||
Events with approval request cannot be edited, but users can do; . |
 |
||||||||||||||||||||||||||||||||||
Request for Approval Icons
The icon |
For users who request for approval For users who receive a request for approval  |
||||||||||||||||||||||||||||||||||
| To Add Event and Location Items | |||||||||||||||||||||||||||||||||||
| If you want to add items to [Event] and [Location], you can use [Personal Preferences]-[Event Item Settings] or [Location Item Settings]. | |||||||||||||||||||||||||||||||||||
| Schedule |
|---|
| User's Manual |
|
Copyright (C) 2012 NEOJAPAN,Inc. All Rights Reserved. |