Screen Structure and Basic Operations
You can read the mail received to the email address you have specified.
* The following dialog appears if you have no email account.
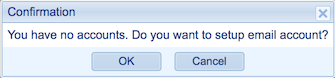
Click "OK" to move to the Account Settings screen.
You can use the WebMail application after you have finished the account settings.
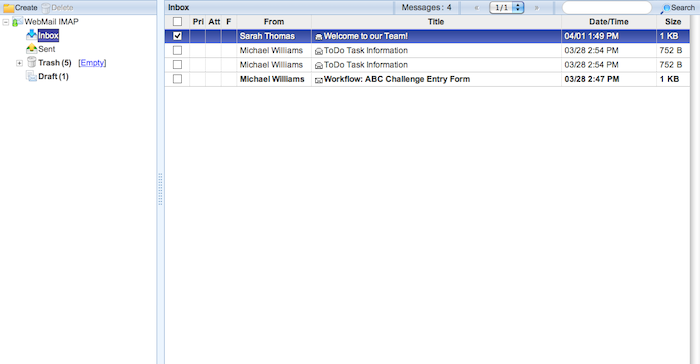
- Email Main Screen
 Header Menu
  Message List
-
The trays and folders.
You can also add new folders.
Each folder shows the number of the unread messages with parentheses.
(For more details, please refer to To Manage Folders .)
-
The list of messages is displayed.
The list of messages stored in each tray and folder is displayed.
Unread messages are displayed in bold.
-
You can use the quick search.
When you enter keywords and press enter key or "Search" button, messages that match the keywords are displayed.
The search function searches in "From", "To/Cc", "Title", "Message body" fields.
* To use the quick search, select not "WebMail IMAP" but one of the trays and folders of the tree in the left pane.
* If you want to specify more search criteria such as "Received Date/Time", use the Advanced Search by pressing the [Search] button on the top of the screen.
-
This is the message selected in the list above.
- 2-pane email screen
The message preview pane is not displayed when "2 panes without message preview" is selected in "Layout of Email Screen" in "Personal Settings" - "Display Settings".
To see the details of a message, double-click it on the list of messages.
- Sub Menu
When you press the right mouse button on a folder, the sub menu is displayed.

-
Display the message in a new window.
-
Reply the selected messages to the sender.
-
Reply the selected messages to all the recipients.
* When you compose a reply message, the same email addresses as your address are deleted automatically.
-
Display the email forwarding screen for the selected messages.
-
Display the edit screen.
-
Display the composing a message to the sender of the selected message.
-
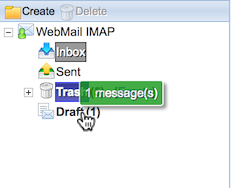
Move the selected messages to the Trash.
-
Flag the selected message.
-
Mark the selected messages as read.
-
Display the printable screen and the dialog for printing.
-
Download the selected messages as a zip file.
You can select as many messages as you want.
Each email message is saved as an email formed file.
Its filename contains a sequence number from 1 in ascending order of the received date or sent date of the message.
* The download function has to be set to "Allow" in "System Settings" - "Download Message Settings".
-
Display the "New Contact" screen in which the name and email address are filled.
-
Add sender's information to the junk email list.
You can choose either domain or email address to identify the sender as a junk email.
TroubleshootingThe following warning dialog appears if the connection to the email server failed.
Confirm your account settings or ask your system administrator.

To Read Message
When you press a message you want to read, the content of message is displayed.
You can also double press on a message to open the message in new window.
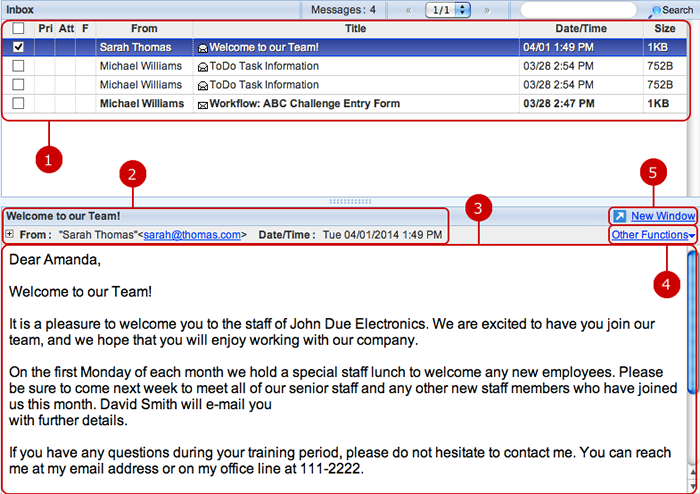 Other Functions
When you click Other Functions link on email list screen or email view screen, menu of other functions is displayed.

-
Display Add Schedule screen in a new window.
The following information will be automatically filled in Add Schedule screen.
- "Subject" will be added to "Event".
- "Body" will be added to "Details".
- Attached files in the email and the email contents which has been converted to HTML format (mail.html) will be added to "Attachment Files".
Please refer to the explanation of Schedule in the user's manual for more details.
-
Create new circulation/report is displayed in a new window.
The following contents will be the default value:
- "Subject" will be added to "Title(Format)".
- "Body" will be added to "Details".
- Attached files in the email and the email contents which has been converted to HTML format (mail.html) will be added to "Attachment Files".
Please refer to the explanation of Circulation/Report for more details.
-
Display Create Information screen in a new window.
The following information will be automatically filled in a Create Information screen.
- "Subject" will be added to "Title".
- "Body" will be added to "Details".
- Attached files in the email and the email contents which has been converted to HTML format (mail.html) will be added to "Attachment Files".
(For more information, please refer to Information in User's Manual.)
-
Click to copy the email contents to a file and add to Cabinet.
The following contents will be added to Cabinet:
- "Subject" will be added to "Title".
- Contents of an email.
- Attached files in an email will be added to "Attachment Files".
Please refer to the explanation of Cabinet for more details.
View Email ScreenDouble click on an email or click "New Window" to view the email in a new window.
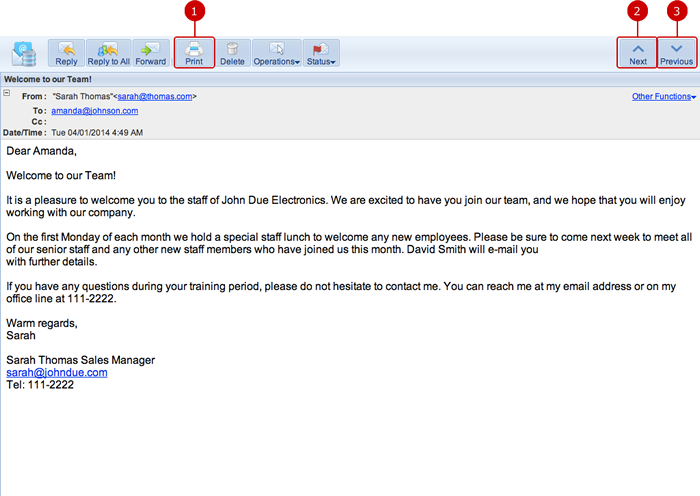
-
Display a printable view and a print window.
-
Display next email.
-
Display previous email.
* "Next" and "Previous" buttons will not appear if an email is opened from the following functions:
- Search result of "All" (search box on the top page)
- WebMail that has been set in Portal
- Attachments of "eml" format
To Compose and Send Message
When you press "New Message" button, the message composing screen is displayed.
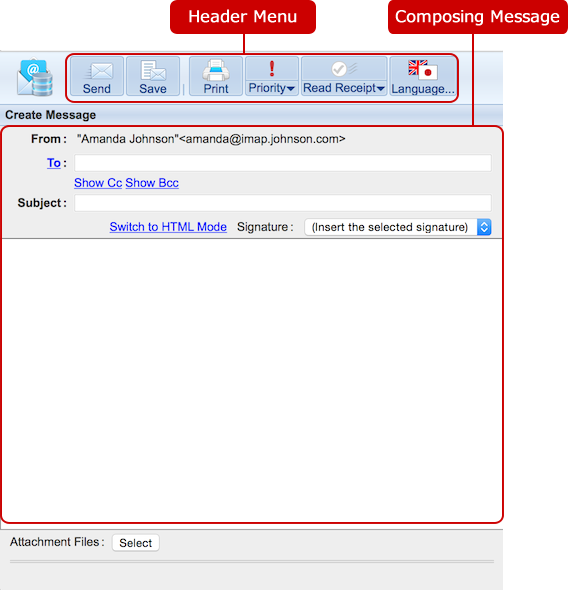 Header Menu
-
Send the message.
-
Save the email message in the Draft folder.
-
Display a printable screen.
-
Set the priority of the message.
-
Choose whether to request a read receipt to the recipients.
-
Change the language of the message.
Composing Messages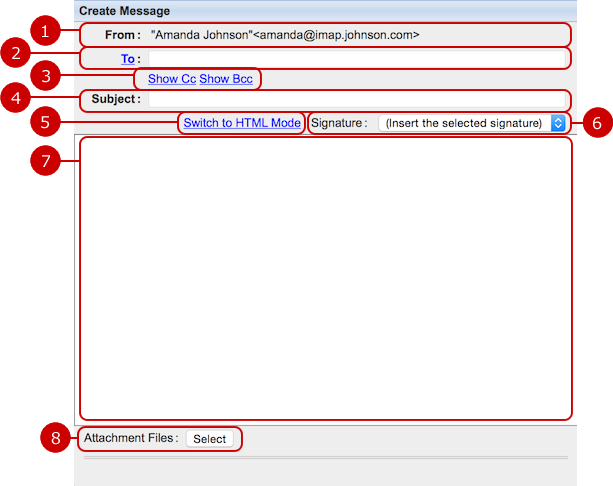
When you press "Send" button after you complete the entry, the message is sent.
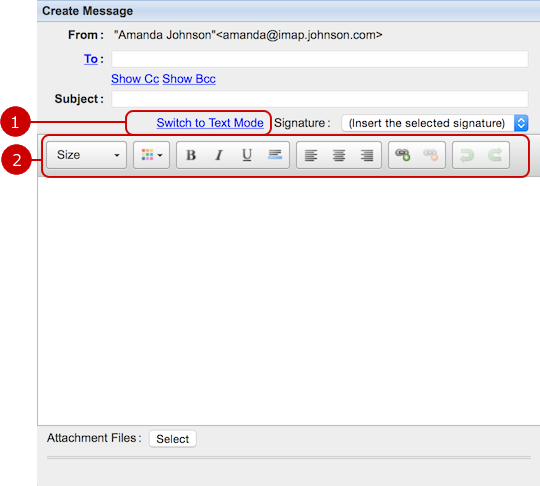
HTML Email Editor
HTML email editor is used for writing HTML email.
* In rich text editor, pressing Enter key at the end of a line will insert a paragraph break (p tag). Pressing Shift key and Enter key on the other hand will insert a line break (br tag).
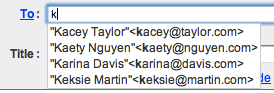
 Auto Complete Function
It provides the auto complete function which shows the candidate address when you are typing characters in recipient fields (To, Cc, Bcc).
The auto complete function searches in contacts registered in your personal address book, the public address book, and User Directory.
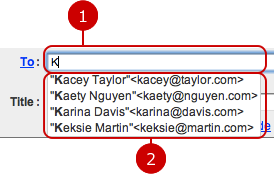
- When entering a name
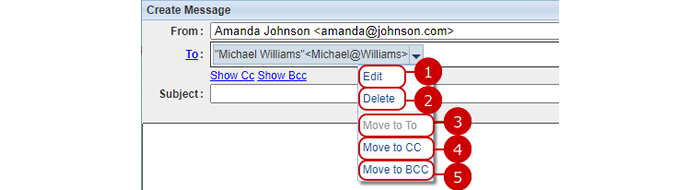
 Moving Email Addresses
Confirmed receipient (To, Cc, Bcc) can be edited and moved.
* The Move Mail Address has to be set to "Allow" in "Personal Settings" - "Basic Settings".
(For more information, please refer to
WebMail > Personal Settings > To Setup Basic Settings in User's Manual.)
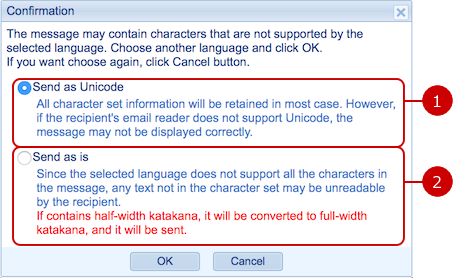
 To Confirm Language Settings Before Sending/Saving
We provide a feature to confirm the language settings when clicking the "Send" or "Save" button.
The following window appears, if the message contains an unknown character, which is not supported by the selected language, and it is not "Unicode (UTF-8)."
* The window appears when the message contains a half-sized katakana.
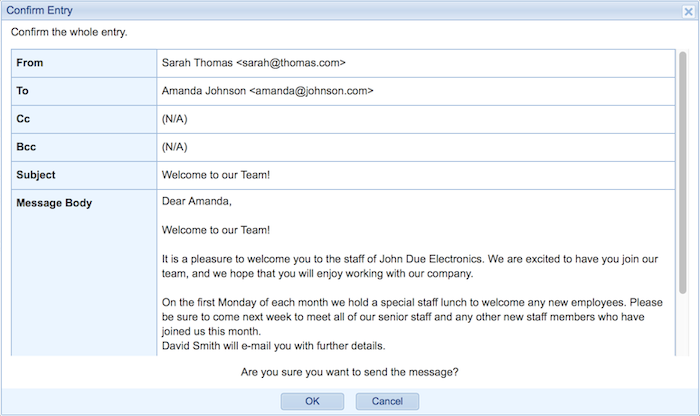
 To Confirm Entry Before Sending
We provide a feature to confirm messages when clicking the "Send" button.
Three types of confirmation windows are available.
* You can change your confirmation window in "Confirm before Sending" in "Personal Settings" - "Basic Settings".
* You can change the settings only when the system administrator allows that.
- Confirmation window showing whole entry
If the WebMail's recipient whitelist has acceptable email addresses, other email addresses are highlighted in red.

(For more information about the recipient whitelist, please refer to
To Setup Recipient Whitelist in the system management manual.)
- Confirmation window showing whole entry with check boxes
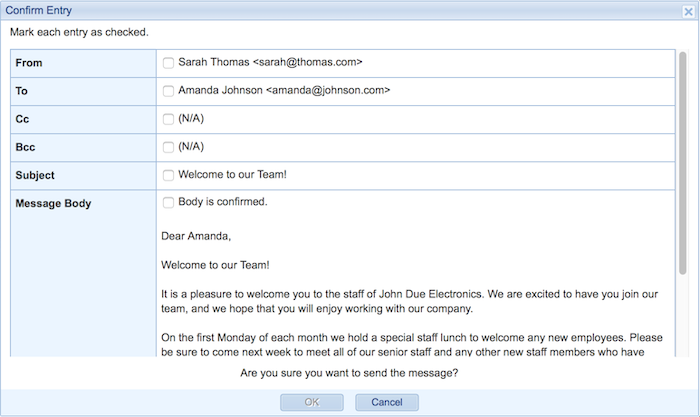
* You cannot click the [OK] button until you have checked all check boxes.
The WebMail's recipient whitelist affects like the followings on the confirmation window.

- Email addresses not found in the whitelist are highlighted in red.
- The checkboxes of the email addresses found in the whitelist are marked as checked by default (using partial matches).
(For more information about the recipient whitelist, please refer to
To Setup Recipient Whitelist in the system management manual.)
The following warning message appears on the confirmation window, if it is set.

This message means that the number of "To" and "Cc" email addresses exceeds the setting value of "Number of email addresses to warn."
* The message appears only when "Yes(Show the whole entry.) or "Yes(Do not send a message unless all entries are checked.)" is selected in the "Confirm before Sending" field.
- Normal confirmation window
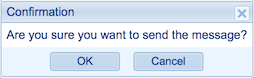
Click the [OK] button in the confirmation window, and the message will be sent.
To Recall Sent MessagesWe provide a feature to recall sent messages.

A note appears saying "Sending the message..." on the top of the WebMail IMAP screen after sending, if the feature is enabled.
While the note exists, you can recall the message by clicking the "Cancel" link next to the note.
Recalled messages are saved in the "Drafts" folder.
* The "Drafts" folder has other unsent messages caused by any failure, closing the browser, and so on.
* You can change how long do messages stay in "Recall Sent Messages" in "Personal Settings" - "Basic Settings".
* The settings may not be available depending on the administrator's settings.
To Reply or Forward Message
- Reply a message
When you press "Reply", "Reply to All" button, you can reply the message to the sender.
"Reply" button: The sender of the selected message is set to "To" and message body is inserted automatically.
"Reply to All" button: In addition to the function of "Reply" button, the addresses in "Cc" also set.
* Where you can change how to quote original messages is in "Replay Style" in "Personal Settings" - "Basic Settings".
* If you have specified "Location of Signature" in "Personal Settings" - "Basic Settings", your signature will be inserted automatically into the message.
- Forward a message
When you press "Forward" button, you can compose a message to which the message body you selected is inserted.
* Unlike reply, the sender's email address is not set to "To". Set the email address of a person you want to forward the message.
* Where you can change whether to attach original messages is in "When Forwarding Message" in "Personal Settings" - "Basic Settings".
* If you have specified "Location of Signature" in "Personal Settings" - "Basic Settings", your signature will be inserted automatically into the message.
To Manage Messages
WebMail IMAP provides various functions to manage messages.
- To move messages to a folder
Select messages you want to move and hold down the mouse button. When you release the mouse button over a folder, the messages are moved to the folder. You can select more than one group.
* You can select and move more than one message by using Ctrl key (command key in Mac) or Shift key.
* You can move the draft messages saved in the Draft folder.
* You cannot move messages to the Draft folder.
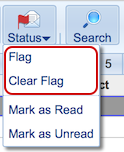
- To flag a message
You can flag a message which contains important information.
The flag can be used in the search criteria, you can find the message easily.
You can add a flag with the following menu.
-
Status Menu - opened by clicking the Status button.
-
Context Menu - opened by right-clicking a message.

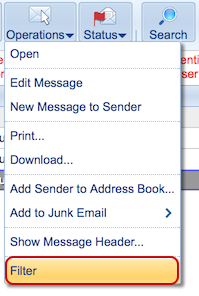
- To filter messages
Click the Filter link to filter the selected messages in the list. The link is displayed in the Operation menu of the header menu.
- To filter junk messages
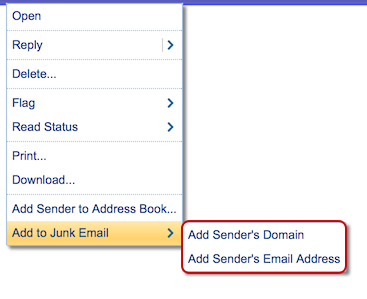
You can add junk email information in the Junk Email Settings.
Right-click a message, click "Add to Junk Email," and select a way on the context menu.
-
Add Sender's Domain - Add the string after the at mark (@) to the junk email list.
-
Add Sender's Email Address - Add the email address to the junk email list.
(Please refer to
WebMail IMAP> Personal Settings > Setup junk emails for how to setup junk emails for more details.)
To Print Email Messages
Click the "Print" button, and its print screen appears.
The Print button is displayed in:
-
The sub menu opened by the Operation button in the header menu.
-
The context menu opened by right-clicking an email message.
-
The details of email message screen.
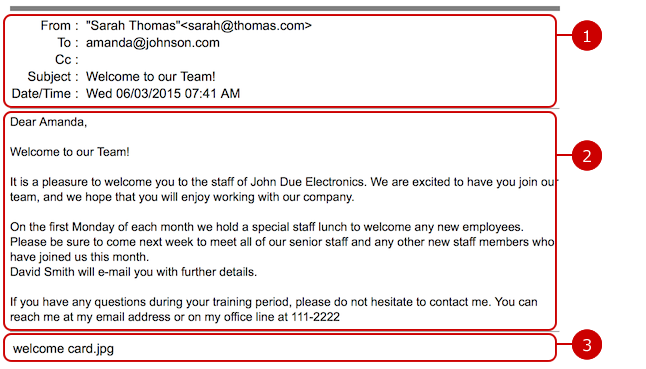
-
Information about the sender, subject, and others.
-
The message body.
-
The attached files' names if they exist.
To Manage Folders
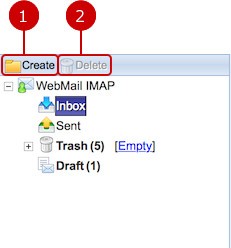
You can add, edit and delete folders on the folder list area.
* You can drag & drop a folder to move it on the list of folders screen.
- Sub Menu
When you press the right mouse button on a folder, the sub menu is displayed.
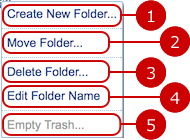
To Create Folders
Click the "Create" button above the folder list, the Create Folder window appears.
Enter a new folder name and select a position to insert the folder.
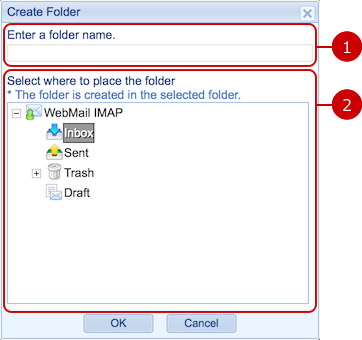
-
Enter a folder name.
-
Select the position to insert the folder.
Choose it from the folder tree.
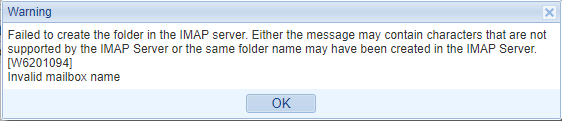
* You may not be allowed to add folders to the Inbox depending on the IMAP server.
The following warning appears if you cannot.
When the entry is complete, press "OK" button to save the data.
To Change Folder Names
Press the right mouse button on a folder and select "Edit Folder Name" link in the sub menu, and Edit Address Folder Name window will appear.
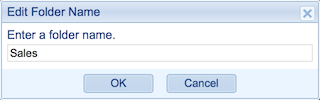
When changes are complete, press "OK" button to save the data.
To Search Messages
When you press "Search" button, the message search panel is displayed.
You can use various search criteria such as keyword, date.
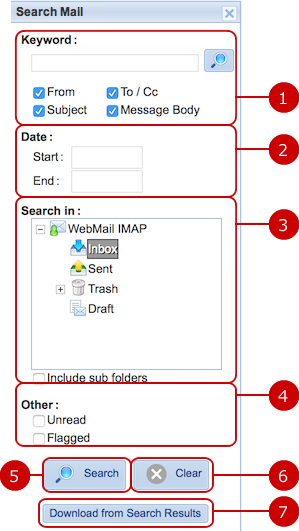
-
Enter keywords.
The search function searches in "From", "To/Cc", "Title", "Message body" fields.
-
Enter a date period.
The search function searches messages that received date within the period.
When you click an entry field, a calendar will be displayed.
* Enter a date in MM/dd/yyyy format, numeric.
-
Choose a folder to be searched.
The search function searches messages in the folder you selected.
If you check "Include sub folders" option, the search function searches sub folders as well as the folder.
-
Enter other search conditions.
Unread: unread messages will be searched.
Flagged: flagged messages will be searched.
-
When you press "Search" button, messages that match the search conditions are displayed in the list screen.
* An error dialog appears when it has passed more than the specified seconds (Server Timeout in the Mail Server Settings), since the search was requested.
Please wait a while and try to search again, or ask your administrator.
-
"Clear" button clears all entries for the search conditions.
-
When you press "Download from Search Results", the messages in the list are zipped and downloadable.
Each email message is saved as an email formed file.
Its filename contains a sequence number from 1 in ascending order of the received date or sent date of the message.
* The [Download from Search Results] button may not be available depending on the administrator's settings.
