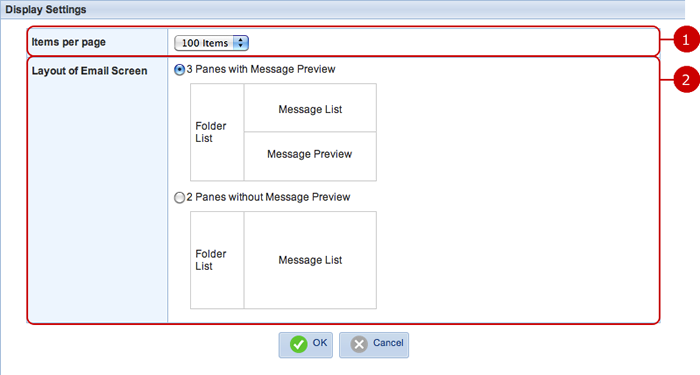
To Setup Display Settings
When you press Display Settings in Settings screen, Display Settings screen is displayed.
-
Choose a number of messages to be displayed on one page.
-
Choose a layout of email screen.
When the entry is complete, press "OK" button to save the data.
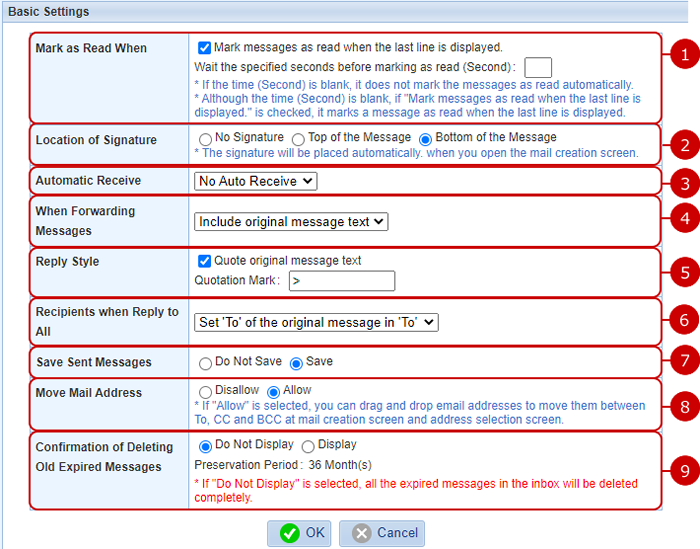
To Setup Basic Settings
When you press Basic Settings in Settings screen, Basic Settings screen is displayed.
-
This option allows you to mark messages automatically as read when you display their last line.
You can also define how many seconds to wait before marking items as read.
* The option is valid only when the "Second" is specified.
-
Choose a location where to insert your signature.
The signature will be inserted at the specified position when you compose a message.
-
Choose an value for the auto receive interval from the options:
No Auto Save, 10 minutes, 15 minutes, 30 minutes, and 60 minutes.
* New messages arrive automatically if they exist at the specified intervals.
-
Choose whether to quote original messages or to attach them as a file when forwarding.
-
Select whether to quote text of original messages when replying.
You can use any character as a quotation mark.
-
Choose which to add original "To" recipients to "To" or "Cc" of a reply.
-
You can save sent messages to the "Sent" folder.
* If you set Gmail as the IMAP server, all sent messages will be saved in the Sent folder because of the Gmail specifications even when "Do Not Save" is selected in the "Save Sent Messages" setting.
-
Select whether to allow moving email addresses.
* If "Move Mail Adress" option in "System Settings" - "General Settings" screen is set to "Disallow", this option is not displayed.
-
Select whether to confirm before deleting expired incoming messages.
* If the confirmation screen is not displayed, all the expired messages are deleted completely regardless of read or unread.
* This setting may not be available depending on the administrator's settings.
When the entry is complete, press "OK" button to save the data.
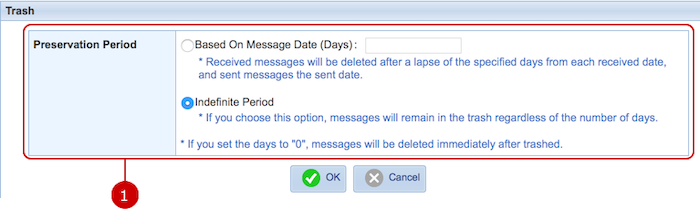
To Setup Trash Setting
When you press the link of Trash in Settings screen, Trash settings screen is displayed.
You can setup the preservation period in the trash.
-
Set the period when deleting messages after trashed.
Expired messages will be deleted automatically.
If "indefinite" is selected, no email message in the trash will be deleted automatically.
* If you set the days to "0", messages are deleted immediately after trashed.
* Only messages just under Trash are deleted. Folders under Trash and messages stored in the folders are not deleted. When the entry is complete, press "OK" button to save the data.
When the entry is complete, press "OK" button to save the data.
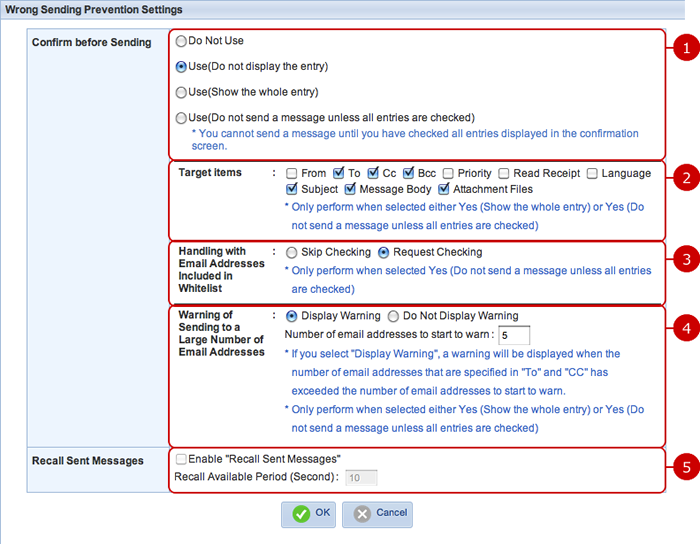
To Setup Wrong Sending Prevention
Click the "Wrong Sending Prevention Settings" link in the Settings screen, and the screen of the same name appears.
You can set several options to prevent sending wrong messages.
-
Select how to confirm messages before sending.
* You can change the settings only when the system administrator allows that.
-
If any "Yes" is selected, select target items to confirm.
* Only perform when selected either Yes(Show the Whole Entry) or Yes(Do not send a message unless all entries are checked)
* You can change the settings only when the system administrator allows that.
-
Select whether to confirm messages before sending even if those addresses are included in the whitelist.
(For more information about the whitelist, please refer to To Setup Recipient Whitelist in the system management manual.)
* Only perform when selected Yes(Do not send a message unless all entries are checked)
* You can change the settings only when the system administrator allows that.
-
Select whether to warn when the number of addresses exceeds the specified limitation.
* If you select "Display Warning", a warning will be displayed when the number of email addresses that are specified in "To" and "CC" has exceeded the number of email addresses to start to warn.
* Only perform when selected either Yes(Show the Whole Entry) or Yes(Do not send a message unless all entries are checked)
* You can change the settings only when the system administrator allows that.
-
Select whether to enable Recall Sent Messages feature and specify Recall Available Period.
You can also specify Recall Available Period in seconds.
* You can change the settings only when the system administrator allows that.
When the entry is complete, press "OK" button to save the data.
To Setup Accounts for WebMail
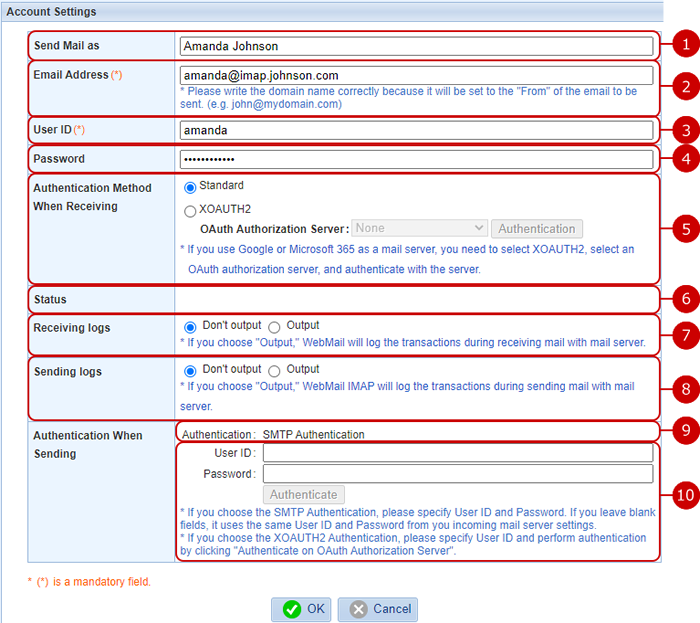
When you press the link of Account Settings in Settings screen, Account Settings screen is displayed.
Setup email accounts to send and receive messages.
- Account Settings
-
Enter an account name.
-
Enter an email address.
The email address you entered is displayed in "Account Name<Email>" format as a sender's email address.
-
Enter a user ID of the email server.
-
Enter password of the email server.
-
Choose the authentication method when you log in into the incoming mail server.
Choose "Standard", if the email server is not configured in a special authentication method.
If you use XOAUTH2 for authentication method for Google or Microsoft 365 mail server please select "XOAUTH" and perform authentication.
OAuth authorization server need to be set by the system administrator.
Clicking "Authenticate" will display Google or Microsoft 365 sign in screen. Please authenticate by signing in into the respective services.
* If you are already signed in into Google or Microsoft 365, you will be authenticated using that account. Please check the details of the signed in account.
If you plan to authenticate multiple settings, please sign out from Google or Microsoft 365 for every authentication.
-
The status of the account is displayed.
If connection failed, an error message is displayed.
If no error occurred, nothing is displayed.
-
Choose whether to output communication logs of received email messages with the mail server.
If "Output" is selected, WebMail application logs communication with the mail server during receiving email messages.
* The up to date results will be stored.
-
Choose whether to output communication logs of sent email messages with the mail server.
If "Output" is selected, WebMail application logs communication with the mail server during sending email messages.
* The up to date results will be stored.
The download link appears when there is a log of received or sent email messages.

-
Choose the authentication method when you log in into the outgoing mail server.
* This section does not appear when the system administrator has selected the "No Authentication" option in the "Authentication for Sending" settings.
-
Choose the authentication method when you log in into the outgoing mail server.
If "SMTP Authentication" is displayed for authentication, enter user ID and password for SMTP authentication.
If "XOAUTH2 Authentication" is displayed for authentication, enter user ID and password for XOAUTH2 authentication and perform authentication on the selected OAuth authorization server by clicking "Authenticate" button.
Clicking "Authenticate" will display Google or Microsoft 365 sign in screen. Please authenticate by signing in into the respective services.
* This section does not appear when the system administrator has selected the "No Authentication" option in the "Authentication When Sending An Email" settings. * When omitted, it is authenticated by User ID and Password set in Incoming Mail Server.
* If you are already signed in to Google or Microsoft 365, you will be authenticated using that account. Please check if the signed in account is correct.
When the entry is complete, press "OK" button to save the data.
To Setup Read Receipts
When you press the link of Read Receipts in Settings screen, Read Receipts screen is displayed.
Setup Read Receipts.
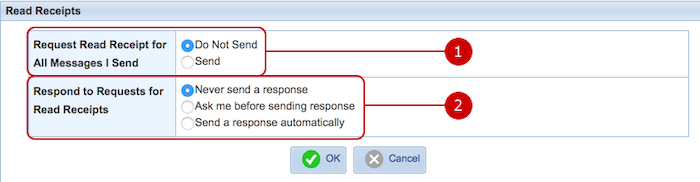
When the entry is complete, press "OK" button to save the data.
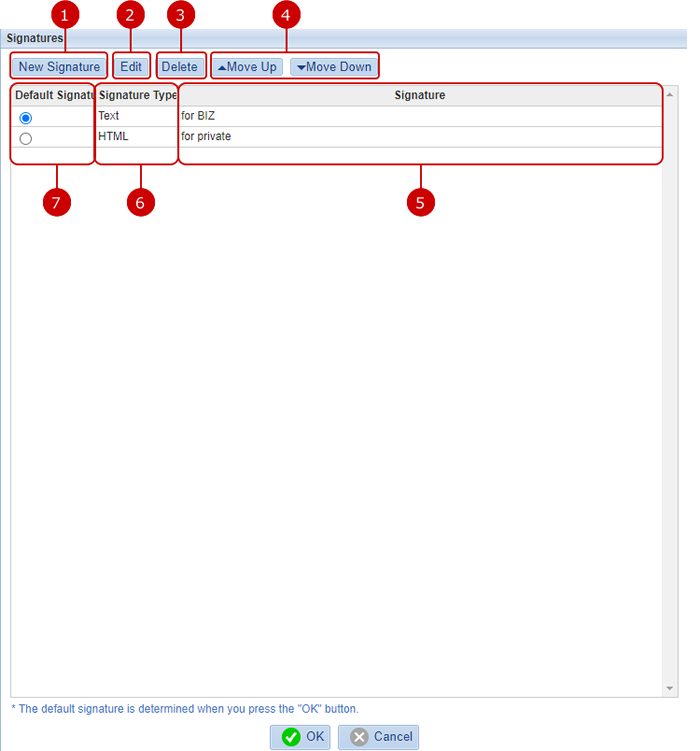
To Setup Signatures
When you press the link of Signatures in Settings screen, Signatures screen is displayed.
You can create signatures which can be added to messages.
You can create more than one signature.
- Signature list
-
Display Add Signature screen.
-
Display Edit Signature screen of the selected signature.
-
Delete the selected signatures.
Select license keys you want to delete and press this button to delete them. You can select more than one signature using Ctrl key (Command key in Mac) or Shift key.
-
Set the display order of the signatures.
-
The list of signatures is displayed.
-
The signature type is displayed.
-
Choose the default signature.
When the setup is complete, press "OK" button to save the data.
- Add Signature screen
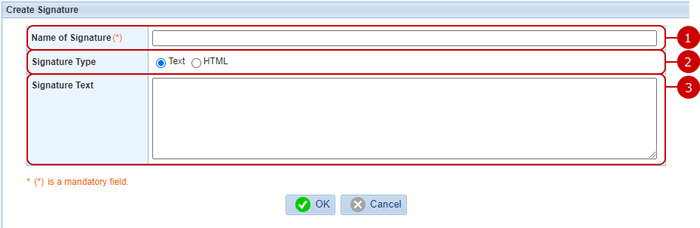
When the entry is complete, press "OK" button to save the data.
To Setup Filters
When you press the link of Message Filters in Settings screen, Message Filters screen is displayed.
The messages will be automatically forwarded, moved to another folder, or moved to the Trash, according to the rules for received messages.
* If no filter is setup, all received messages are stored in Inbox.
It may be convenient that creating folders by purpose or genre, etc. and messages are automatically classified by the filter function to keep good readability of Inbox.
- List of filters
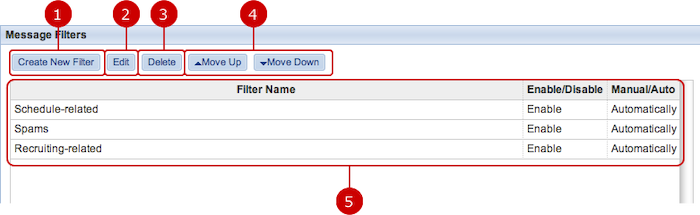
-
Display Create Message Filter screen.
-
Display Edit Filter screen of the selected filter.
-
Delete the selected filters.
Select license keys you want to delete and press this button to delete them. You can select more than one filter by using Ctrl key (command key in Mac) or Shift key.
-
Set the display order of the filters.
-
The list of filters is displayed.
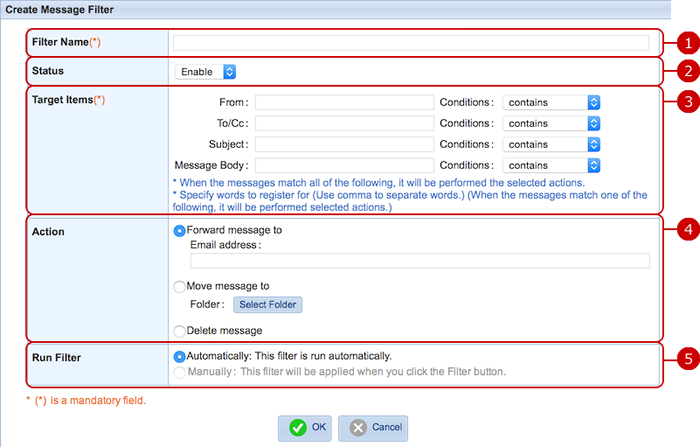
- Create message filter
-
Enter a filter name.
-
Choose whether to enable the filter.
-
Choose a condition of the match and enter text for each field (Sender, To/Cc, Title, Message body).
* If all the conditions are fulfilled, the filter applies.
* You can enter multiple texts separated by a comma. In this case, if one of the texts matches the condition, the filter applies.
-
Choose any one of the following three actions when all the conditions are fulfilled.
- Forward
- Move
- Delete
* If filtering option is set to "Disallow", you cannot choose "Forward".
-
Choose when the filter applies.
Automatically... Messages are filtered automatically when receiving the messages.
Manually... Messages you selected on the list are filtered when you press "Filter" button.
* If you choose "Forward message to" in the action, you cannot choose "Manually".
* You can input a maximum of 2047 characters into the text field.
* Up to 100 email addresses can be set.
When the entry is complete, press "OK" button to save the data.
To Set Junk Senders
When you press the link of Junk Senders in Settings screen, Junk Senders screen is displayed.
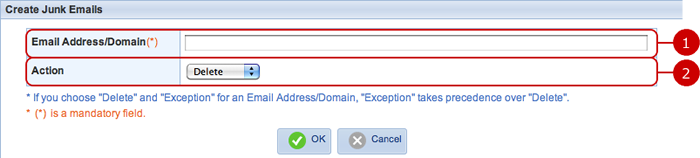
You can delete messages if the sender's email address or domain matches partially specified text.
- Junk senders list
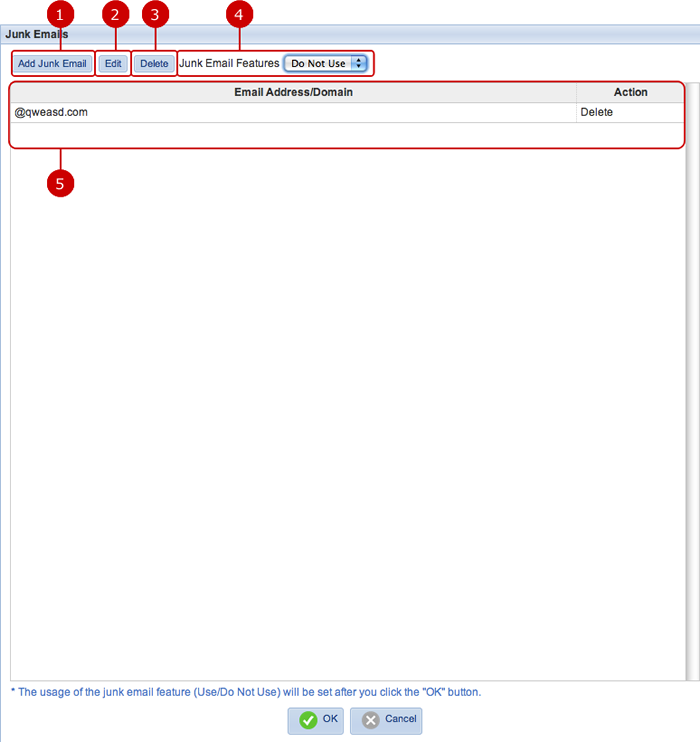
-
Display Create Junk Sender screen.
-
Display Edit Junk Sender screen.
-
Delete the selected junk senders.
Select license keys you want to delete and press this button to delete them. You can select more than one junk sender by using Ctrl key (command key in Mac) or Shift key.
-
Choose whether to use Junk Email option.
-
The list of junk senders is displayed.
-
Enter keywords to search contacts.
The search function searches in "Email Address/Domain" of junk senders.
When the setup is complete, press "OK" button to save the data.
- Create Junk Senders screen
When the entry is complete, press "OK" button to save the data.
