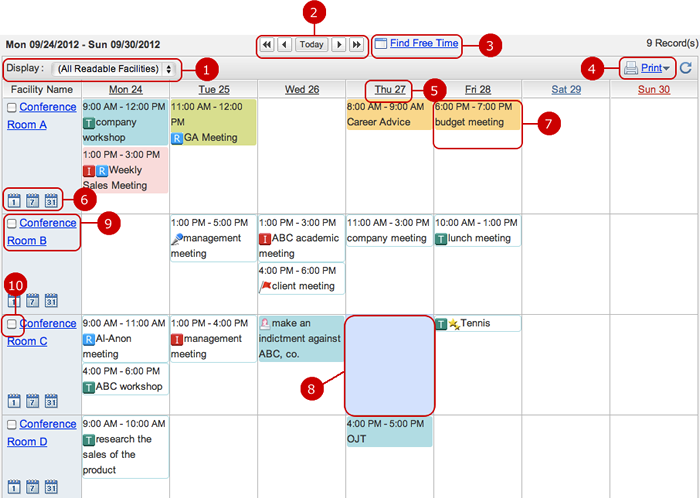
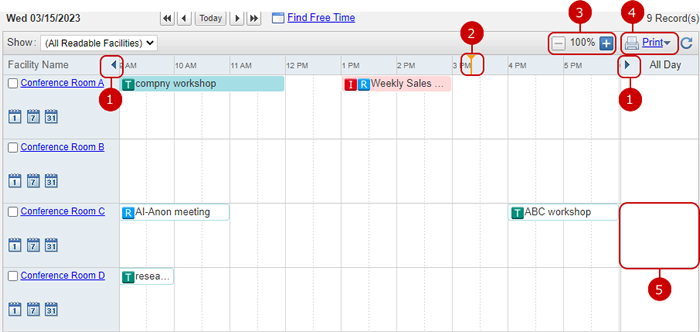
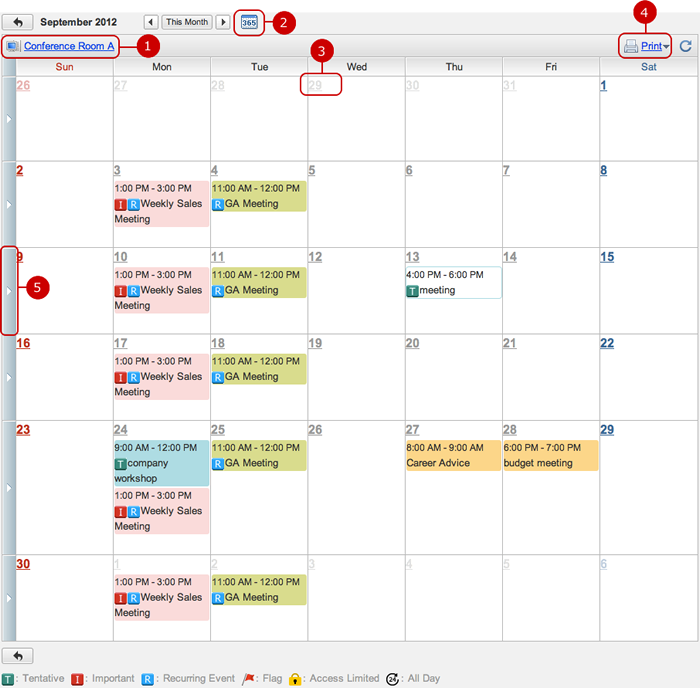
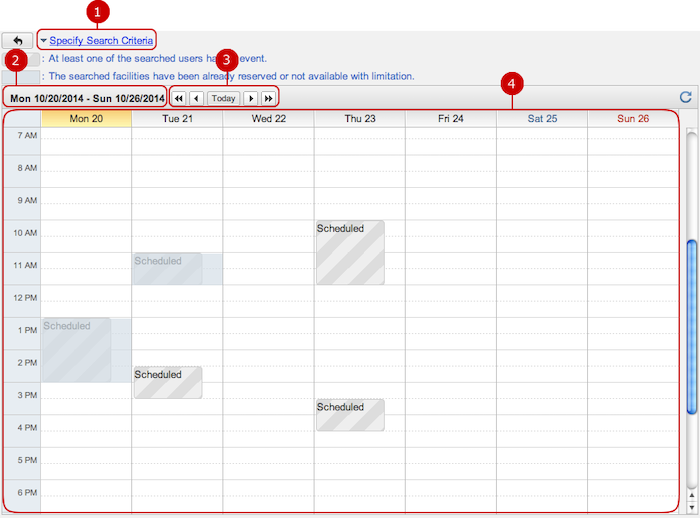
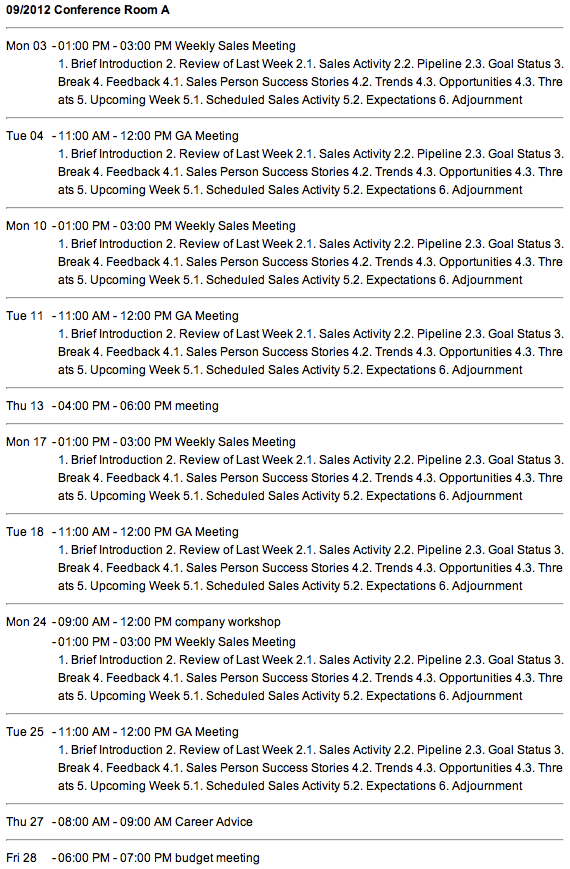
To Display Facility Reservations (Group/Week)
You can check schedule of reservations per facility group or all facilities.
In addition, you can add, view, edit reservations.
* Reservations of facilities that you do not have "Read" access right are not displayed.
-
Choose a facility group to display its facilities.
* Facilities and facility groups which categorize facilities can be created by only system administrators or application administrators who manage all facilities.
-
Change start date of schedule of reservations for one week.
The displayed button will depend on the "First day of the monthly calendar" setting in [Personal Settings > Display Settings] and [System Management > General Settings].
- When "Current Date" is selected, the following button is displayed.

 : Schedule of reservations started one week before is displayed.
 : Schedule of reservations started one day before is displayed.
 : Schedule of reservations started today is displayed.
 : Schedule of reservations started one day after is displayed.
 : Schedule of reservations started one week after is displayed.
- When other than "Current Date" is selected, the following button is displayed.

: Schedule of reservations started one week before is displayed.
 : Display the Schedule of one week starting with the day set in "First day of the weekly calendar".
: Schedule of reservations started one week after is displayed..
-
Find free time.
When you press the link of Find Free Time, Find Free Time screen is displayed.
Please refer to To Find Free Time of Users and Facilities for more details.
-
When you click the print link, a printable view is opened in a new window.
When you select a print menu, a printable facility reservation screen is displayed in a new window.
If you click Print (without frame), printable view of text format is displayed.
-
Date and day is displayed.
When you press a link of the date, "Group/Day" screen is displayed.
-
Switch between "Day", "Week", "Month" screen.
When you press each icon, reservations for the facility for "Day", "Week", "Month" respectively is displayed.
-
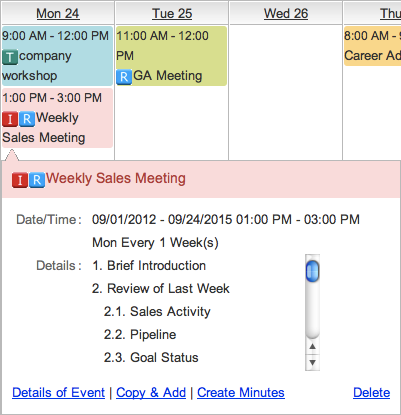
Schedule of reservations is displayed.
When you press a reservation, purpose, start date/time, end date/time, details are displayed in a balloon.
When you press the link of Details of Event, the details screen is displayed.
Please refer to To Check Details of Reservation for more details.
You can go to edit screen of an event by double click a facility reservation.
* If you do not have the required permission, double click will move you to the details screen.
-
Add a reservation.
When you press the area you selected, Add Event screen is displayed.
Please refer to To Add Reservation for more details.
-
Facility name is displayed.
When you press a link of the name, the facility information window is displayed.
* If a system administrator has set Details of Facility option to display, the facility name will be displayed in a link form.
-
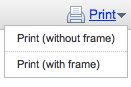
Narrow down facilities.
When you check a box beside of the facility name field, a message is displayed above the date (day of week).
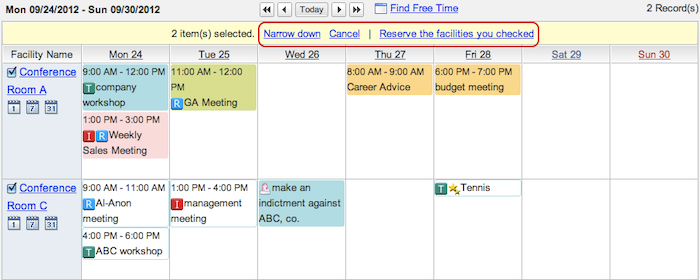
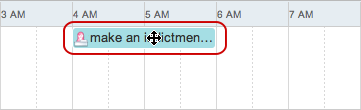
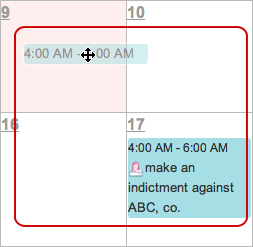
To Drag And Drop to Move DatesYou can move the date of events by dragging and dropping the event box on a calendar.
Click the event, drag to the new date, and release your mouse, and the event is moved.
* When the "Event update using drag & drop" setting in [Personal Settings > Display Settings] and [System Management > General Settings] is set to "No", you cannot update an event using drag & drop.
To Display Facility Reservations (Group/Day)
The list of reservations for one day, per a facility group or all readable facilities is displayed.
You can add, view, edit reservations.
* Facilities that you do not have "Read" access right are not displayed.
-
Scroll the schedule horizontally.
The schedule is scrolled horizontally when you press and hold down the button.
Or, you may click and hold down the mouse button, and move the mouse on a light blue bar that shows time.
-
This bar shows the current time.
-
Enlarge/Shrink Schedule.
(Please refer to the explanation of Schedule > To Enlarge/Shrink Schedule in the user's manual for more details.)
-
When you click the print link, a printable view is opened in a new window.
When you select a print menu, a printable facility reservation screen is displayed in a new window.
If you click Print (without frame), printable view of text format is displayed.
-
Reservation with unspecified time is displayed.
To Drag And Drop to Change TimeYou can change the time of events by dragging and dropping the event box on a calendar.
- To move time
Click the event, drag to the new time, and release your mouse, and the event is moved.
- To change length
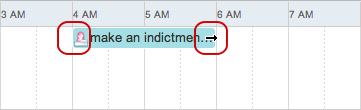
Click a edge of the event, drag to the new time, and release your mouse, and the length of event is shorten or lengthened.
* Dragging and dropping changes the start time and end time to 30 minutes unit on Group/Day screen.
* When the "Event update using drag & drop" setting in [Personal Settings > Display Settings] and [System Management > General Settings] is set to "No", you cannot update an event using drag & drop.
To Select Time of EventsDragging the mouse, you can select a time span where events are assigned to.
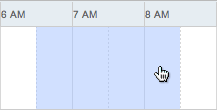
Click a cell and drag the mouse, and you can add an event that will be assigned to the selected time. The time is editable on "Add Event" screen.
To Display Facility Reservations (Month)
One month schedule of reservations for a facility is displayed.
You can add, view and edit reservations.
 To Drag And Drop to Move Dates
You can move the date of events by dragging and dropping the event box on a calendar.
- To change date
Click the event, drag to the new date, and release your mouse, and the event is moved.
* When the "Event update using drag & drop" setting in [Personal Settings > Display Settings] and [System Management > General Settings] is set to "No", you cannot update an event using drag & drop.
To Add (Make) Reservation
When you press an area of the event displaying field in "Group/Day", "Group/Week", or "Month" screen, the area is colored and selected.
When you press the selected area again, Add Event screen is displayed. If the date and time was obtained, they are set to the event.
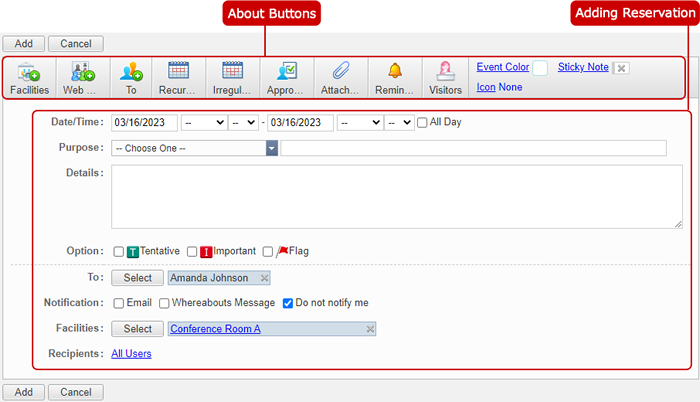 About Buttons
-
Select Facilities.
When you click Facilities, Facilities window is displayed.
-
Click the icon to display Web Conference dialog.
Select a web-conferencing facility from the dialog.
-
Select users to whom an event is added.
When you press "Select" button, Select User window is displayed.
An event inherited from the reservation is added to the users/groups you selected.
(For more details about user/group selection, please refer to Common Functions for All Screens > User/Group/Role Selection in User's Manual.)
-
Setup the recurring reservation.
When you press Recurring Event, Recurring Event window is displayed.
You can add recurring events such as regular meeting, which is held on the same time and location.
-
Setup the irregular event.
You can add the same event on several days by selecting multiple date.
When you press Irregular Event, Irregular Event window is displayed.
Select dates you want to add the event.
-
Set approval request.
When you add the event to other users, you can request for approval of the event.
A user who is requested for approval the event approves or disapproves in the detail of the event screen.
* If you are not participated in the event, you cannot request for approval.
-
Attach files to the reservation.
When you press the button, Attachment File window is displayed. Choose files you want to attach.
-
Set a reminder.
When you press Reminder, Reminder window is displayed.
Choose when you want to send a reminder.
* The reminder is sent to the email address that is selected in your profile.
* If you are not participated in the event, you cannot set a reminder.
-
Set visitors.
If people from outside are participated in the event such as a meeting, set visitors.
When you press Visitors, Visitors window is displayed.
Enter contact information, reception room, remarks, company names and names.
* Visitors information is linked to Visitor application.
(For more information, please refer to
Visitor Management in User's Manual.)
-
When you press Event Color, you can choose any one of 12 types, 6 colors (Border only, Filled).
-
When you press Sticky note button, you can copy the information to a Sticky note.
Please refer to the explanation of Sticky Note for more details.
* If you are not participated in the event, you cannot use Sticky Note.
-
When you click Icon, Icon window is displayed.
Select an icon you want to set the reservation.
Adding Reservation 
-
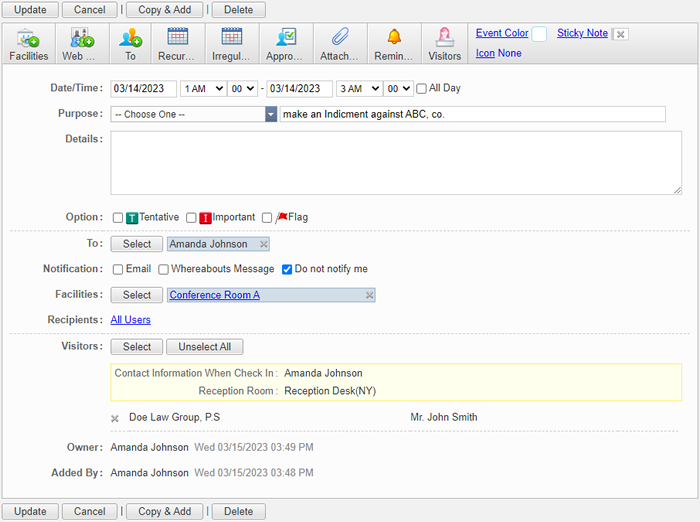
Enter a start and end date/time.
* For a recurring or an irregular event, the start time after the end time is accepted.
* If you check "All Day", you cannot select the time.
-
Enter and/or select a purpose.
You can select one from purpose items which you and the Facility Reservation application administrators have setup.
* If you select a purpose item, its color will be assigned to the event.
-
Enter details of the reservation.
-
Select icons put the reservation as option.
-
Users who participated in the event/reservation are displayed.
When you press "Select" button, Select User window is displayed.
(For more details about user selection, please refer to Common Functions for All Screens > User/Group/Role Selection in User's Manual.)
-
Choose the notification options.
* This option is displayed only if at least once user is selected.
* Default value is determined by setting value of "Notification" in "Personal Settings" - "Display Settings" or "System Management" - "General Settings".
-
Facilities you selected are displayed.
When you press "Select" button, Facilities window is displayed. Select facilities to be searched.
* If a system administrator has set Details of Facility option to display, the facility name will be displayed in a link form.
-
Select recipients.
* This field appears only when "Allow" is selected in "Add Access Limited Event" in "System Management" - "General Settings".
* For more information, see
Schedule > To Assign Recipients of Events in the user's manual.
Click "Add" button to save and add the data.
To Find Free Time of Users and Facilities
When you press the link of Find Free Time in the list of reservations screen, Find Free Time screen is displayed.
You can find free time of users and facilities with the condition such as users, facilities, period.
If you want to add an event which is using facilities to several users, you can find free time of both the users and facilities.
-
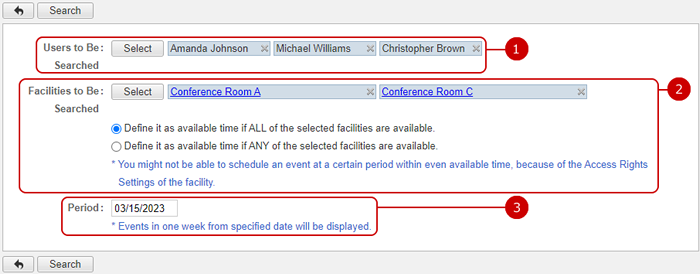
Select users to be searched.
When you press "Select" button, Select User window is displayed. Select users to be searched.
(For more details about user selection, please refer to Common Functions for All Screens > User/Group/Role Selection in User's Manual.)
-
Select facilities to be searched.
When you press "Select" button, Facilities window is displayed. Select facilities to be searched.
If you selected several facilities, you can define a condition of "available time".
-
Define it as available time if ALL of the selected facilities are available.
You will find available time when all of the selected facilities are available.
-
Define it as available time if ANY of the selected facilities are available.
You will find available time when any of the selected facilities are available.
* If a system administrator has set Details of Facility option to display, the facility name will be displayed in a link form.
-
Enter a period of search.
When you press the entry field, a calendar screen is displayed. Click a date from the calendar to set the date in the text box.
* Events in one week from specified date will be displayed.
* Enter a date in MM/dd/yyyy format, numeric.
When you press "Search" button, events that match the search criteria are displayed in the list screen.
- Search Results
-
The search conditions are displayed.
-
The period of displaying events in search results.
-
Change the period of schedule of reservations.
: Schedule of reservations started one week before is displayed.
: Schedule of reservations started one day before is displayed.
: Schedule of reservations started today is displayed.
: Schedule of reservations started one day after is displayed.
: Schedule of reservations started one week after is displayed.
-
Free time displayed.
Here you can see available time of the selected users and facilities.
"Scheduled" indicates that any of the selected users already has an event.
Time spans filled with light blue are not available because they have been already reserved or have a certain limit.
Click a empty cell, and it will be selected and highlighted.
Click the cell again, and you can move to "Add Event" screen where the selected users, facilities, and time span are assigned.
To Drag to Select Time of EventsDragging the mouse, you can select a time span where events are assigned to.
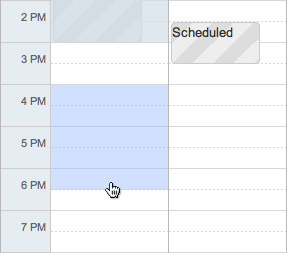
Click a cell and drag the mouse, the selected and highlighted time span changes.
Then release the mouse button, and you will move to "Add Event" screen where the selected users, facilities, and time span are assigned.
If any of the selected facilities is not available at the time, a confirmation window shown below will appear.
- At least one facility is not available at the time
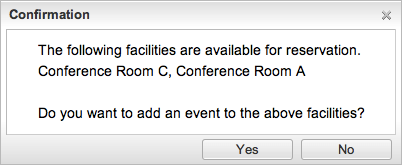
The confirmation window shows available facilities of all of the selected ones.
Click "Yes" to move to "Add Event" screen where the selected users, shown facilities, and the selected time span are assigned.
- No facility is available at the time
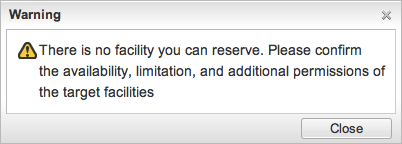
The warning window says that all of the selected facilities are not available at the selected time.
* If all of the selected facilities are not available, you cannot move to "Add Event" screen. Select other ones.
To Check Detail of Reservation
When you press a reservation in such as "Group/Day", "Group/Week" screen, the part of the reservation information is displayed in balloon.
* If you do not have "Read" access right to a facility, reservations of the facility are not displayed.
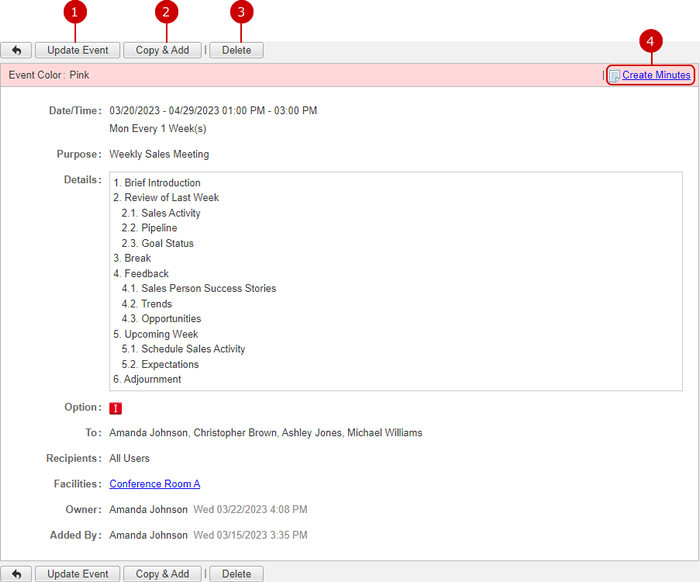
When you press the link of Detail of Event, Details of Event screen is displayed.
If you want to edit a reservation, use this screen.
-
Display Update Event screen.
* If Editing or Deleting Events option in "System Management" - "General Settings" is set to "Allow Only Owner", the users who match the following conditions can update the event.
- The owner of the event.
- Users who have update access right to all participating users and the facilities added to the event.
* If Editing or Deleting Events option in "System Management" - "General Settings" is set to "Allow Anyone Who Are Added to The Event", the users who match the following conditions can update the event.
- The owner of the event.
- Users who are participating in the event.
- Users who have update access right to all participating users and the facilities added to the event.
-
Copy the event displaying and display Add Event screen.
-
Delete the event.
* If Editing or Deleting Events option in "System Management" - "General Settings" is set to "Allow Only Owner", the users who match the following conditions can delete the event.
- The owner of the event.
- Users who have delete access right to all participating users and the facilities added to the event.
* If Editing or Deleting Events option in "System Management" - "General Settings" is set to "Allow Anyone Who Are Added to The Event", the users who match the following conditions can delete the event.
- The owner of the event.
- Users who are participating in the event.
- Users who have delete access right to all participating users and the facilities added to the event.
-
Create minutes.
Click minute button to create new minute which is linked to a corresponding event.
(For more information, please refer to Minutes > To Create Minutes in User's Manual.)
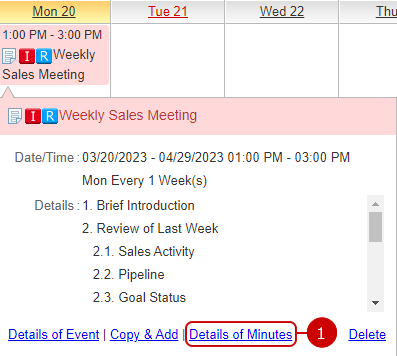
- When Minutes Is Set
If minutes are set to an event, the link of Details of Minutes is displayed in the balloon.
-
Display the details of minutes.
When you press the link of Details of Minutes, Details of Minutes screen is displayed.
To Update Reservations
When you press "Update Event" button in Detail of Event, Update Event screen is displayed.
You can edit a reservation by double clicking a reservation from the list.
* If Editing or Deleting Events option in "System Management" - "General Settings" is set to "Allow Only Owner", the users who match the following conditions can update the event.
- The owner of the event.
- Users who have update access right to all participating users and the facilities added to the event.
* If Editing or Deleting Events option in "System Management" - "General Settings" is set to "Allow Anyone Who Are Added to The Event", the users who match the following conditions can update the event.
- The owner of the event.
- Users who are participating in the event.
- Users who have update access right to all participating users and the facilities added to the event.
You can edit any items as you can do on Add Event screen.
- In the case of the event is a recurring event or irregular event
The Date/Time field is replaced by the dedicated field.
If you want to change the recurring/irregular setting, press the link of the setting after the date field.
When you press the link, Recurring/Irregular Event window is displayed.


To unselect an attachment file, click "x" before the file name.
Other things are the same as Add Event screen.
Click "Update" button to save the changes.
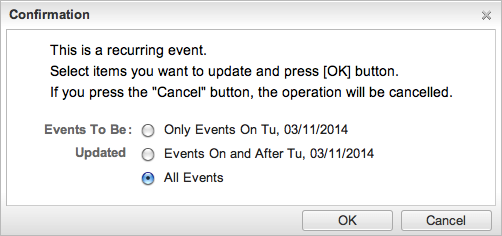
* If you edit a recurring event or irregular event and press "Update", a confirmation window is displayed.
In the confirmation window, you can choose the period of the reservation you update.
- Confirmation Window for Updating Recurring/Irregular Event
To Delete Reservations
When you press "Delete" button in Detail of Event or Update Event screen, or the link of Delete in the balloon, a confirmation window is displayed.
The message of the confirmation window may differ by user.
* If Editing or Deleting Events option in "System Management" - "General Settings" is set to "Allow Only Owner", the users who match the following conditions can delete the event.
- The owner of the event.
- Users who have delete access right to all participating users and the facilities added to the event.
* If Editing or Deleting Events option in "System Management" - "General Settings" is set to "Allow Anyone Who Are Added to The Event", the users who match the following conditions can delete the event.
- The owner of the event.
- Users who are participating in the event.
- Users who have delete access right to all participating users and the facilities added to the event.
- Regular Confirmation Window
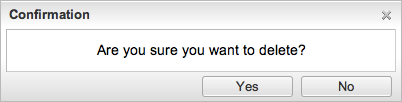
This type of confirmation window is displayed in the case of following.
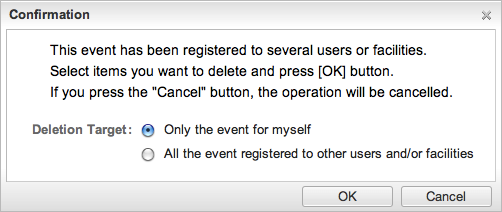
- Delete Target Confirmation Window
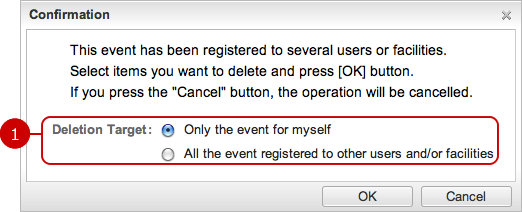
This type of confirmation window is displayed, if the user is participated in the event (who has "Delete" right to all the users and facilities).
* Clicking the "Delete" button in the Update Event screen will display regular confirmation window.
-
Choose Deletion Target.
Only the event for myself: Only the user's event is deleted.
All the event registered to other users and/or facilities: The event itself is deleted.
When the user presses "OK" button, the event is deleted. The deleted events cannot be recovered. Please take note.
- Confirmation Window for Non-Owner Deletes Event
This type of confirmation window is displayed, if the user is not participated in the event (who has "Delete" right to all the users and facilities).
When the user presses "Yes" button, the event will be deleted. The deleted events cannot be recovered. Please take note.
* Clicking the "Delete" button in the Update Event screen will display regular confirmation window.
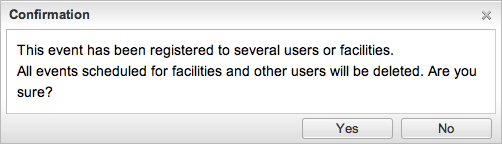
- Confirmation Window for Recurring/Irregular Event
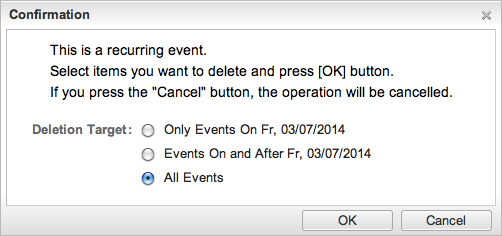
This type of confirmation window is displayed, if the event is recurring/irregular event.
When the user presses "Yes" button, the event is deleted. The deleted events cannot be recovered. Please take note.
* If the user is not participated in the event (who has "Delete" right to all the users and facilities),
The following confirmation window (Delete Target Confirmation Window) is displayed prior to displaying Confirmation Window for Recurring/Irregular Event.
- Delete Target Confirmation Window
* This window is not displayed when you clicked "Delete" button in Update Event screen.
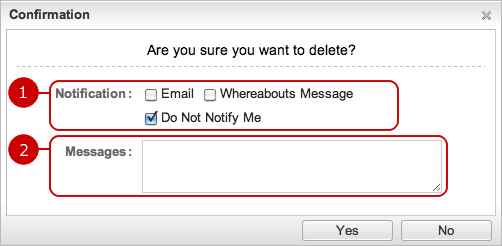
To Notify Reservations Deletion
If a user who delete an event sets Notification When Deleting option to "Use", additional input fields appear to send a notification.
A notification is sent to users who are participated in the event.
* You can set Notification When Deleting option by Delete Events Notification Settings in Personal Settings in Schedule application.
* Even if you set Notification When Deleting option to "Use", the input fields may not be displayed because of the settings by the administrator.
-
Choose how to notify the deletion.
Email: Send a notification by email.
Whereabouts Message: Send a notification by Whereabouts Message.
Do Not Notify Me: Send a notification to the users other than you.
* Default value is determined by setting value of "Notification" in "Personal Settings" - "Display Settings" or "System Management" - "General Settings".
* If Email Notification option is set to "Do Not Use" by the administrator, Email option is not displayed.
* If Whereabouts application is set to "Do Not Use", Whereabouts Message option is not displayed.
* If both Email and Whereabouts Message cannot be used, the input fields is not displayed.
-
Enter message.
When you press "Yes" button, a notification is sent and the event is deleted. The deleted events cannot be recovered. Please take note.
* The input fields are displayed in each delete confirmation window.
Please refer to the explanation of
To Delete Reservations about the delete confirmation windows.
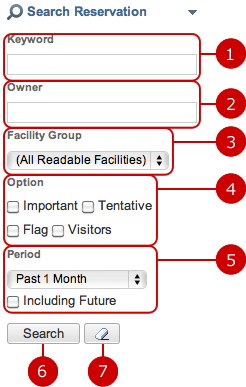
To Search Reservations
When you open the menu on the left side of screen, the reservation search function appears.
You can find reservations by entering various conditions, such as keyword, Owner, Facility Group.
* If number of messages found exceeds 5,000, more than 5,000 messages are not displayed. Please add or edit the search conditions to narrow down.
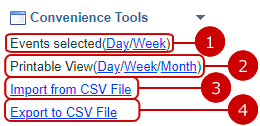
To Use Convenience Tools
When you open the menu on the left side of screen, you can use convenience tools dedicated for Facility Reservation.
The tools include Printable View, Import from CSV File, Export to CSV File.
-
Display schedules of the selected user(s)/facility(ies).
Click the link, a daily/weekly schedule showing the events of the selected user(s)/facility(ies) is displayed.
For more information, see To Display Schedule of Selected User(s)/Facility(ies) .
-
Display reservations in printable view, new window.
You can choose either day, weekly or monthly.
Please refer to To Print Reservations for more details.
-
You add reservations from a file (Import).
When you press the link ,CSV Import screen is displayed.
Please refer to To Add Reservations from File (Import) for more details.
-
You can save reservations to a file (Export).
When you press the link ,CSV Export screen is displayed.
Please refer to To Save Reservations to File (Export) for more details.
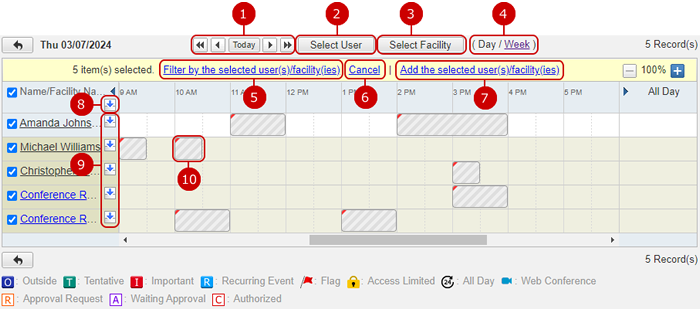
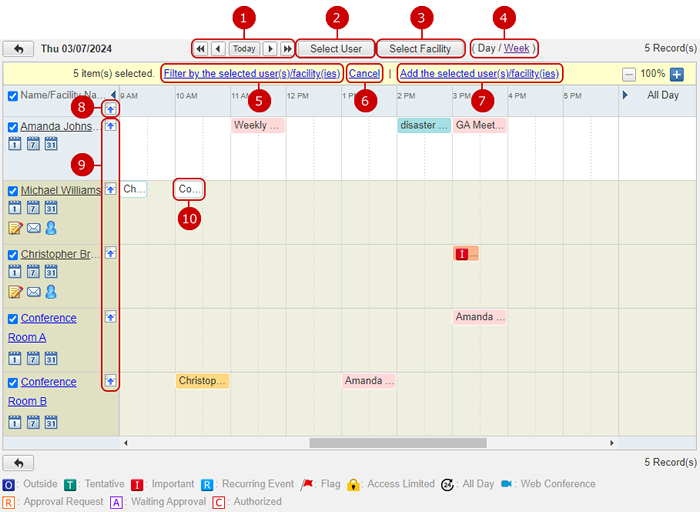
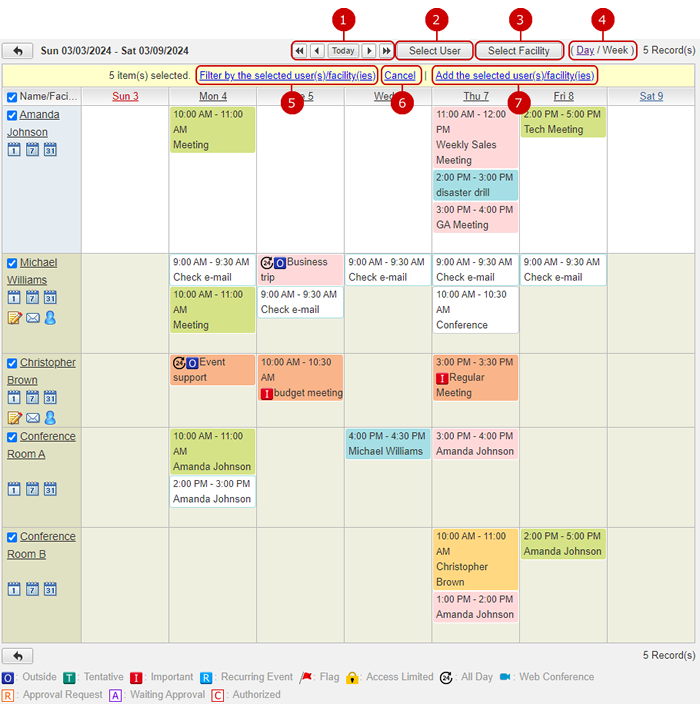
To Display Schedule of Selected User(s)/Facility(ies)
When you open the right Sub-Window menu, there's "Events Selected (Day/Week)" in "Convenience Tools".
When you press the link of Day or Week, the schedule of the selected user(s)/facilitiy(ies) events is display.
Day Display (Hide Details)
Day Display(Show Details)
Week Display
To Print Reservations
Printable View is one of Convenience Tools which is displayed when the menu on the left side of the screen is open.
When you press the link of Weekly or Monthly, the list of reservations for one week, one month respectively started from the date of the reservation sheet you are currently viewing.
To Add Reservations from File (Import)
Import from CSV File is one of Convenience Tools which is displayed when the menu on the left side of the screen is open.
When you press the link of Import from CSV File, Import from CSV File screen is displayed.
You can add reservations from a file in one batch.
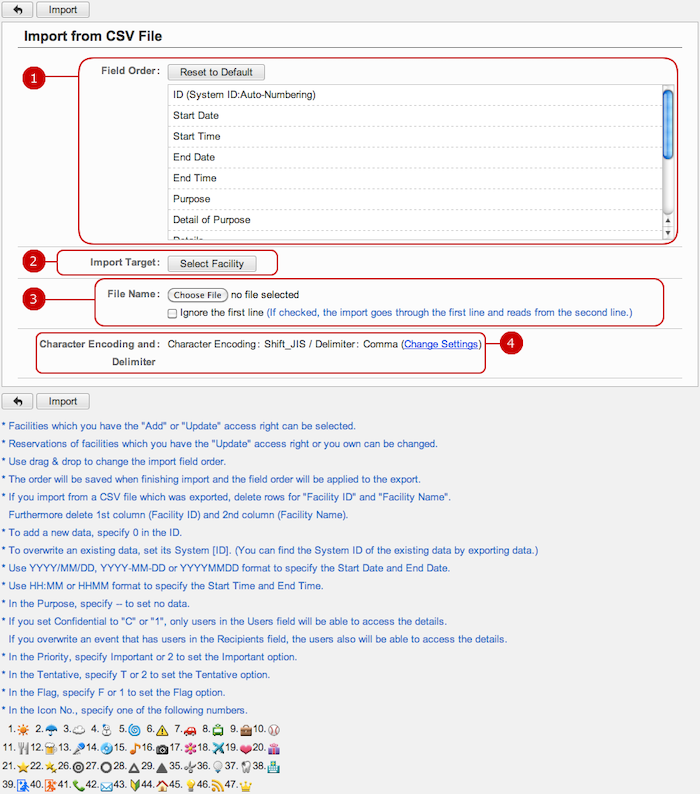
After all entries are completed, when you press "Import" button, importing reservations is started.
* Updating irregular or recurring events will exclude the date from the original irregular or recurring events and create a new event.
To Save Reservations to File (Export)
Export to CSV File is one of Convenience Tools which is displayed when the menu on the left side of the screen is open.
When you press the link of Export to CSV File, Export to CSV File screen is displayed.
You can save reservations data to a file.
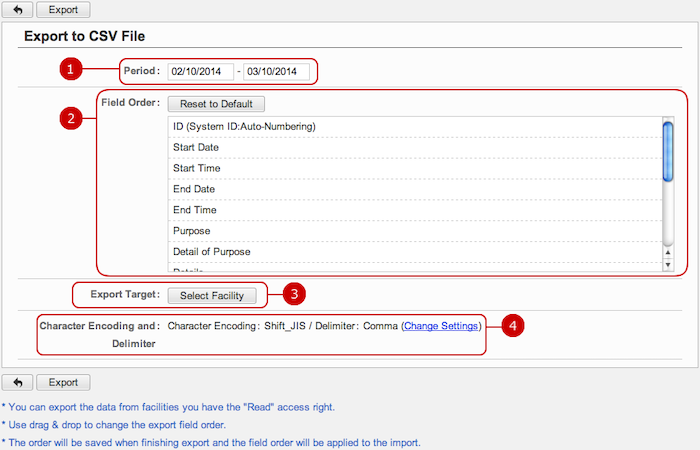
-
Specify the period of reservations data to be saved to a file.
When you press the entry field, a calendar screen is displayed. Click a date on the calendar, and it will be set to the field.
* Enter a date in MM/dd/yyyy format, numeric.
-
The fields of a reservation to be saved are displayed. You can change the order of the fields.
* Press and hold down the mouse button over a field name and move the mouse up and down and release the mouse button on desired place to change the order.
-
Reservations for facilities are saved.
When you press "Select Facility" button, Select Facilities window is displayed. You can select more than one facility.
-
Choose a character encoding and delimiter used in the file.
Press Change Settings link to change the character encoding and delimiter options.

-
Choose a character encoding.
-
Choose a delimiter.
After all entries are completed, when you press "Export" button, exporting reservations is started.
Facilities Selection WindowClick Select Facility on Export To CSV File screen and a facilities selection window is displayed.
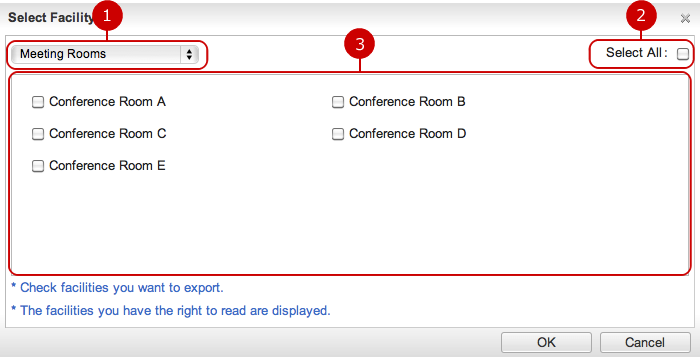
-
Select a group facility.
-
Check "Select All" checkbox to select all displayed facilities.
-
All facilities that have "read" access rights is displayed.
Press "OK" button to confirm the export target items.
