To See List of Minutes
This is the screen showing list of minutes.
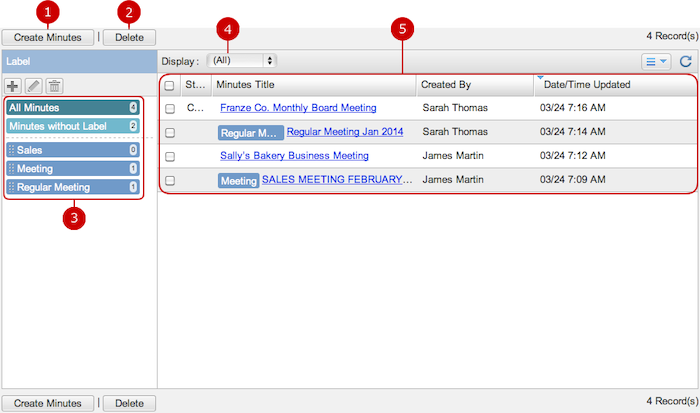
To Create Minutes
Click "Create Minutes" and go to Create Minutes screen.
-
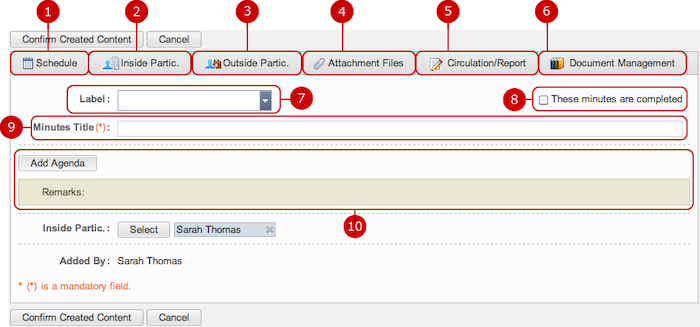
Schedule connects the new minutes to a scheduled event.
Click the button to open Choose Event window.
* After choosing a scheduled event, its Users are set to Inside Partic. and Recipients fields of the minutes.
-
Inside Partic. opens Select window to select inside attendees.
They can see and edit the minutes.
When you press the button, Select User window is displayed.
(For more details about user selection, please refer to Common Functions for All Screens > User/Group/Role Selection in User's Manual.)
-
Outside Partic. opens Outside Participants window to enter outside attendees.
Enter names like: "John Smith", "Robert Brown", etc.
* You can also set email addresses to send the minutes via email.
Input example: "John Smith","Robert Brown"<brown@yourdomain>,...
* Outside attendees cannot log in desknet's NEO and edit the minutes.
-
You can add files related to the minutes. When you press the button, file selection window is displayed. Select a file you want to attach.
-
You can send a circulation to prompt people to look through the minutes.
When you press the button, Select User window is displayed. Click Circulation/Report to open Circulation/Report window and select users. You can select non-attendees as well.
The circulation contains all contents such as agendas and attachment files.
-
You can save the minutes, including attachments, to a folder of Document Management.
Click Document Management to open Select window and select a folder.
-
Add a label to classify the minutes.
You can select any of saved labels on the list shown by clicking the white "▼" mark, or add a new one by typing in the box. or add a new one by typing in the box.
-
Select the check box to mark the minutes as completed.
-
Enter title of the minutes.
-
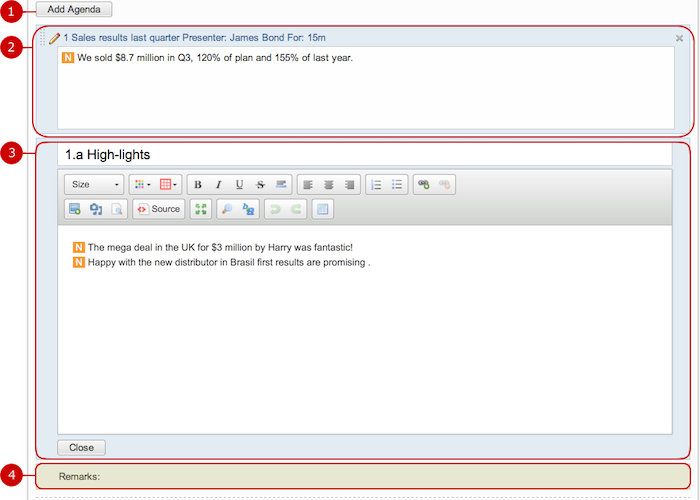
Add agenda topics.
For more information, see To Edit Agenda.
When all, including the setting of attachment files, done, click "Confirm Created Content" and go to Confirm Minutes screen.
To Edit Agenda
You can add, edit, delete, and sort agenda topics.
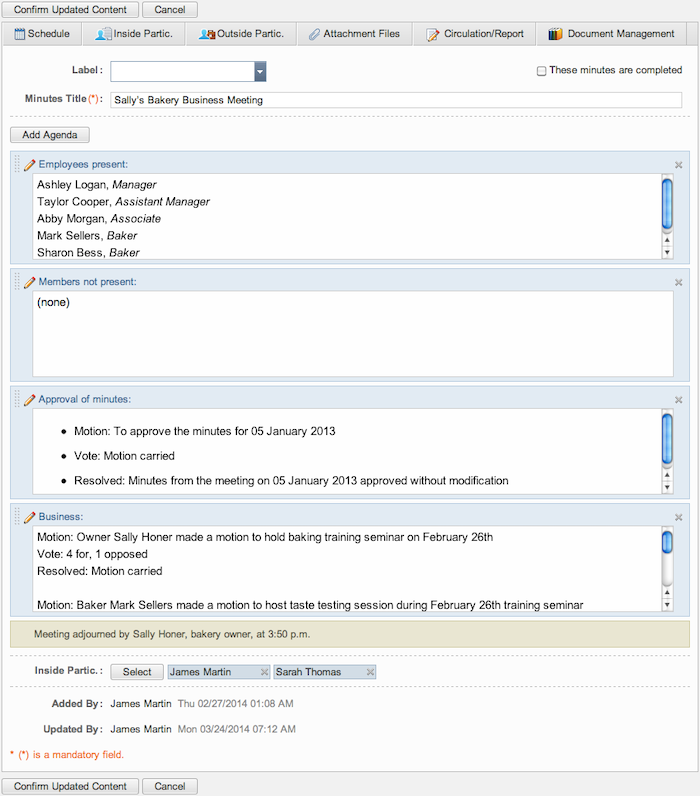
To Confirm Entry of Minutes
Click "Confirm Created Content" and go to Confirm Minutes screen.

-
This is the list of inside attendees.
Click Subject to Notify to select people whom you would like to send an email notification to; click Not Subject to Notify to deselect.
* You can send email notifications only when the administrator enabled the feature on Setup > System Settings > Mail Server Settings screen.
-
This is the list of outside attendees.
Click Subject to Notify to select people whom you would like to send an email notification to; click Not Subject to Notify to deselect.
* You can send email notifications only when the administrator enabled the feature on Setup > System Settings > Mail Server Settings screen.
-
These are topic titles, details, and remarks.
-
This is other information about the minutes.
You may click the link of an attachment file to download it.
When all done, click "Create" and save the data, and then A notification will be sent.
To See Minutes
Click the link of a minutes title on Main screen and go to Details of Minutes screen.
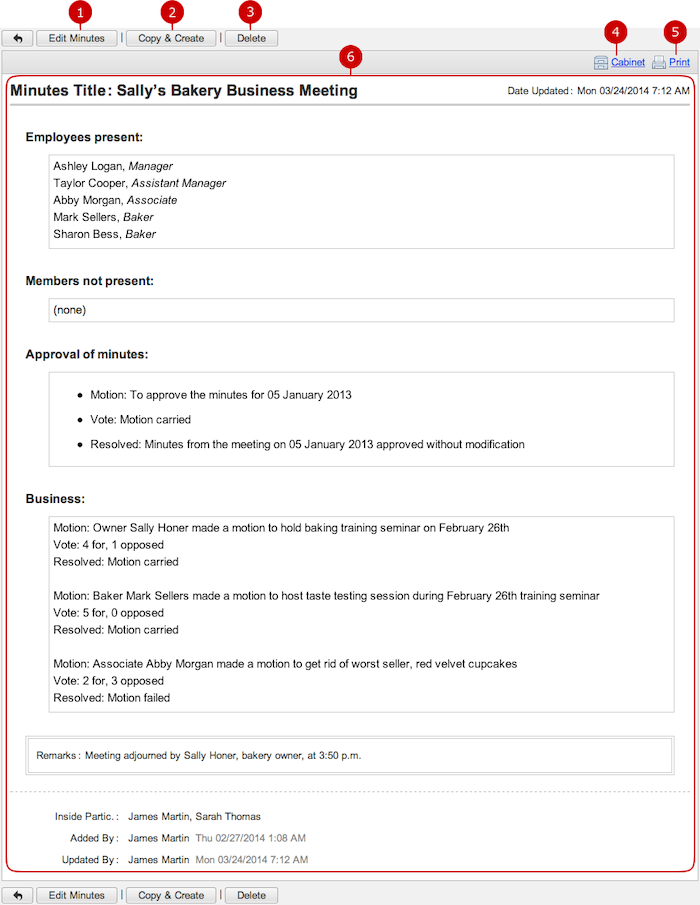
To Print Minutes
Click the "Print" link on Details of Minutes screen and go to Print screen of the minutes.

To Edit Minutes
On Details of Minutes screen, click "Edit Minutes" and go to Edit Minutes screen.
You can edit anything you did when created.
When all done, click "Confirm Updated Content" and go to Confirm Minutes screen. Confirmation screen of entered contents is displayed.
To Delete Minutes
On Main, Details of Minutes, or Edit Minutes screen, click "Delete" and Confirmation dialog will appear.
The minutes will be deleted right after clicking "Yes". The minutes will be permanently deleted and cannot be recovered. Please take note.
* You can delete only minutes you created.
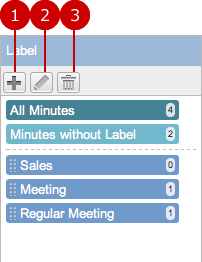
To Manage Labels
You can add, edit, and delete labels in the list of labels area on Main screen.
-
Add Label creates a new label.
Click the button to open Add Label window. Enter a label name and save.
(Label name that too long will be shorten when being displayed in the label list.)
-
Edit Label edits a label.
Select a label and click Update button to change the label name.
Enter a label name and save.
-
Delete Label deletes a label.
Select a label and click Delete button to delete the label.
The label will be deleted right after clicking "Yes" and classified into "Minutes without Label".
Minutes which labels are deleted will be displayed as minutes without labels.

* To apply a label to minutes, hold the label and move it upon the minutes item. The new label will be set.
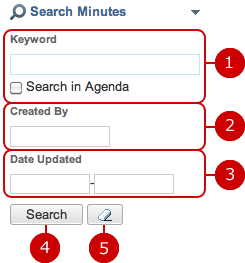
To Search Minutes
The option area of Side Pane has the Search Minutes feature.
You can search minutes with various criteria including Keyword, Created By, and Date Updated.
-
Enter keywords.
The search finds minutes which Minutes Title contains the words you typed in Keyword box.
Select Search in Agenda check box to search in title and details of agendas as well.
* If you want to specify more than one keyword, use space to separate keywords.
* Specifying multiple keywords will perform "OR" search. This means the search results contain either one or more keywords that you specified.
-
The search finds minutes which Created By contains the words you typed in Created By box.
-
You can specify range of Date Updated.
Click a date in the calendar, which appears by clicking a date input box. Click a date on the calendar, and it will be set to the field.
* Please use the date format of "MM/DD/YYYY".
-
Click "Search" and you will see the list of results.
-
"
 " clears all search criteria.
