desknet's Multilingual Manual
User's Manual
Back to Multilingual Manual
 

Tag Buttons

This is the function which inserts tags in a message in Information application.


Icon Description
The tag which defines font size is inserted.
The tag which defines font color is inserted.
Refer [the guide below] for using the function.
The tag which defines background color is inserted.
Refer [the guide below] for using the function.
The tag which defines bold text is inserted.
The tag which defines italic text is inserted.
The tag which defines underlined text is inserted.
The tag which defines strikethrough text is inserted.
A horizontal line is inserted.
The tag which aligns a text or inserted file left is inserted.
The tag which aligns a text or inserted file center is inserted.
The tag which aligns a text or inserted file right is inserted.
An unordered list tag is inserted for a text or inserted file.
* If you use "Unordered list", the space between lines may be large.
An ordered list tag is inserted for a text or inserted file.
* If you use "Ordered list", the space between lines may be large.
The dialog box is open to insert or edit a hyperlink.
Refer [the guide below] for using the function.
A hyperlink which is inserted by [Insert/Edit Hyperlink] tag button is removed.
* This button cannot be used when no text or file is selected.
The dialog box is open to insert or edit an embedded media.
The dialog box is open to insert or edit an image.
HTML source code can be edited.
Displays the editor to the full screen size.
The dialog box is open to search text in the message.
Refer [the guide below] for using the function.
The dialog box is open to find or replace text in the message.
Refer [the guide below] for using the function.
Undos previous insertion.
Redos the action you undid.
A table is inserted if no table is selected.
If a table is selected, the selected table can be edited.
Refer [the guide below] for using the function.
The selected table is deleted.
This button cannot be used if no table is selected.
The dialog box is open to edit the selected row in the table.
Refer [the guide below] for using the function.
This button cannot be used if no cell is selected.
The dialog box is open to edit the selected cell in the table.
Refer [the guide below] for using the function.
This button cannot be used if no cell is selected.
Inserts a row before the selected row.
This button cannot be used if no cell is selected.
Inserts a row after the selected row.
This button cannot be used if no cell is selected.
Deletes the row at the current cursor position.
This button cannot be used if no cell is selected.
Inserts a column before the selected row.
This button cannot be used if no cell is selected.
Inserts a column after the selected row.
This button cannot be used if no cell is selected.
Deletes the column at the current cursor position.
This button cannot be used if no cell is selected.
Splits cells.
This button cannot be used if no table or cell is selected.
Merges cells.
This button cannot be used if no table or cell is selected.

* Even if you use are using a tag button, you can add an attachment file.

[Font Color] Tag Button

1. The dialog box is open when you click [Font Color] tag button.
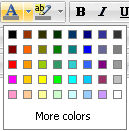

2. When you click the color you want to use, the tag for the selected color is inserted.
If you want to use other color, click Other Color.


[Background Color] Tag Button

1. The dialog box is open when you click [Background Color] tag button.
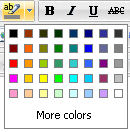

2. When you click the color you want to use, the tag for the selected background color is inserted.
If you want to use other color, click Other Color.


[Insert/Edit Hyperlink] Tag Button

1. The dialog box is open when you click [Insert/Edit Hyperlink] tag button.
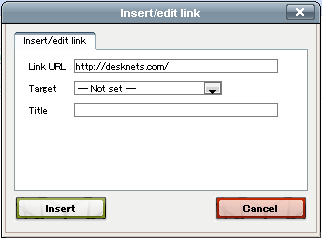

2. When you enter the URL of the link and click [Insert] button, the [link] tag is inserted.


[Search] Tag Button

1. The dialog box is open when you click [Search] tag button.
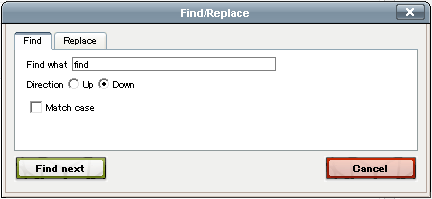

2. Enter the search text and click [Next] button to search the text in the message.


[Replace] Tag Button

1. The dialog box is open when you click [Replace] tag button.
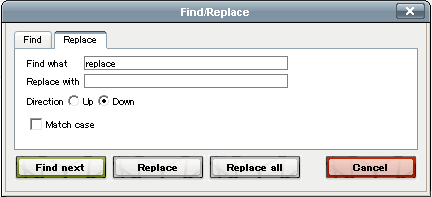

2. Enter the search text and click [Next] button to search the text in the message.

3. Enter the search text and the replacement text, and click [Replace] button to replace the search text with the replacement text.


[Insert/Edit Table] Tag Button

1. The dialog box is open when you click [Insert/Edit Table] tag button.
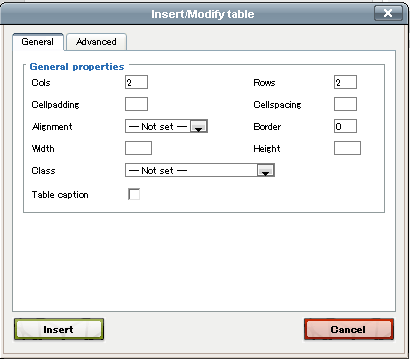

Columns Specify the number of columns in the table.
* You cannot change it when you select the table or cell.
Rows Specify the number of rows in the table.
* You cannot change it when you select the table or cell.
Cellpadding Specify the space between the cell wall and the cell content.
Cellspacing Specify the space between the cells.
Align Choose the table position from [Left], [Center] and [Right].
Border Specify the width of the borders around a table.
Width Specify the width of the table.
Height Specify the height of the table.
Class Specify the class of the table.
Header Row Check this option if you want to have a header row.


[Row Properties] Tag Button

1. When you select a table or cell and click [Row Properties] button, the dialog box is open.
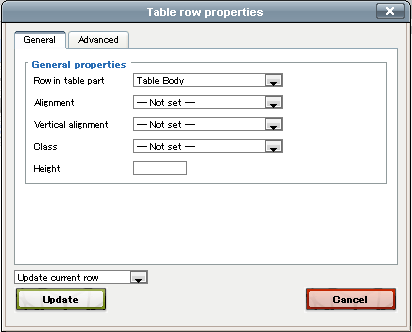

Row Choose one from [Table Header], [Table Body], [Table Footer].
Align Choose one form [Align Center], [Align Left], [Align Right].
Vertical Align Choose one form [Align Top], [Align middle], [Align bottom].
Class Specify the class of the table.
Height Specify the height of the table.


[Cell Properties] Tag Button

1. When you select a table or cell and click [Cell Properties] button, the dialog box is open.
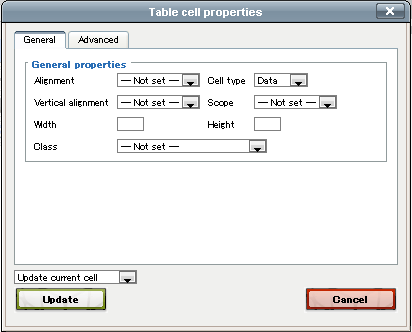

Align Choose one form [Left], [Center], [Right].
Cell Type Choose one form [Left], [Center], [Right].
Vertical Align Choose one from [Top], [Middle], [Bottom].
Scope Choose one from [Top], [Middle], [Bottom].
Width Specify the width of the table.
Height Specify the height of the table.
Class Specify the class of the table.


Copyright (C) 2012 NEOJAPAN,Inc. All Rights Reserved.