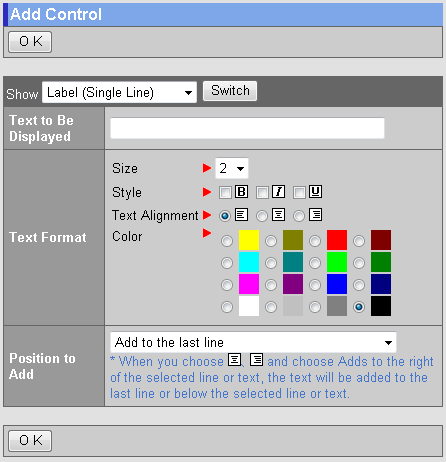
1. Label (Single Line)
With this control, you can set size, color, etc. to text. This can be used for a title.
|
| Field |
Description |
| Text to Be Displayed |
Enter single line text.
This is useful for a title. |
| Text Format |
Specify the text format.
Select 1 to 7 for the size.
Select "Bold", "Italic" or "Underline" from the style.
Select "Left", "Center" or "Right" from the Text Alignment.
Select a color from 16 colors selection. |
| Position to Add |
Select the position you want to add the text.
Select "Add to the last line", "Adds to below the selected line or control", "Adds to the right of the selected line or control" or "Adds to above the selected line or control". |
|

|
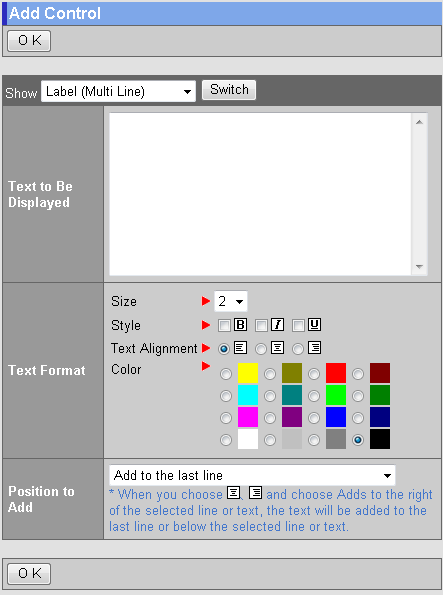
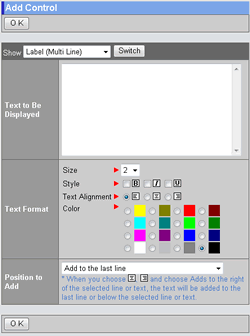
2. Label (Multi Line)
With this control, you can set size, color, etc. to text. This control allows you to display multi line text. This is useful when you want to display important text.
|
| Field |
Description |
| Text to Be Displayed |
Enter text.
This is useful when you want to display message text. |
| Text Format |
Specify the text format.
Select 1 to 7 for the size.
Select "Bold", "Italic" or "Underline" from the style.
Select "Left", "Center" or "Right" from the Text Alignment.
Select a color from 16 colors selection. |
| Position to Add |
Select the position you want to add the text.
Select "Add to the last line", "Adds to below the selected line or control", "Adds to the right of the selected line or control" or "Adds to above the selected line or control". |
|
|
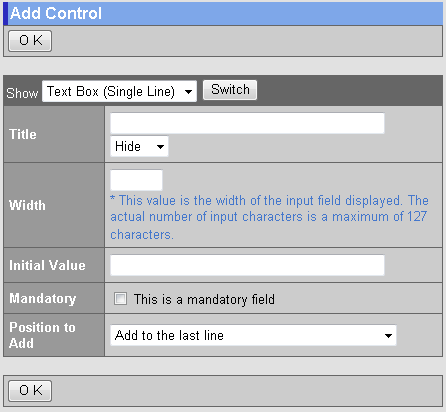
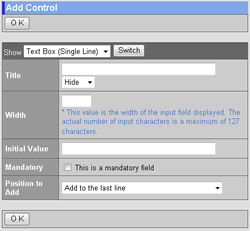
3.Text Box (Single Line)
This control allows users to input text. This control can be used for a sub title of application form, etc.
|
| Field |
Description |
| Title |
Enter the title of the text box.
Select "Show" to display the title in the left of the text box. |
| Width |
Specify the width of the input field. |
| Initial Value |
Enter text displayed as the initial text. |
| Mandatory |
Specify whether this field is mandatory. * Mark will be displayed in the left of the text box. |
| Position to Add |
Select the position you want to add the text box.
Select "Add to the last line", "Adds to below the selected line or control", "Adds to the right of the selected line or control" or "Adds to above the selected line or control". |
|
|
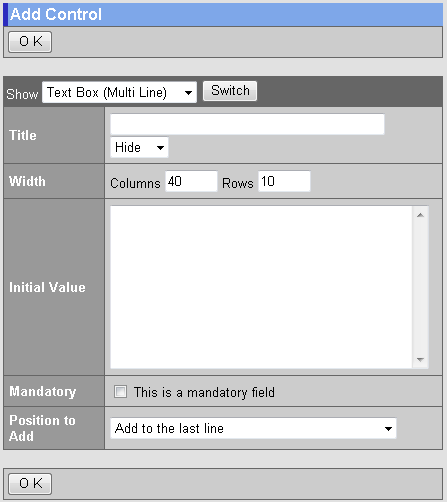
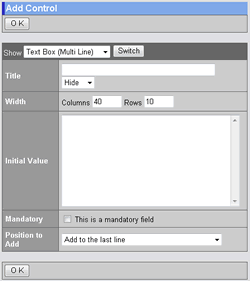
4. Text Box (Multi Line)
|
| Field |
Description |
| Title |
Enter the title of the text box.
Select "Show" to display the title in the left of the text box. |
| Width |
Specify the width of the input field. |
| Rows |
Specify the number of rows of the input field. |
| Initial Value |
Enter text displayed as the initial text. |
| Mandatory |
Specify whether this field is mandatory. * Mark will be displayed in the left of the text box. |
| Position to Add |
Select the position you want to add the text box.
Select "Add to the last line", "Adds to below the selected line or control", "Adds to the right of the selected line or control" or "Adds to above the selected line or control". |
|
|
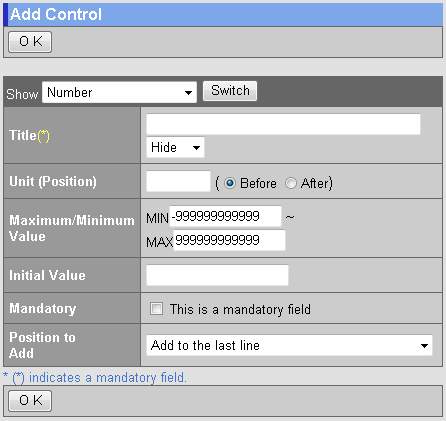
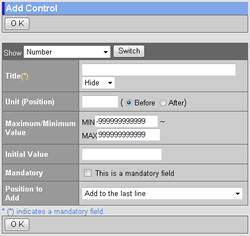
5. Number
This control allows you to create number field, e.g. time and amount.
* You can use Auto Calculation function with this control to calculate the numbers.
|
| Field |
Description |
| Title |
Enter the title of the number field.
Select "Show" to display the title in the left of the text box. |
| Unit (Position) |
Specify the unit of the number.
You can select a position of the unit. |
| Maximum/Minimum Value |
Specify maximum and minimum values. |
| Initial Value |
Enter number displayed as the initial value. |
| Mandatory |
Specify whether this field is mandatory. * Mark will be displayed in the left of the number field. |
| Position to Add |
Select the position you want to add the number field.
Select "Add to the last line", "Adds to below the selected line or control", "Adds to the right of the selected line or control" or "Adds to above the selected line or control". |
|
|
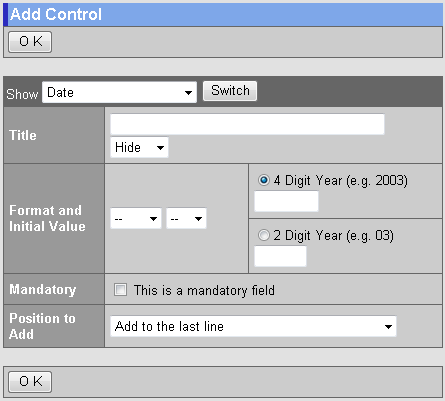
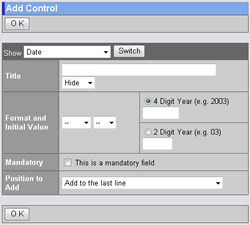
6. Date
|
| Field |
Description |
| Title |
Enter the title of date field.
Select "Show" to display the title in the left of the date field. |
Format
and Initial Value |
Specify initial values for year, month and day.
You can select 2 digit year or 4 digit year for the year. |
| Mandatory |
Specify whether this field is mandatory. * Mark will be displayed in the left of the date field. |
| Position to Add |
Select a position you want to add the date field.
Select "Add to the last line", "Adds to below the selected line or control", "Adds to the right of the selected line or control" or "Adds to above the selected line or control". |
|
|
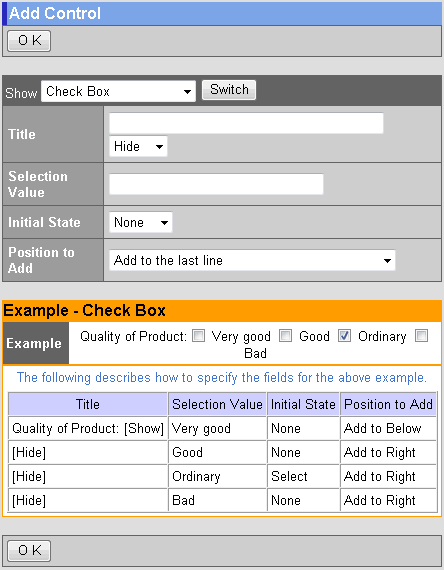
7. Check Box
This control allows users to select more than one options.
|
| Field |
Description |
| Title |
Enter the title of the check box.
Select "Show" to display the title in the left of the check box. |
| Selection Value |
Enter selection values of the check box. |
| Initial State |
Specify whether it is checked or not as the default. |
| Position to Add |
Select the position you want to add the check box.
Select "Add to the last line", "Adds to below the selected line or control", "Adds to the right of the selected line or control" or "Adds to above the selected line or control". |
|

|
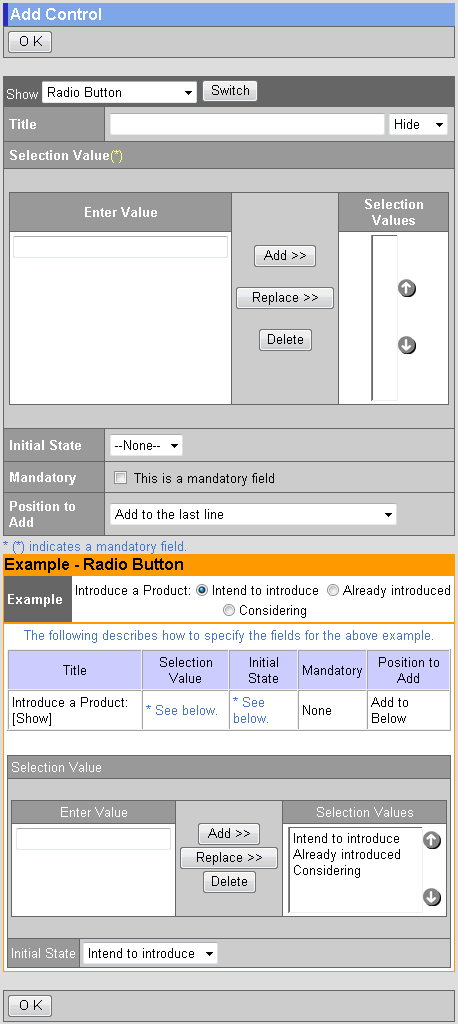
8. Radio Button
Use this control for single selection from several options.
This is useful to ask meeting attendance, e.g. attendance, nonattendance.
|
| Field |
Description |
| Title |
Enter the title of the radio button.
Select "Show" to display the title in the left of the radio button. |
| Selection Value |
Enter selection values of the radio button. |
| Initial State |
Select an initial value from the "Selection Values" |
| Mandatory |
Specify whether this field is mandatory. * Mark will be displayed in the left of the radio button. |
| Position to Add |
Select a position you want to add radio button.
Select "Add to the last line", "Adds to below the selected line or control", "Adds to the right of the selected line or control" or "Adds to above the selected line or control". |
|

|
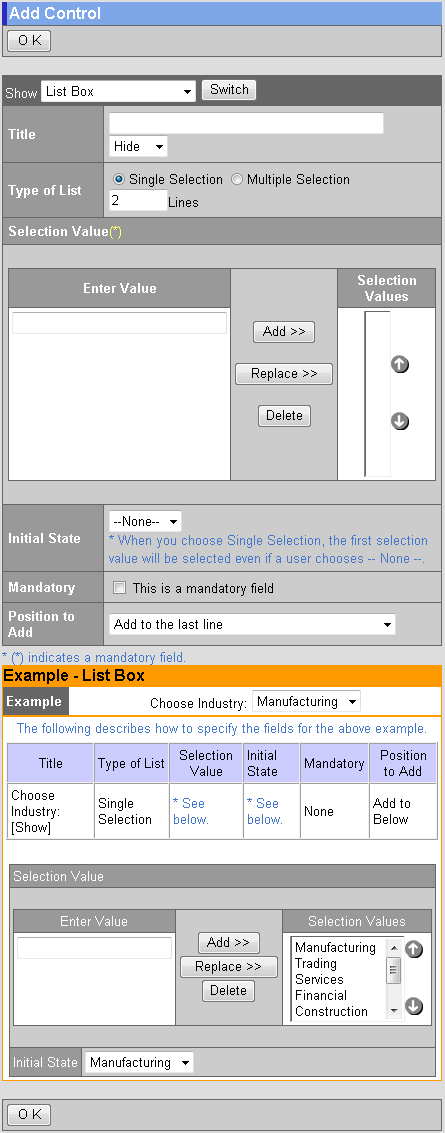
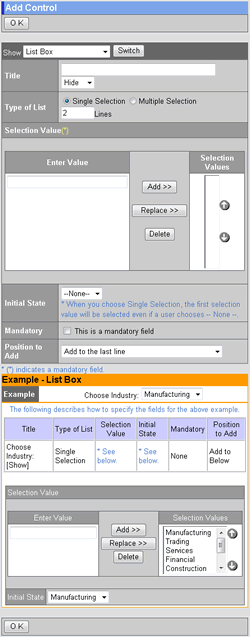
9. List Box
Use this control to select one item from several items.
This is useful when you want to make a selection, for example place of business trip.
|
| Field |
Description |
| Title |
Enter the title of the list box.
Select "Show" to display the title in the left of the list box. |
| Type of List |
Select "Single Selection" or "Multiple Selection". |
| Selection Value |
Enter selection values of the list box. |
| Initial State |
Select an initial value from the "Selection Values" |
| Mandatory |
Specify whether this field is mandatory. * Mark will be displayed in the left of the list box. |
| Position to Add |
Select the position you want to add the list box.
Select "Add to the last line", "Adds to below the selected line or control", "Adds to the right of the selected line or control" or "Adds to above the selected line or control". |
|
|
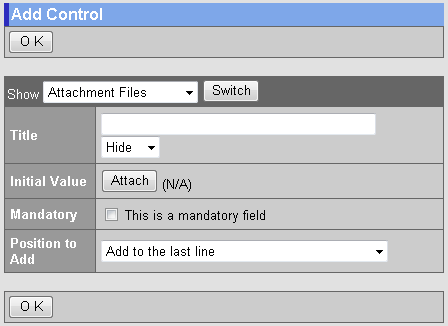
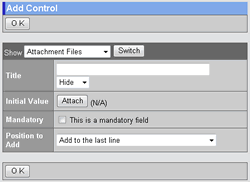
10. Attachment File
|
| Field |
Description |
| Title |
Enter the title of the attachment file.
Select "Show" to display the title in the left of the attachment file. |
| Initial Value |
Enter a file name as the initial value. |
| Mandatory |
Specify whether this field is mandatory. * Mark will be displayed in the left of the attachment file. |
| Position to Add |
Select a position you want to add the attachment file.
Select "Add to the last line", "Adds to below the selected line or control", "Adds to the right of the selected line or control" or "Adds to above the selected line or control". |
|
|
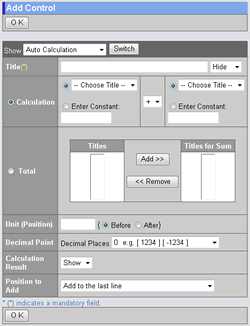
11. Auto Calculation
It allows four arithmetic operations for expense calculation and sales calculation, etc.
|
| Field |
Description |
| Title |
Enter the title of the auto calculation.
Select "Show" to display the title. |
| Calculation |
You can calculate with using numbers, auto calculation items and constants. |
| Total |
Select a title you want to sum up. |
| Unit (Position) |
Specify a unit.
You can select a position of the unit. |
| Decimal Point |
Specify decimal point of the number. |
| Calculation Result |
Select "Show" or "Hide". |
| Position to Add |
Select a position you want to add auto calculation.
Select "Add to the last line", "Adds to below the selected line or control", "Adds to the right of the selected line or control" or "Adds to above the selected line or control". |
|
|