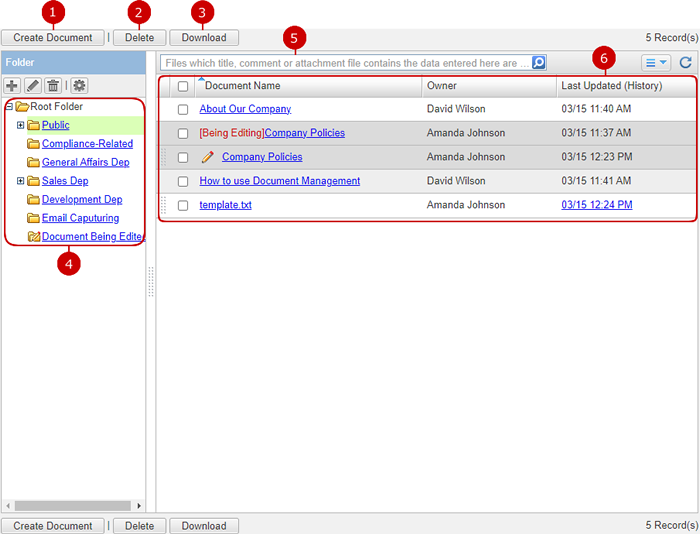
To Display Documents
The list of folders and documents in a folder you selected will be displayed.
-
Add a document.
Add a document to a folder you selected.
* Users who have "Add" access right to a folder can create documents in the folder.
-
Delete documents.
Select documents from the list and press this button to delete them. You can select more than one setting.
* Only users with delete permission regarding the document can delete it.
* When "Delete Document by Owner" in [System Management > General Settings] is set to "Allow", the owner can delete the document.
-
Download documents.
Select documents from the list and press this button to download them. You can select more than one document.
* If Enable Batch Download option in "System Management" - "Files Download Settings" is set to "Disallow", this button will not be displayed.
-
Folders to categorize documents are displayed.
When you press the link of each folder, documents stored in the folder are displayed.
You can add, edit, delete and set access rights to folders here. (For more details, please refer to To Manage Folders .)
When you press the link of "Document Being Edited", the list of documents being edited by you are displayed.
-
Enter keywords.
The search function searches in the "Document Name", "Comment", and "File Name" field by keywords.
* If you want to specify more than one keyword, use space to separate keywords.
* Specifying multiple keywords will perform "OR" search. This means the search results contain either one or more keywords that you specified.
-
The list of documents is displayed.
When you press a link of Document Name, Details of Document screen is displayed.
If a document has been updated, a link is displayed in Last Updated (History) field. When you press a link in the field, Histories screen is displayed.
 icon is displayed for a document which contains Minutes application's data.
"Being Edited" is displayed for a document being edited.
* If a document being edited by you,

icon is displayed at the left of a name of the document.
When you press a link of Document Name, Edit Document screen is displayed.
Documents which saved as draft are not displayed for users other than you.
* Folders and documents you do not have "Read" access right are not displayed.
* When you press and hold down the mouse button over the grip on the left side of a document, and move it over a folder and release the mouse button, the document is move to the folder.
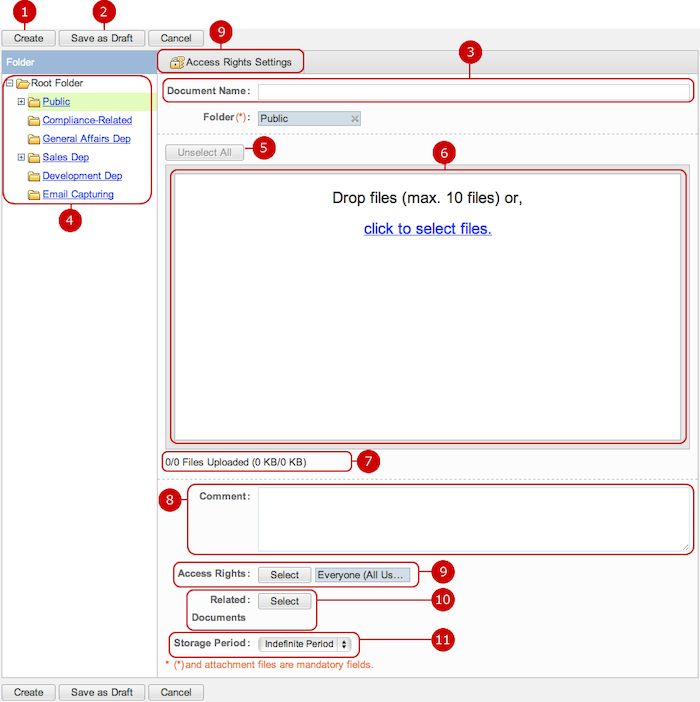
To Create Document
When you press " Create Document" button, Create Document screen is displayed.
* You can attach multiple files in a documents, and set access rights to a document.
-
Create a document.
Documents you created can be viewed and edited by other users.
* Users who do not have "Update" access right to a document cannot edit the document.
-
Save the document as a draft.
* Documents being edited cannot be viewed and updated by users other than the editor. The previous version of the document is displayed for users other than the editor.
-
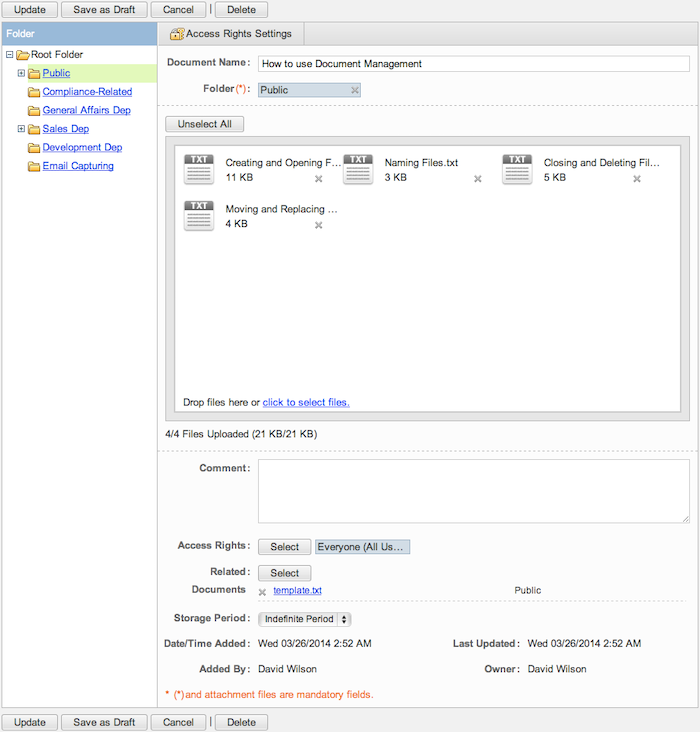
Enter a document name.
-
Choose a folder to save the document.
Choose the folder where you want to save the document from the folder list on the left.
-
Unselect all files.
-
Upload files.
When you press "click to select files", a window to select files is displayed.
In addition, you can drop files inside of the border to upload the files.
* You cannot use the upload function by dropping files in some browsers.
-
The number and total size of the files are displayed.
-
Enter comments
The comment can be used to search the files.
-
Set access rights.
Setup access rights of the document.
When you press "Access Rights Settings" button, or "Select" button, Set Access Rights windows is displayed.
(Please refer to To Setup Access Rights for more details.)
-
Select related documents.
You can select related documents with the document being created from existing documents.
Documents you selected are displayed as links.
* The links of the documents are displayed in the details screen each other.
-
Set the storage period.
If you choose "Date", the field to enter a period is displayed.
When you click an entry field, a calendar will be displayed. Click a date on the calendar, and it will be set to the field.
* If the documents which storage period has passed are not displayed in the document list. (the documents are not deleted after expiration)
* Enter a date in MM/dd/yyyy format, numeric.
When the entry is complete, press "Add" button to save the data.
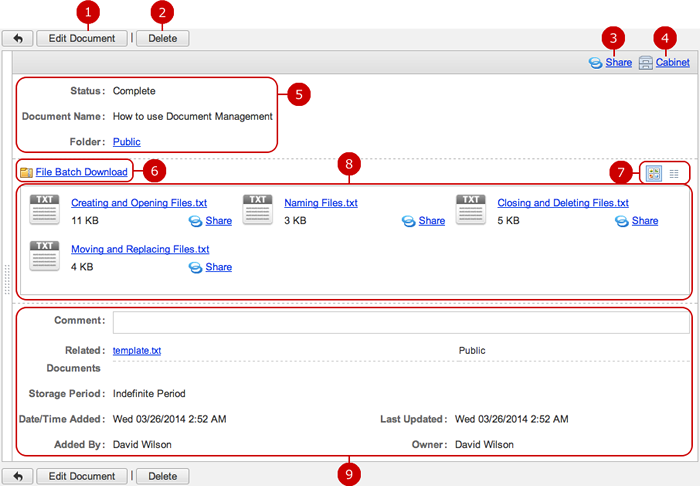
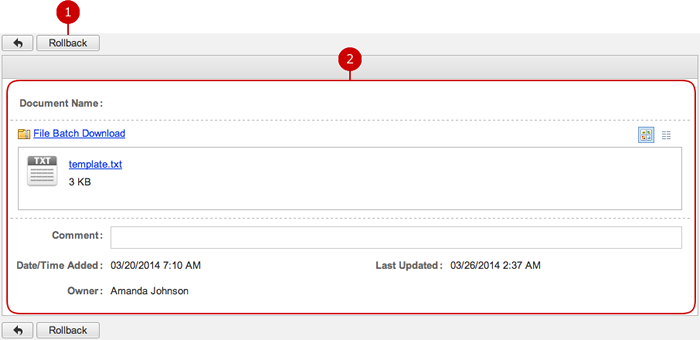
To View Document
When you press a link of Document Name, Details of Document screen is displayed.
The screen is changed according to the status of editing.
- A Complete Document
-
Display Edit Document screen.
* The button is not displayed for users who do not have "Update" access right to the document.
-
Delete the document.
* The button is not displayed to users who do not have "Delete" access right to the document.
* When "Delete Document by Owner" in [System Management > General Settings] is set to "Disallow", the button is not displayed to the owner.
-
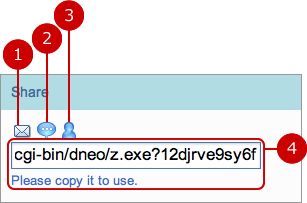
When you press Share button, you can issue a shortened URL.
Please refer to the explanation of To Use Shortened URL of Document for more details.
-
You can add a new cabinet item of the minutes by clicking "Cabinet" here.
Please refer to the explanation of Cabinet for more details.
-
The information of the document is displayed.
When you press the link of Folder, documents in the folder are displayed.
-
Perform file batch download.
All attached files will be download as a zip file.
-
Switch the display file views.
Thumbnail View... A compressed image is displayed for image file, and an icon representing the type of a file is displayed for other files. This view has good visibility.
List View... Files are displayed in a list.
-
Files stored in the document are displayed.
If you choose Thumbnail View, A compressed image is displayed for image file, and an icon representing the type of a file is displayed for other files.
The Share button is displayed for each file.
Please refer to the explanation of To Use Shortened URL of Document for more details.
-
The information of the document is displayed.
If related documents are set, the documents are displayed in links.
When you press a link, the details of the document is displayed.
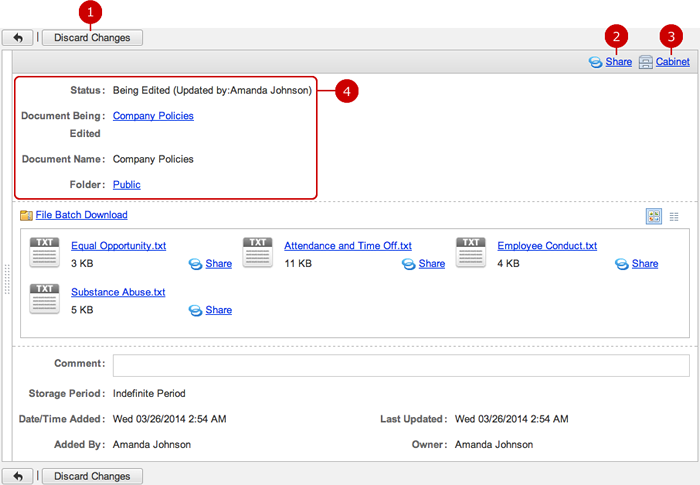
- A Document Being Edited
-
The document will be replaced by previous version.
* The button is not displayed for users other than the editor.
* If there is no previous version of document available, the button is not displayed.
-
When you press Share button, you can issue a shortened URL.
Please refer to the explanation of To Use Shortened URL of Document for more details.
* In the case of document being edited, the button is not displayed for users other than the editor.
-
You can add a new cabinet item of the minutes by clicking "Cabinet" here.
Please refer to the explanation of Cabinet for more details.
* In the case of document being edited, the button is not displayed for users other than the editor.
-
The information of the document is displayed.
In the case of document being edited, a name of user who is updating the document is displayed in Status.
When you press "Document Being Edited" link, the document which is saved as draft is displayed.
When you press the link of Folder, documents in the folder are displayed.
* The button is not displayed for users other than the editor.
To Use Shortened URL of Document
You can shorten a URL of a screen and file and use a shortened URL in messages of such as Neotwi which limit number of characters of a message.
(Please refer to the explanation of
Neotwi in user's manual for more details.)
To Edit Document
When you press "Edit Document" button in Details of Document, Edit Document screen is displayed.
* Users who do not have "Update" access right to a document cannot edit the document.
You can change any information of the information message.
Click "Update" button to save the changes.
* Data/Time Added is when the task was created. It remains even after updated. The last updated date and time is recorded in Last Updated.
* If you change content of a document, revision number is numbered and content before the change is save as history (You can save revised version of a document as many as the administrator setup)
* You can replace content of a document by previous revision. (Rollback function)
To Delete Documents
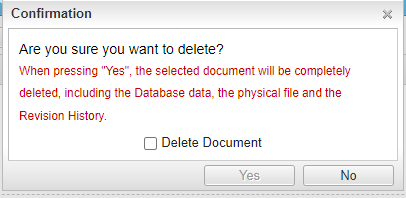
On Item Management And Check In/Out, Item Details or Edit Item screen, click "Delete" and Confirmation dialog will appear.
When you press "Yes" button, the documents are deleted. The documents are permanently deleted and cannot be recovered. Please take note.
* Users who do not have "Delete" access right to a document cannot delete the document.
* When "Delete Document by Owner" in [System Management > General Settings] is set to "Disallow", the owner of the document can delete it.
* When "Document" in the "Delete Confirmation Check Box" in [System Management > General Settings] is set to "Use", press the "Delete Document" check box in the [Confirmation] window to enable the "Yes" button.
To View Revision History
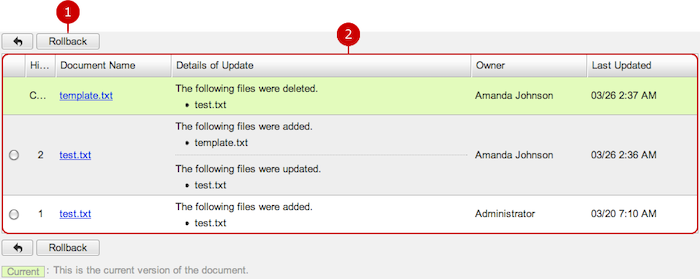
When you press a link of Last Updated (History), Histories screen is displayed.
In the list of revisions, you can view histories, owner of document, Last Updated.
You can also replace the current document by a previous revision of the document by using the rollback function.
* If a document has not been updated, no link is displayed in Last Updated (History) field.
To View Older Revision of Document
When you press a link of Document Name, the details of the revision for the document is displayed.
You can also replace the current document by the previous revision of the document by using the rollback function.
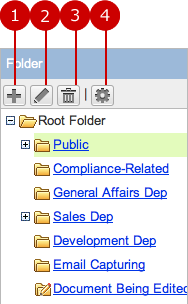
To Manage Folders
You can add, edit, delete and set access rights to folders in the list of folders.
-
A new window for folder creation is displayed.
The folder is created in the selected folder.
* Users who have "Add" access right to a folder or the owner of the folder can create folders in it.
After the creation of the folder is complete, a window for setup access rights is displayed.
(Please refer to To Set Access Rights for more details)
-
Edit a folder name.
When you choose a folder you want to change the name and press "Edit Folder" button, Edit Folder screen is displayed.
Enter a name and save.
* Users who have "Update" access right to a folder or the owner of the folder can change the folder.
-
Delete a folder.
When you select folders you want to delete and press "Delete" button, a delete confirmation window is displayed.
When you press "Yes" in the delete confirmation windows, all the folders are deleted.
* Please note that all the folders and sub folders and documents under the folders are deleted. Please take note.
* Users who have "Delete" access right to a folder or owner of the folder can delete the folder.
* When "Delete Confirmation Check Box" of "Document Folder" in [System Management > General Settings] is set to "Use", check the "Delete Document Folder" check box in the delete confirmation window to enable the "Yes" button to be pressed.
-
Setup access rights of a folder.
When you choose a folder you want to set access rights and press "Access Rights Settings" button, a window for setting access rights is displayed.
(Please refer to To Set Access Rights for more details)
* Users who have "Update" access right to a folder or the owner of the folder can set access rights of the folder.
* You can drag & drop a folder to move it on the list of folders screen.
To Setup Access Rights
You can setup flexible access rights of folders.
Basically each folder is a space involved with the owner, however you can appoint users who can be involved in each folder by setup access rights.
If you want to set access rights of a document, set access rights in Set Access Rights window of Create/Edit Document screen.
If you want to set access rights of a folder, set access rights in Access Rights Settings window of the list of folders screen.
* You can set the access rights to the child folders or documents within the access rights of the parent folder.

-
The rights which are set to parent folder are displayed.
You cannot set beyond the rights.
-
Information of the folder is displayed.
-
Select users, groups, and/or roles that grant access rights.
Click "Select User/Group/Role" button to open the selection dialog.
(For more details, please refer to Common Functions for All Screens > User/Group/Role Selection in User's Manual.)
-
Change Rights opens Change Rights window to set the access rights on selected users, groups, and roles in the list below.
When you choose one from User/Group/Role and press "Change Rights And Notification" button, Change Rights And Email Notification Settings window is displayed.
-
Unselect users, groups or roles.
-
The list of users/groups/roles to which the user grant access rights is displayed.
User/Group/Role, Belonging Group, Conditions, Right fields, Email Notification are displayed.
For users, belonging groups are displayed.
When the setup is complete, press "OK" button to save the data.
- About Change Rights
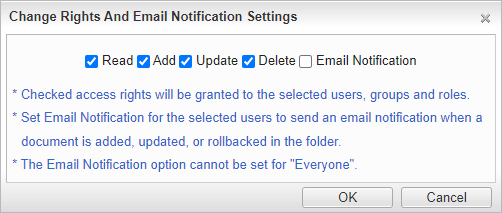
There are five types of rights: "Read", "Add", "Update", "Delete", and "Email Notification".
-
Read Right
Users who have the right can view cabinet file in the folder.
-
Add Right
Users who have the right can create documents or folders in the folder.
-
Update Right
Users who have the right can edit the name of folder and change access rights of the folder.
-
Delete Right
Users who have the right can delete the folder and documents and folders in the folder.
-
Email Notification
When the document is added, updated, delete, a notification can be received.
* If "Read" right is not set, you cannot set "Add", "Update", and "Delete" right and Email Notification. If you remove "Read" right, the user/group/role is removed automatically from the list.
* You cannot set Email Notification to "Everyone (All Users)".
* The owner of a folder can add, edit and delete documents and folders regardless of the access rights settings.
Press "OK" button to complete the setup.
- Confirmation when changing access rights
When you change access rights, a confirmation window for changing access rights to child folders is displayed.
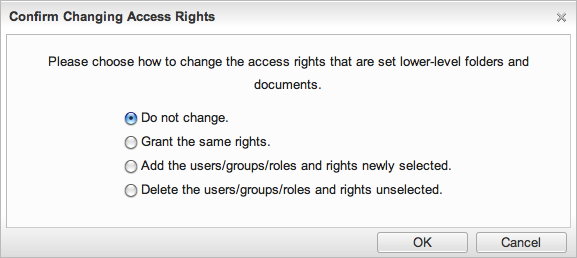
- Do Not Change... Do not change the access rights of child folders and documents.
- Grant the same rights... Set the same access rights of the parent to child folders and documents.
- Add the users/groups/roles and rights newly selected... Add the users/groups/roles and rights newly selected to child folders and documents.
- Delete the users/groups/roles and rights unselected... Delete the users/groups/roles and rights unselected from child folders.
Click [OK] to change the option.
* Access rights of notification email is not applied to the subordinates folders.
* Access Rights of Document
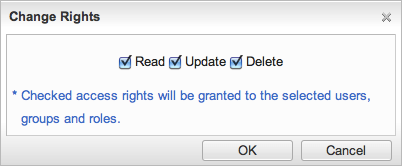
There are three access rights: "Read", "Update", and "Delete".
-
Read Right
Users who have the right can view the document.
-
Update Right
Users who have the right can edit the document.
-
Delete Right
Users who have the right can delete the document.
* If "Read" right is not set, you cannot set "Update", and "Delete" right. If you remove "Read" right, the user/group/role is removed automatically from the list.
* The owner of a document can edit and delete the document regardless of the access rights settings.
Press "OK" button to complete the setup.
- Folder automatically created by Workflow application
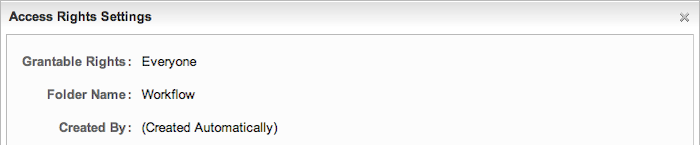
If the system administrator has set "Yes" in the "Application Storage Setting" field, the application will be stored in a folder in the Document Management application when the last approver has approved it.
A new folder named "Workflow" will be created automatically if you have not specified a certain folder.
(Created Automatically) is displayed in Created By field.
Please refer to
Workflow > To Setup General Settings in the user's manual for more detail.
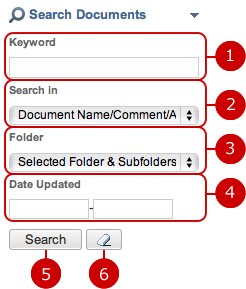
To Search Documents
When you open the menu on the left side of screen, the document search function appears.
You can find events by entering the conditions, such as keyword, folder, date updated.
-
Enter keywords.
The search function searches in the fields specified in "Searched in" by keywords.
* If you want to specify more than one keyword, use space to separate keywords.
* Specifying multiple keywords will perform "OR" search. This means the search results contain either one or more keywords that you specified.
-
Choose where to be searched by the keywords.
-
Choose folders to be searched.
Choose any one of all, selected folder, selected folder & subfolders, document being edited. The search function searches in the target folder.
-
Specify the period of update date.
When you click an entry field, a calendar will be displayed.
* Enter a date in MM/dd/yyyy format, numeric.
-
When you press "Search" button, documents that match the search conditions are displayed in the list screen.
-
When you press [
 ] button, all search conditions are cleared.
