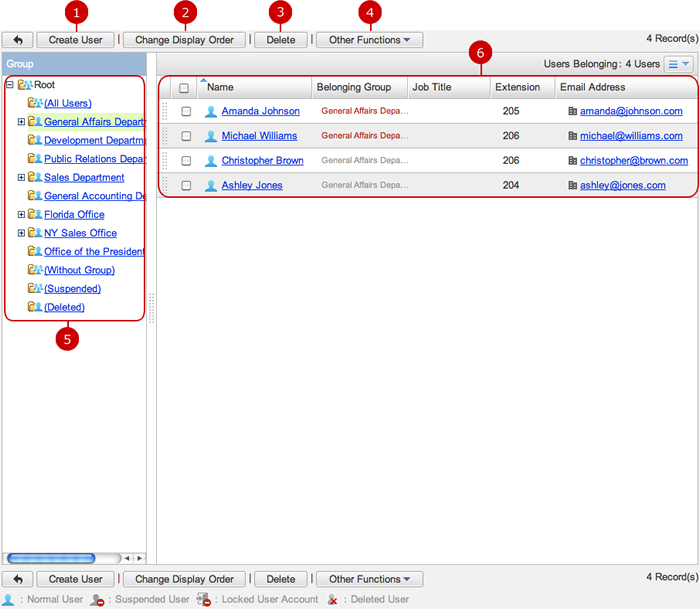
To Display User Management List
When you press the link of Operation Settings > User Settings > User Management in Settings menu, User Management List is displayed.
You can add, edit, and delete desknet's NEO users.
-
Creates a user.
When you press "Create User", Create User screen is displayed.
-
Changes the display order of users you selected.
Choose purpose items on the list and then press "Change Display Order" button to switch the screen mode to Change Display Order mode. In Change Display Order mode, choose the destination of the users. You can move more than one user at once.
* Press and hold down the mouse button over the data you want to move and move the mouse and release the mouse button on desired place to change the display order.
-
Delete users.
Select users you want to delete and press this button to delete them. You can select more than one user.
* The login user cannot be deleted.
* "(Deleted)" users will be deleted from database.
-
Other sub functions to apply to users.
-
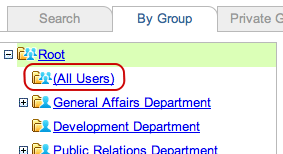
The list of groups is displayed.
When you click the link of a group, the list of users belonging to the group is displayed.
-
The list of users is displayed.
When you press a user name, update screen of the user is displayed.
When you press the link of each email address, Message Composing screen is displayed.
* To use this feature, setup Email Address Link option in Design Settings. When you double click a contact, the detail of contact screen is displayed.
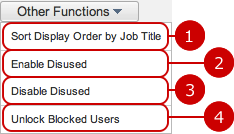
Other FunctionsClick [Other Functions] to see the sub menu.
-
Sorts users by Job Title Code.
Clicking it, a confirmation dialog will appear.
-
Suspend the selected users on the list.
-
Restore the selected users on the list.
-
Unlock the selected users on the list.
To Create User
When you press "Create User" in the list of users, Create User screen is displayed.
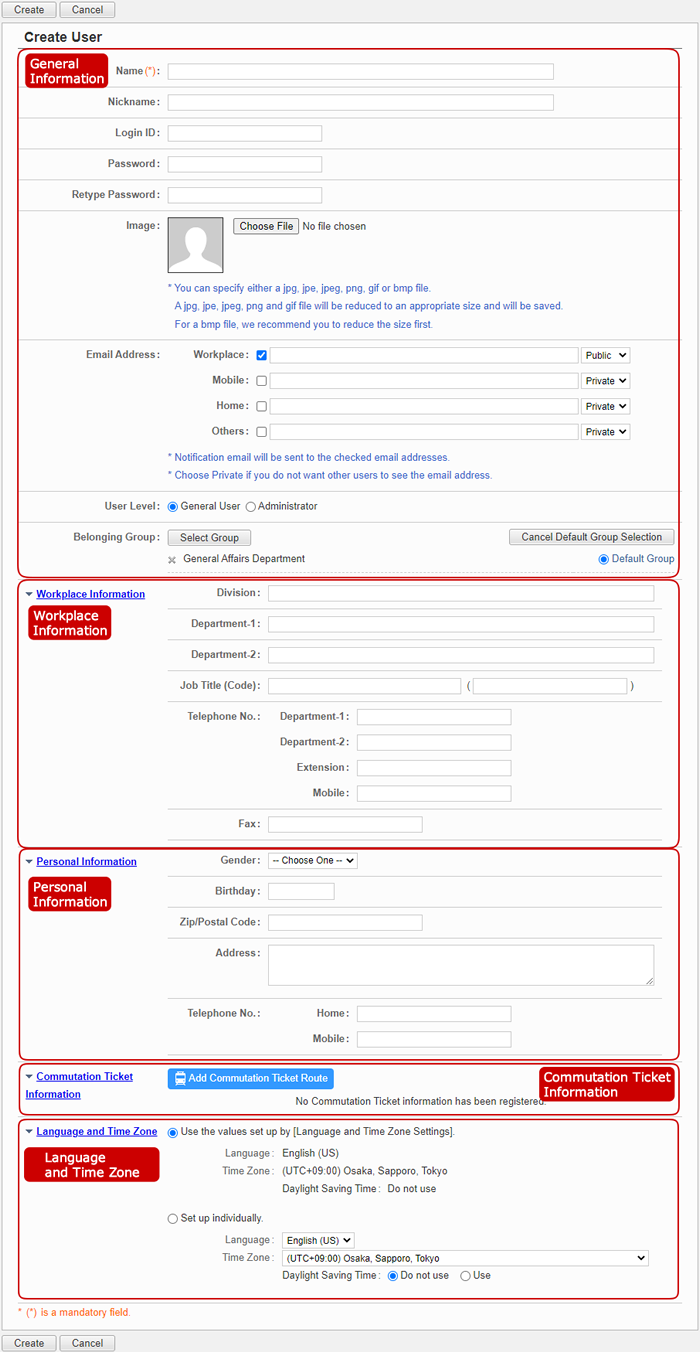 General Information
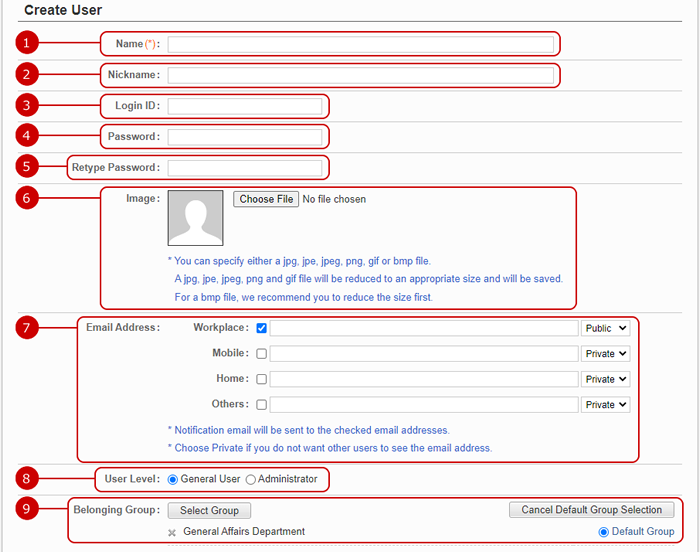
-
Enter a user name.
-
Enter a nickname.
-
Enter a login ID.
* You have to enter this information when the login option is set to "by Entering User ID".
-
Enter a login password.
* If you do not set a password, the user does not have to enter a password when login.
* Users cannot input a password that does not meet password policy if it is set by an administrator.
Input any password that meets the requirement.
-
Enter the same password you entered again to confirm the password.
-
Set an icon of the user.
The image is used in Neotwi, Discussion, posts of Project Management, Profile screen, Portal, Web Conference, Presence and SmartViewer.
-
Enter an email address.
Enter an email address each of "Workplace", "Mobile", "Home", "Other".
* Notification email will be sent to checked email addresses.
* Choose Private if you do not want other users to see the email address.
-
Choose a user level.
Choose Administrator if you give the user comprehensive administration rights of desknet's NEO.
-
Set belonging groups.
When you press "Select Group" button, Group Selection window is displayed.
When you press "Select Group" button, Group Selection window is displayed.
* The default group is a group which is initially displayed or selected in such as the list of data, user selection screen.
Workplace Information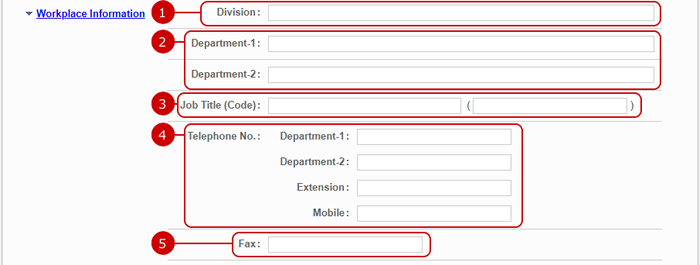
-
Enter a division name.
-
Enter a department name.
If you want to set more the one department, use Department-2.
-
Enter a job title and its code.
The job title code is used to sort the data by the code.
-
Enter telephone Nos.
Enter a telephone No., each of department, another department, extension, mobile.
-
Enter a fax No.
Personal Information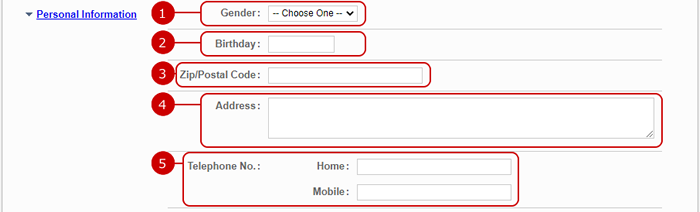
-
Choose a gender.
-
Enter a birthday.
-
Enter a ZIP/Postal code.
-
Enter an address.
-
Enter personal telephone Nos.
Enter a telephone number for home and mobile.
Season Ticket Information
This section appears when the Transportation/Expense features are enabled by the system administrator.
(For more information, please refer to
Transportation/Expenses in User's Manual)
Language and Time Zone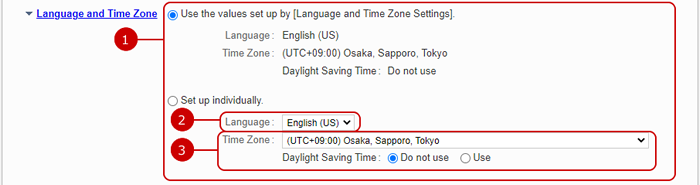
-
Select a setting from the followings.
- Use the values set up by "Language and Time Zone Settings".
- Setup individually.
If you choose "Set up individually", choose a language, a date/time format, time zone and daylight saving time.
-
Choose a language and a date/time format.
The screens for the user will be displayed in the language and the date/time format you selected.
-
Choose a time zone and daylight saving time.
The times such as times in Schedule are changed according to the time zone you set.
When the entry is complete, press "Create" button to save the data.
To Edit User
When you press a link of a Name, Edit User screen is displayed.
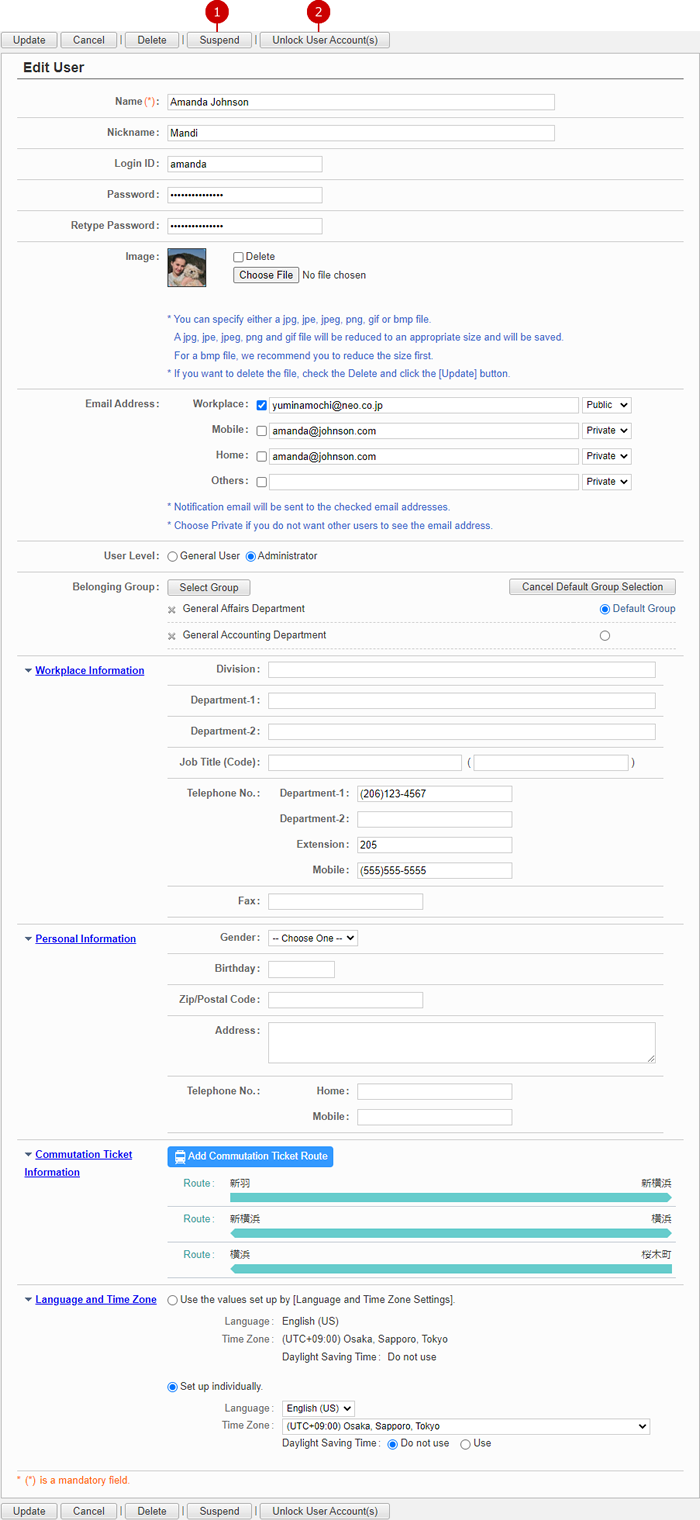
-
Suspend the user.
* If the user is already suspended, "Disable Suspended" button appears.
*A suspended user cannot be a target of auto receive email.
-
Unlocks "Locked" status of a user.
* This button appears only when the user is locked.
Click "Update" button to save the changes.
To Delete UsersWhen you press "Delete" button on the list of users or Edit User screen, a confirmation window is displayed.
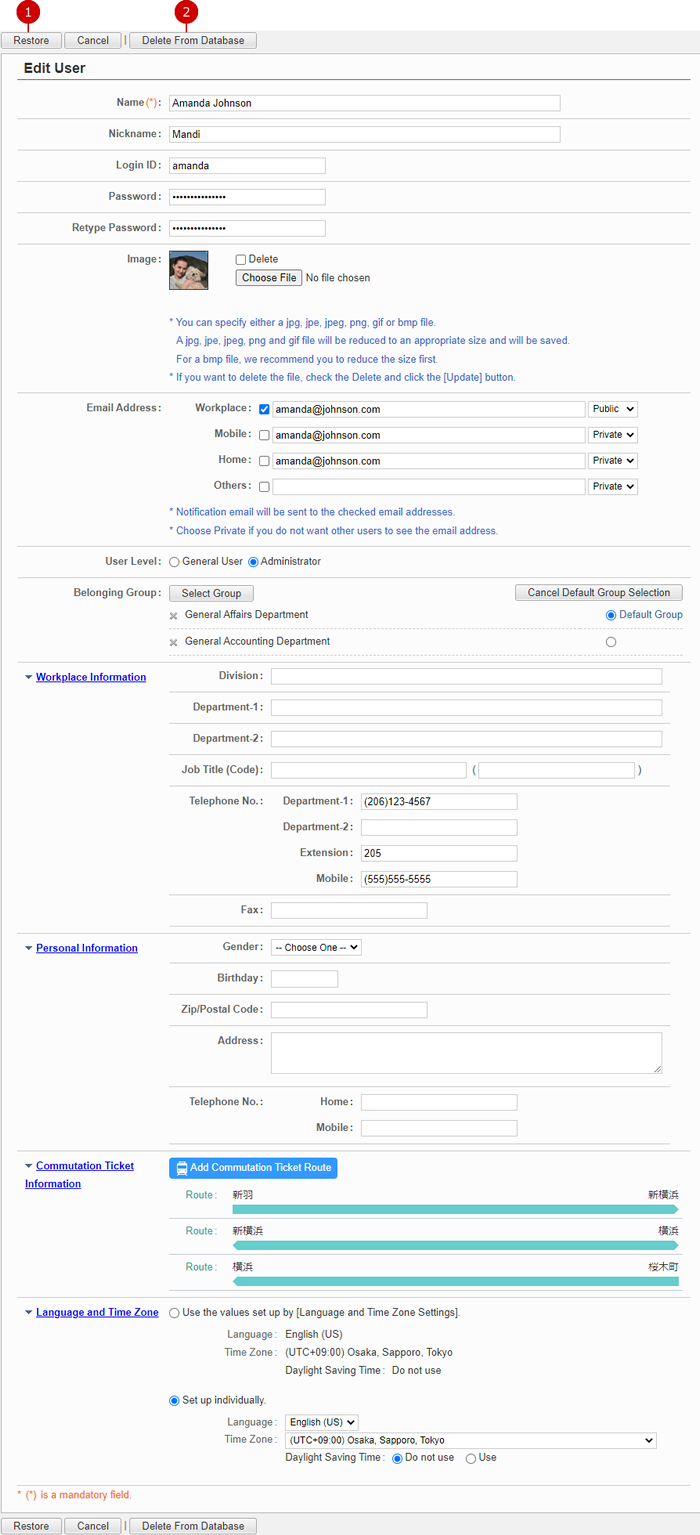
To Delete Users
- Change a user status to "(Deleted)".
When you press "Delete" button on the list of users or Edit User screen, a confirmation window is displayed.
When you click "Yes" button on the confirmation window, the user status will become "(Deleted)".
The "(Deleted)" user will be displayed in "(Deleted)" group.
* You can recover the "(Deleted)" user in the edit user screen.
The recovered user will become a "(Suspended)" user.
* "(Deleted)" users will be deleted from the database if the specified retention period in [Setup] > [Basic Settings] > [Data Retention Settings] has passed.
- Delete a user from database.
When you click "Delete From Database" button in edit screen of a "(Deleted)" user, a confirmation window will be displayed.
When you click "Yes" button on the confirmation window, the user will be deleted from database.
The users who have been deleted from a database cannot be recovered.
Please note that all the related data to the user such as email will be deleted too.
To Add Users from File (Import)
When you press the link of Operation Settings > User Settings > Import User Data in Settings menu, Import User Data screen is displayed.
You can add users from a file in one batch.
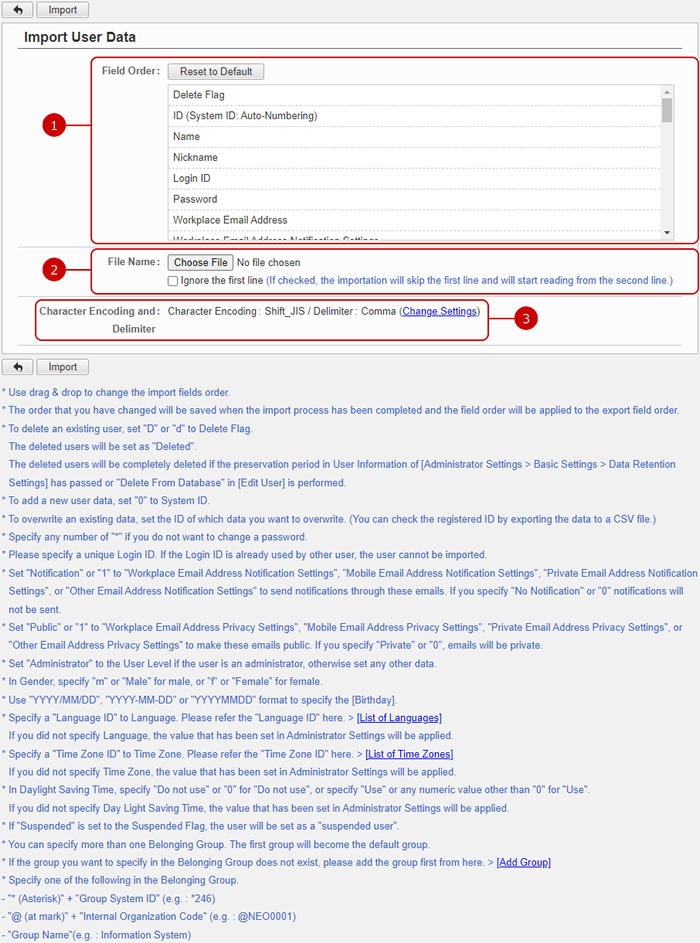
After all entries are completed, when you press "Import" button, importing a form begins.
To Save Users to File (Export)
When you press the link of Operation Settings > User Settings > Export User Data in Settings menu, Export User Data screen is displayed.
You can save users to a file.
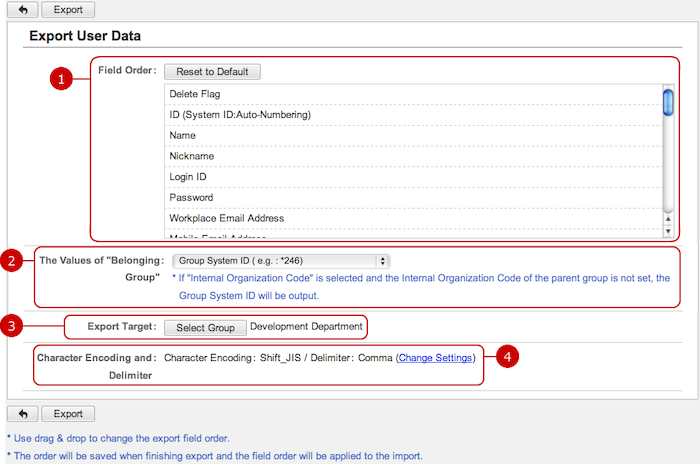
-
The fields of user information to be saved are displayed. You can change the order of the fields.
* Press and hold down the mouse button over a field name and move the mouse up and down and release the mouse button on desired place to change the order.
-
Choose a value output to Belonging Group field.
Choose any one of "Group System ID (e.g.*246)", "Internal Organization Code (e.g. @NEO0001)", "Group Name (e.g. Information System)".
The group data is saved in the file as you selected.
* If "Internal Organization Code" is selected and the Internal Organization Code of the parent group is not set, the Group System ID will be output.
-
Users who belong to the group you selected are saved.
When you press "Select Group" button, Group Selection window is displayed.
-
Select a character encoding and a delimiter.
Press Change Settings link to change the character encoding and delimiter options.

-
Choose a character encoding.
-
Choose a delimiter.
After all entries are completed, when you press "Export" button, exporting users begins.
To Set Editable Field Setting
When you press the link of Operation Settings > User Settings > Editable Field Setting in Settings menu, Editable Field Setting screen is displayed.
Set whether to allow users to edit fields in Profile.

If you uncheck a field, the field in Profile screen cannot be changed.
Click "Update" button to save the changes.
To Set Display Field Settings
When you press the link of Operation Settings > User Settings > Display Field Settings in Settings menu, Display Field Settings screen is displayed.
Select fields to be displayed in user information.
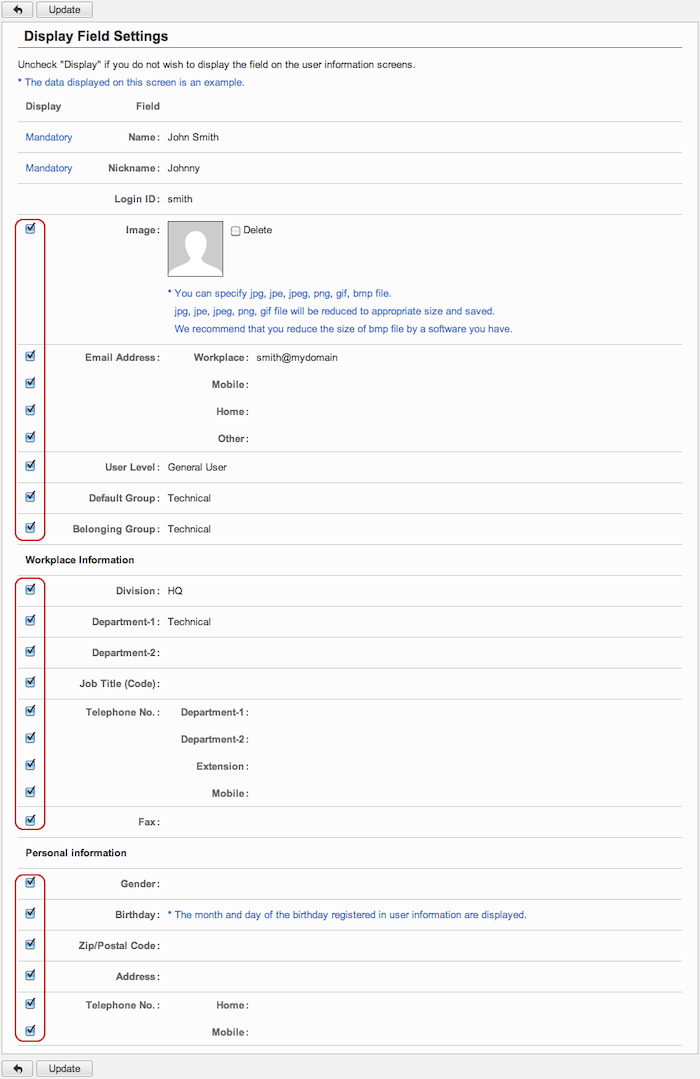
If you uncheck a field the field is hidden in user information.
This settings apply to the following screens.
-
User Directory - User List
-
User Directory - User Information
-
Select User - User Information
-
Visitor Management - Visitors
-
Visitor Management - Participants List
Click "Update" button to save the changes.
To Setup Layout of User Selection
When you press the link of Operation Settings > User Settings > User Selection Layout Settings in Settings menu, User Selection Layout Settings screen is displayed.
Select fields to be displayed in the user selection window.
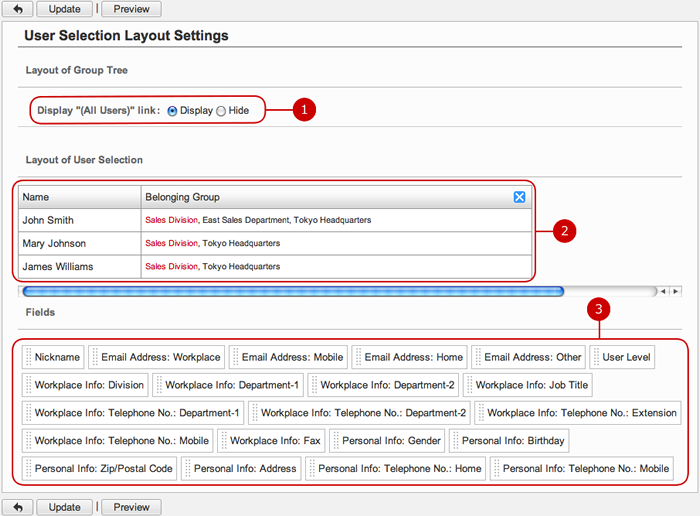
- To Layout Field
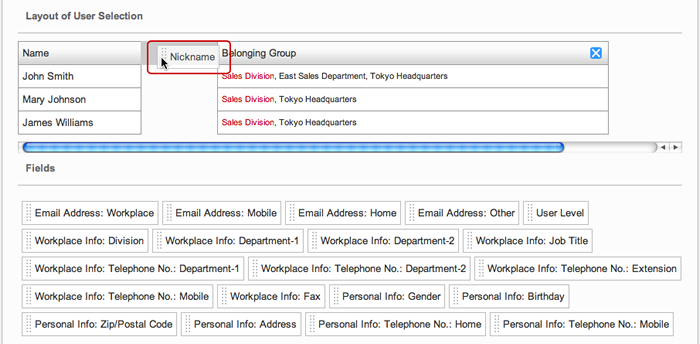
Press and hold down the mouse button over a field you want to display and move to the layout and release the mouse button on desired place to layout the field
- To Change Display Width
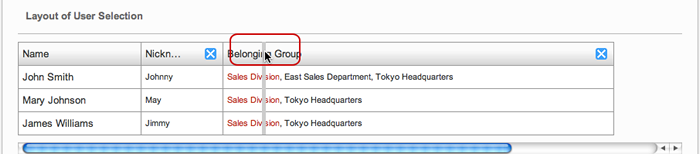
Press and hold down the mouse button over a border line (right hand side of "X" button) of a field and move the mouse rightwards or leftwards, and then release the mouse button to change the width of the field.
* The width of Name cannot be changed.
- Change Display Order of Fields
Press and hold down the mouse button over a field name and move the mouse and release the mouse button on desired place to change the order.
* Name cannot be moved.
- To Preview to Check
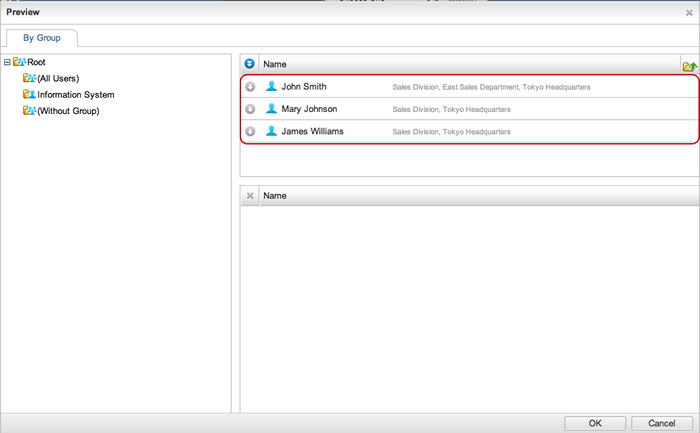
When you press "Preview" button, the user selection window which the setting are applied is displayed.
You can check the layout after the changes. Click "Update" button to save the changes.
To Setup AppSuite User Setting
Go to Operation Settings > User Settings > AppSuite User Settings from the settings menu to display AppSuite User Settings screen.
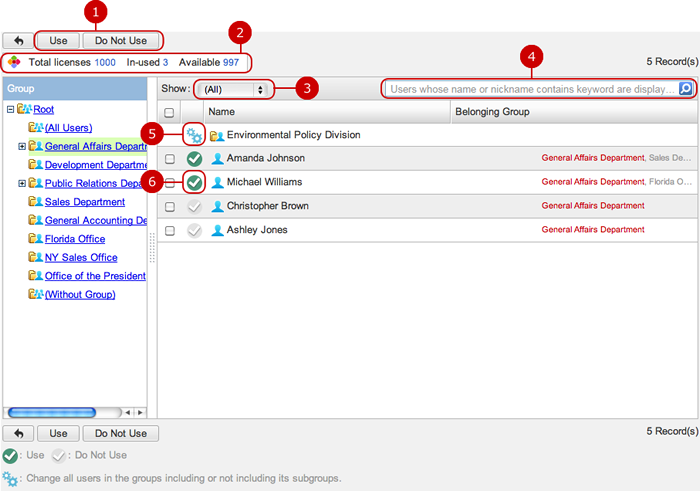
-
Set whether to allow the selected users from using AppSuite or not.
Select users and press this button to change their setting. You can select multiple users at a time.
-
Displays the number of total, in-used and remaining AppSuite licenses.
-
Select users from the list.
-
Use: Displays all users that have been set to "Use".
-
Do not use: Displays all users that have been set to "Do not use".
*Only if "(All Users)" is selected, Groups will be displayed on the list.
-
Searches users who match the Name and Nickname.
If you want to specify more than one keyword, use space to separate keywords.
Specifying multiple keywords will perform "OR" search. This means the search results contain either one or more keywords that you specified.
If a keyword is specified,Groups will not be displayed on the list.
-
Changes the setting of all users in the selected groups including (or not including) its subgroups.
-
Only this group: The selected setting will be applied to all users of the selected groups.
-
Include subgroups: The selected setting will be applied to all users of the selected groups and its subgroups.
-
Changes a user's setting.
Click the "Use" and "Do not use" icon to change a user's setting.
To Display Group Management List
When you press the link of Operation Settings > Group Settings > Group Management in Settings menu, Group Management screen is displayed.
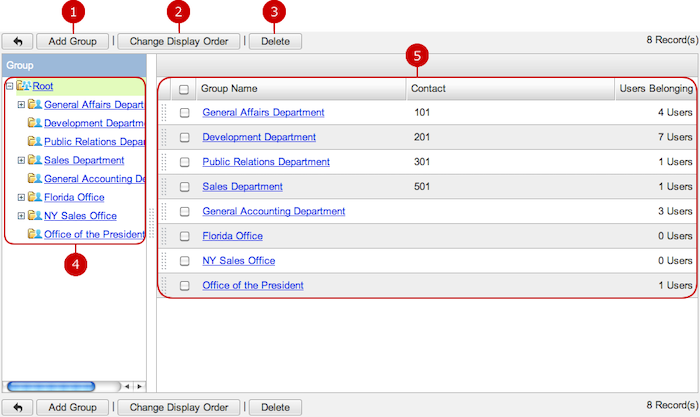
To Add Group
When you press "Add Group" button in the list of groups, Add Group screen is displayed.
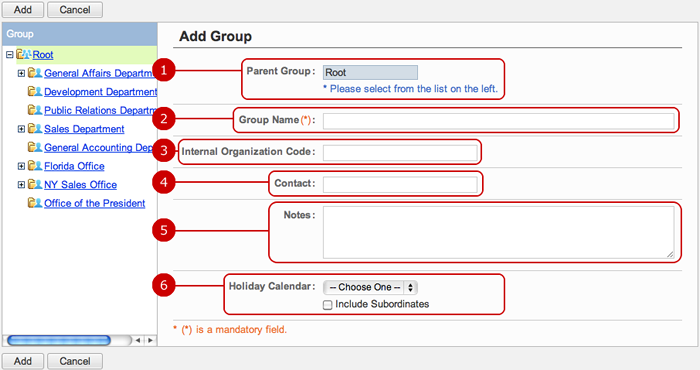
Click "Add" button to save the changes.
To Edit Group
When you press a link of Group Name, Edit Group screen is displayed.
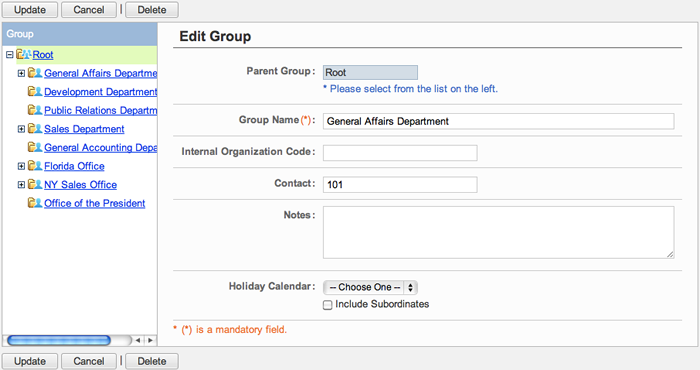
Click "Update" button to save the changes.
* If you change the parent group, child groups are also moved.
To Delete Groups
When you press "Delete" button on Recipient Whitelist Settings screen or Update Recipient screen, a confirmation window appears.
When you press "Yes" button, the groups are deleted. The groups are permanently deleted and cannot be recovered.
To Add Groups from File (Import)
When you press the link of Operation Settings > Group Settings > Import Group Information in Settings menu, Import Group Information screen is displayed.
You can add groups from a file in one batch.
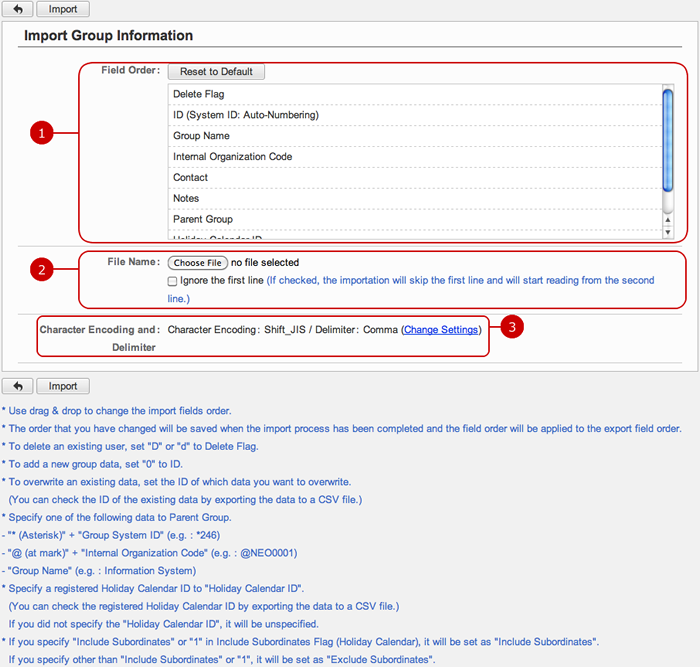
Click "Import" button after all entries have completed and the importing process will be performed.
To Save Groups to File (Export)
When you press the link of Operation Settings > Group Settings > Export Group Information in Settings menu, Export Group Information screen is displayed.
You can save groups to a file.
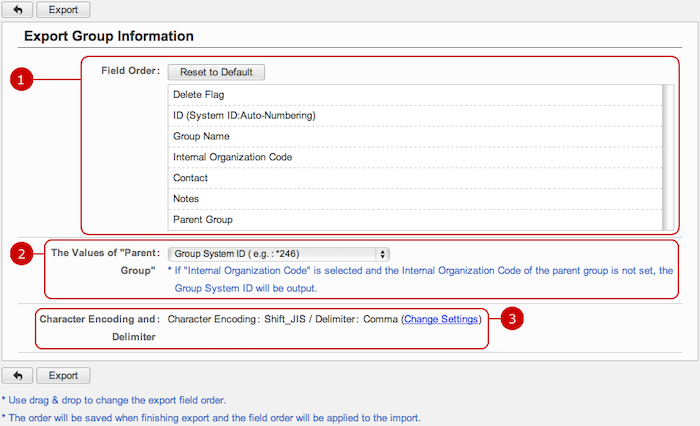
-
The fields of a group to be saved are displayed. You can change the order of the fields.
* Press and hold down the mouse button over a field name and move the mouse up and down and release the mouse button on desired place to change the order.
-
Choose a value output to Parent Group field.
Choose any one of "Group System ID (e.g.*246)", "Internal Organization Code (e.g. @NEO0001)", "Group Name (e.g. Information System)".
The group data is saved in the file as you selected.
* If "Internal Organization Code" is selected and the Internal Organization Code of the parent group is not set, the Group System ID will be output.
-
Select a character encoding and a delimiter.
Press Change Settings link to change the character encoding and delimiter options.

-
Choose a character encoding.
-
Choose a delimiter.
After all entries are completed, when you press "Export" button, exporting groups begins.
To Display Role Management List
When you press the link of Operation Settings > Role Settings > Role Management in Settings menu, Role Management screen is displayed.
- About Role Function
The role feature allows users to create any "collections of users as a role" that cannot be covered by structures of groups.
Without roles, for example, you have to add a certain person as an approver to routes of WorkFlow. When the person has retired, then you have to update all of the routes the person was assigned to.
On the other hand, if you have assigned a role as an approver, only you have to do is to update the one role. Remove the person and add another one to the role.
Roles you created can be used in the following functions.
-
Application administrator settings
-
Access rights settings
-
Recipients of information message
-
Workflow steps in WorkFlow
Usage example: To create an information message to managers
1. Create a role, "Manager Role" which managers are set.
2. Create an information message which recipient is set to "Manager Role".
You can specify a role as a recipient instead of specifying individual users.
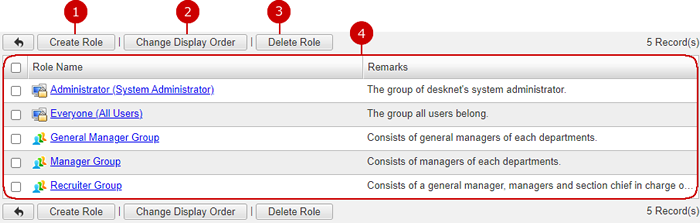
* There are two predefined roles: Administrators (System Administrator) and Everyone (All Users). You cannot change and delete the roles
Administrators... Users who have administrative rights
Everyone... All users
To Create Role
When you press "Create Role" button, Create Role screen is displayed.
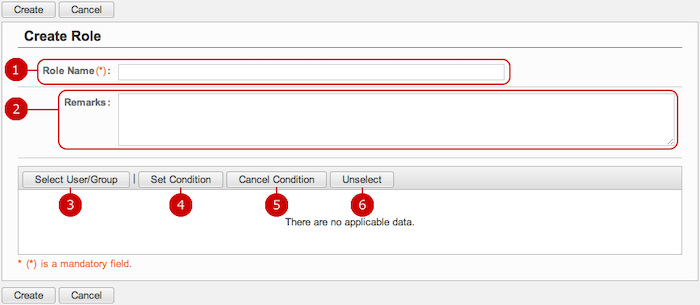
-
Enter a role name.
-
Enter remarks,
Enter description of the role.
-
Select users and groups to be set in the role.
When you press "Select User/Group" button, the user/group selection screen is displayed.
-
Set condition to users and groups you selected.
When you press "Set Condition" button, a window to set condition is displayed.
-
Cancel the condition of users and groups you selected.
When you press "Cancel Condition" button, the setting is canceled and the condition becomes "include".
-
Unselect users and groups.
When the entry is complete, press "Create" button to save the data.
- About Condition Setting Window
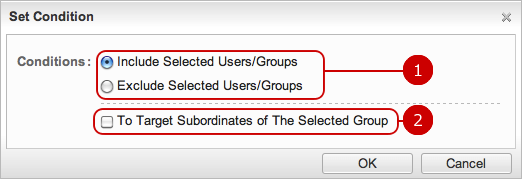
Click "OK" button to complete the settings.
To Edit Role
When you press a link of Role Name, Edit Role screen is displayed.
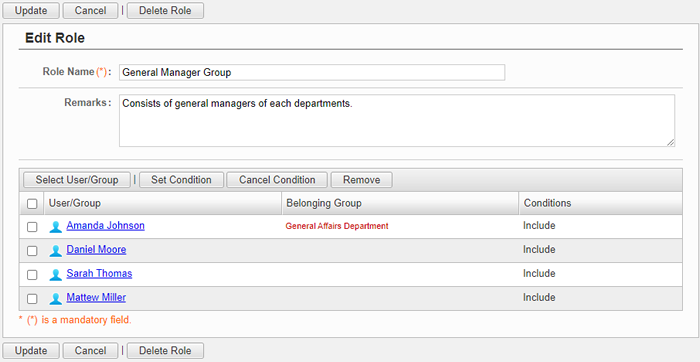
Click "Update" button to save the changes.
To Delete Role
When you press "Delete" button on Recipient Whitelist Settings screen or Update Recipient screen, a confirmation window appears.
When you press "Yes" button, the roles are deleted. The roles are permanently deleted and cannot be recovered.
To Add Roles from File (Import)
When you press the link of Operation Settings > Role Settings > Import Role in Settings menu, Import Role screen is displayed.
You can add roles from a file in one batch.
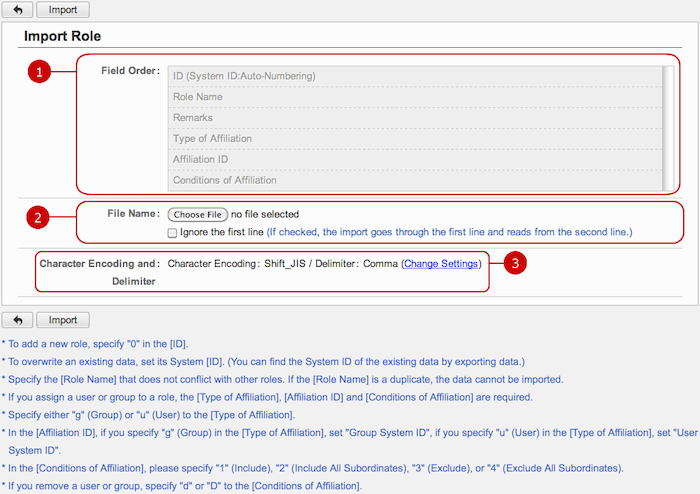
-
The field order is displayed. Please refer to the field order and create a file to be imported.
-
Choose a file. If you would like to ignore the first line, select the check box.
-
Choose a character encoding and delimiter of the file.
Press Change Settings link to change the character encoding and delimiter options.

-
Choose a character encoding.
-
Choose a delimiter.
After all entries are completed, when you press "Import" button, importing roles begins.
To Save Roles to File (Export)
When you press the link of Operation Settings > Role Settings > Export Role in Settings menu, Export Role screen is displayed.
You can save roles to a file.
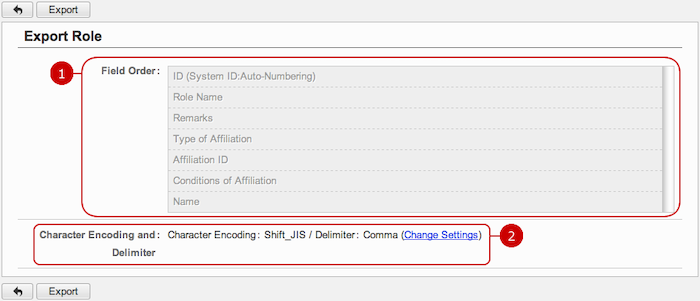
-
The field order is displayed. The data is saved according to the field order.
-
Choose a character encoding and delimiter of the file.
Press Change Settings link to change the character encoding and delimiter options.

-
Choose a character encoding.
-
Choose a delimiter.
When you press "Export" button, exporting roles begins.
To Display Holiday Settings
When you press the link of Operation Settings > Holiday Settings > Holiday Settings in Settings menu, Holiday Settings screen is displayed.
You can check current holiday settings.
About Calendar of Each Function
You can set up the holidays to be displayed in the following functions:
- Date Inputs for Each Applications
- Schedule(Portal) and Facility Reservation
- Schedule
- Facility Reservation
- Time Card
- Project Management
- Transportation/Expenses
- AppSuite
- Presence
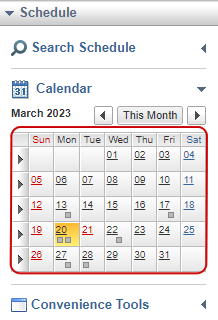
Date Inputs for Each Applications Holidays that have been set in a holiday calendar are displayed in red.
* Saturday is displayed in blue letters and Sunday in red.
* "Day of Week Considered as Holiday" of a calendar will not be displayed in red.
Holiday calendar that has been set to the default group of login user will be applied.
* If a default group is not set, holiday calendar of the first belonging group will be displayed.
* If a holiday calendar is not set to a belonging group or a belonging group is not specified, the general calendar will be used.
- Date Input
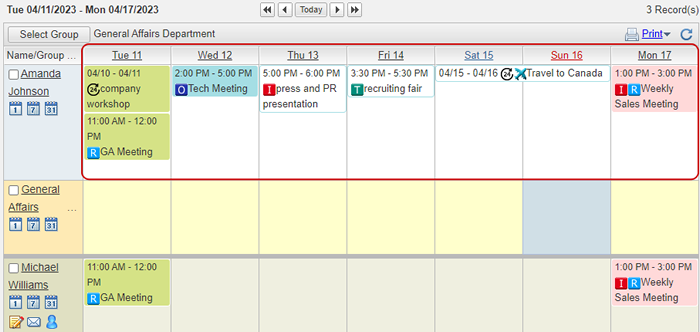
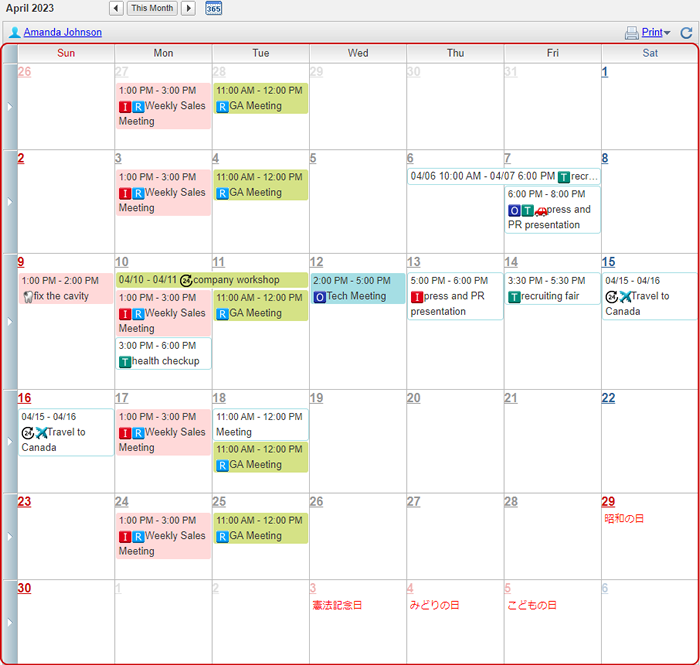
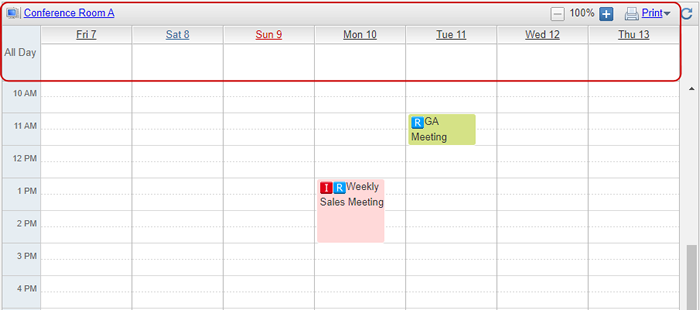
 Schedule
Holidays that have been set in a holiday calendar are displayed in red.
* Saturday is displayed in blue letters and Sunday in red.
* "Day of Week Considered as Holiday" of a calendar will not be displayed in red.
Holiday calendar that has been set to the default group of login user will be applied.
* If a default group is not set, holiday calendar of the first belonging group will be displayed.
* If a holiday calendar is not set to a belonging group or a belonging group is not specified, the general calendar will be used.
The same calendar will be displayed in Schedule of Portal.
- Schedule: Group/Week
- Schedule: Week
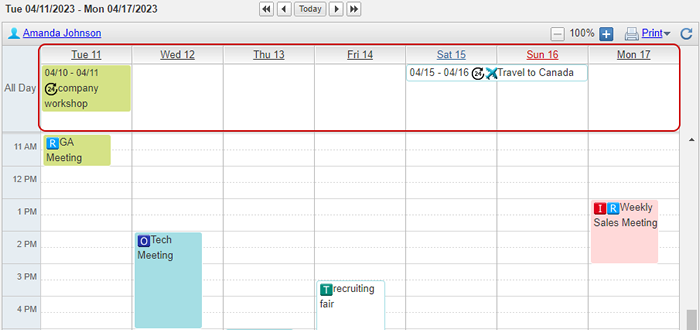
- Schedule: Month
- Schedule: Events selected (Week)
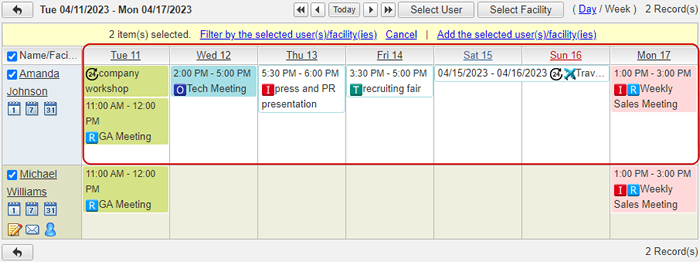
- Schedule: Sub window
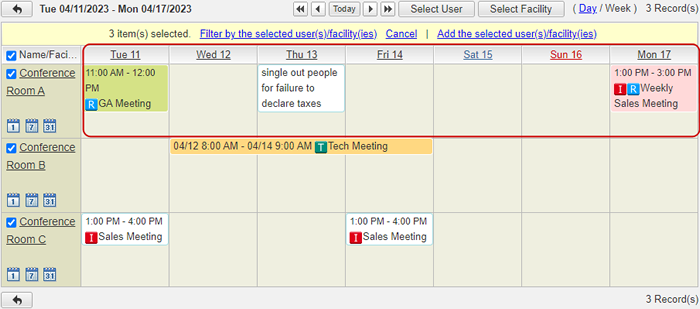
 Facility Reservation
Holidays that have been set in a holiday calendar are displayed in red.
* Saturday is displayed in blue letters and Sunday in red.
* "Day of Week Considered as Holiday" of a calendar will not be displayed in red.
Holiday calendar of managing group of a facility information will be used.
* If the managing group is a general group, general calendar will be displayed.
The same calendar will be displayed in Facility Reservation.
- Facility Reservation: Week
- Facility Reservation: Month
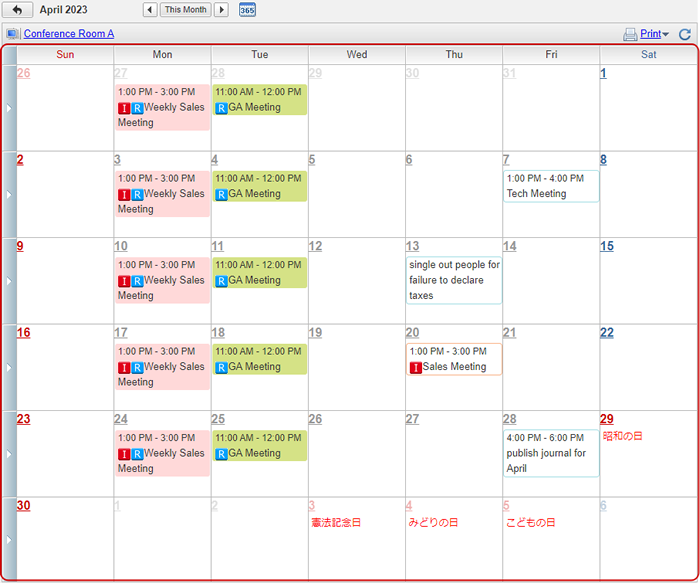
- Facility Reservation: Week

- Facility Reservation: Events selected (Week)
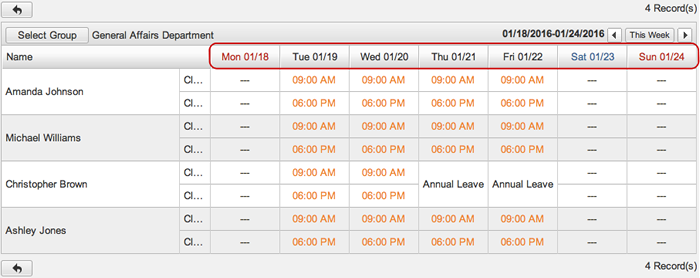
 Time Card
Holidays that have been set in a holiday calendar are displayed in red.
* Saturday is displayed in blue letters and Sunday in red.
Holiday calendar that has been set to the default group of login user will be applied.
* If a default group is not set, holiday calendar of the first belonging group will be displayed.
* If a holiday calendar is not set to a belonging group or a belonging group is not specified, the general calendar will be used.
- Time Card: Work Records
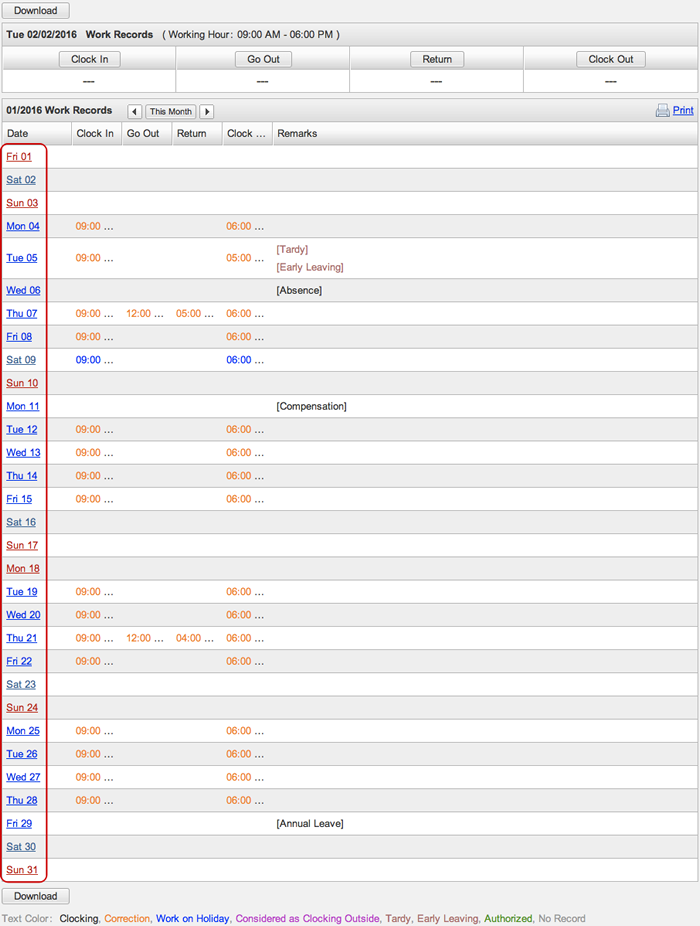
- Time Card: Attendance List
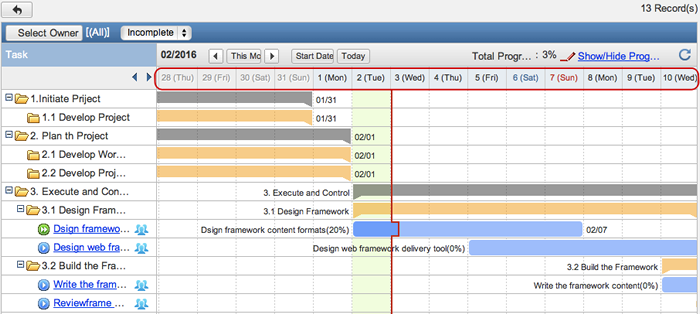
 Project Management
Holidays that have been set in a holiday calendar are displayed in red.
* Saturday is displayed in blue letters and Sunday in red.
* "Day of Week Considered as Holiday" of a calendar will not be displayed in red.
Holiday calendar of managing group of a project will be used.
* If the managing group is not specified, general calendar will be used.
- Project Management: Gantt Chart
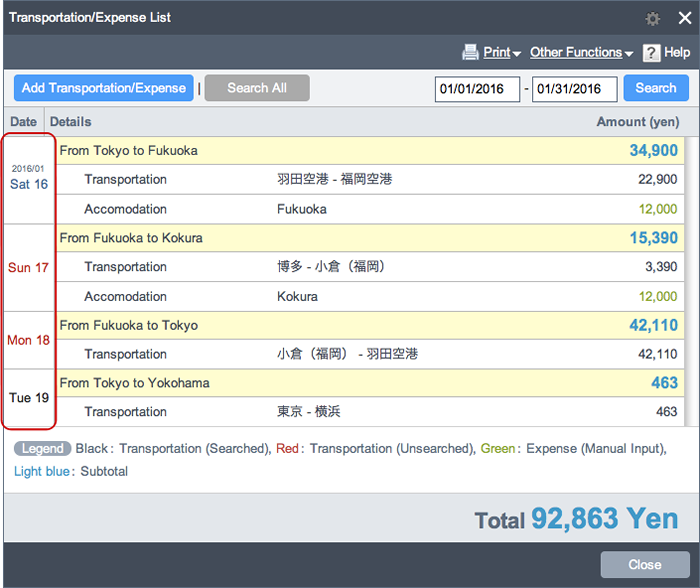
 Transportation/Expenses
Holidays that have been set in a holiday calendar are displayed in red.
* Saturday is displayed in blue letters and Sunday in red.
* "Day of Week Considered as Holiday" of a calendar will not be displayed in red.
Holiday calendar that has been set to the default group of login user will be applied.
* If a default group is not set, holiday calendar of the first belonging group will be displayed.
* If a holiday calendar is not set to a belonging group or a belonging group is not specified, the general calendar will be used.
- Transportation/Expense: List of Transportation/Expenses
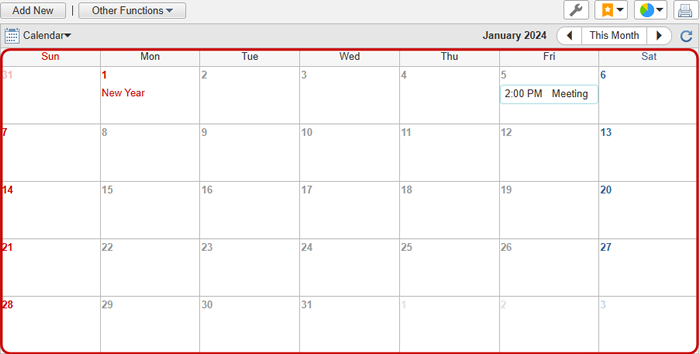
 AppSuite
 Holidays that have been set in a holiday calendar are displayed in red.
* Saturday is displayed in blue letters and Sunday in red.
* "Day of Week Considered as Holiday" of a calendar will not be displayed in red.
Holiday calendar that has been set to the default group of login user will be applied.
* If a default group is not set, holiday calendar of the first belonging group will be displayed.
* If a holiday calendar is not set to a belonging group or a belonging group is not specified, the general calendar will be used.
- Calendar Format Screen
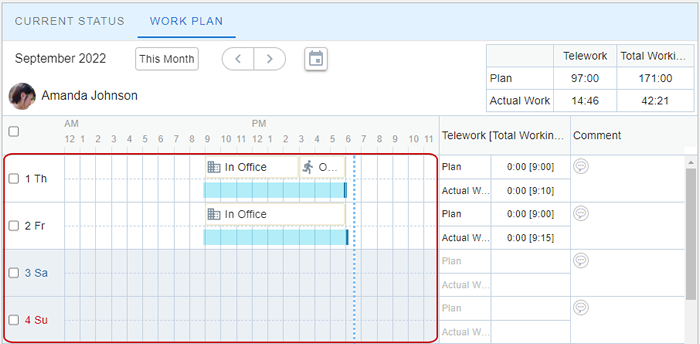
 Presence
 Holidays that have been set in a holiday calendar are displayed in red with a bluish gray background in Presence > Work Plan.
* Saturday is displayed in blue letters and Sunday in red.
* "Day of Week Considered as Holiday" of a calendar will not be displayed in red.
Holiday calendar that has been set to the default group of login user will be applied.
* If a default group is not set, holiday calendar of the first belonging group will be displayed.
* If a holiday calendar is not set to a belonging group or a belonging group is not specified, the general calendar will be used.
- Work Plan
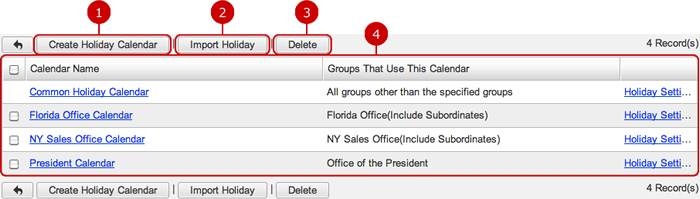
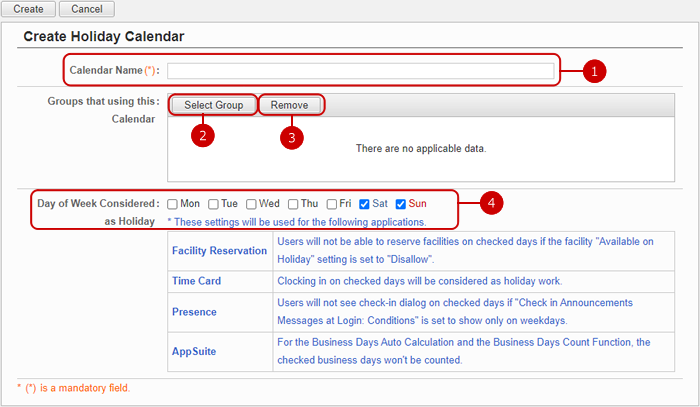
Create Holiday Calendar
When you click "Create Holiday Calendar" button on the Holiday Calendar Settings screen, create calendar holiday screen will be displayed.
-
Enter a holiday calendar name.
-
Select groups that will use the calendar.
When you press "Select Group" button, Group Selection window is displayed. You can select more than one group.
-
Unselect groups.
-
Set days of week considered as holidays.
Selected days will be holidays.
Edit Holiday Calendar
When you click a link of holiday calendar name, an edit screen of the holiday calendar will be displayed.
You can edit the holiday calendar.
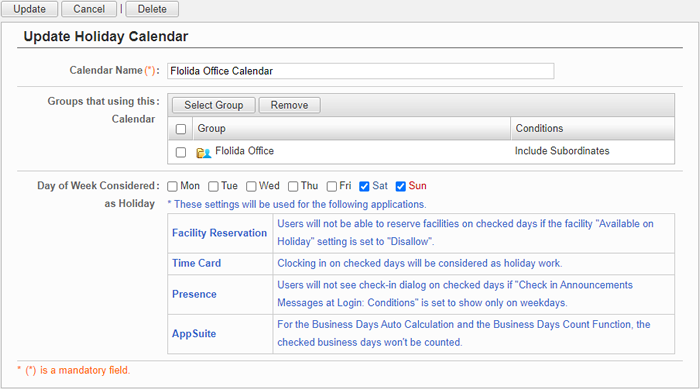
Click "Update" button to save the changes.
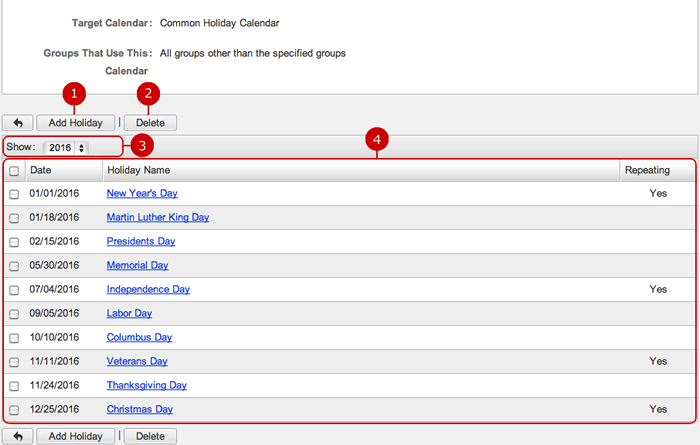
To Display A List of Holidays
When you click "Holiday Settings" on the calendar holiday settings screen, holidays of the selected holiday calendar will be displayed.
You can set holidays for the selected holiday calendar.
-
Display create holiday screen.
-
Delete holidays.
Select holidays that you want to delete from the list and click "Delete" button. You can select more than one holiday.
-
Switch displayed year.
-
A list of holidays are displayed.
When you press a link of holiday name, Edit Holiday screen is displayed.
To Add Holiday
When you press "Add Holiday" button in the list of holidays, Add Holiday screen is displayed.
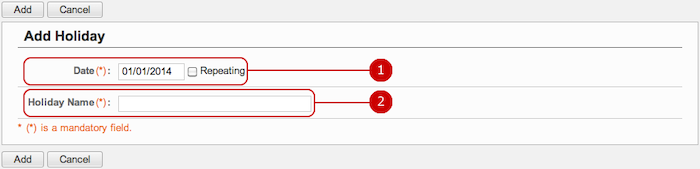
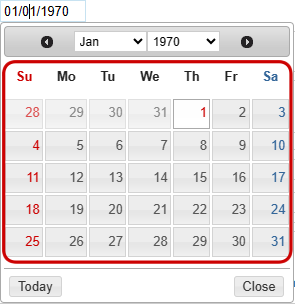
-
Enter year, month, and day of a holiday.
If you check "Repeating", the holiday is repeating every year.
-
Enter a holiday name.
Click "Add" button to save the changes.
To Edit Holiday
When you press a link of holiday name, Edit Holiday screen is displayed.
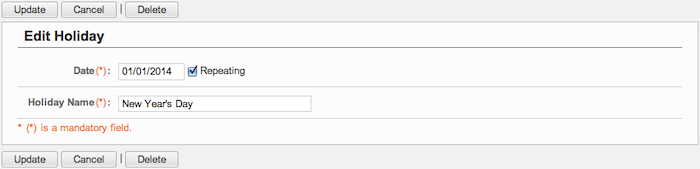
Click "Update" button to save the changes.
To Delete Holidays
When you press "Delete" button on Recipient Whitelist Settings screen or Update Recipient screen, a confirmation window appears.
Click "Yes" button to delete the holidays. The holidays are permanently deleted and cannot be recovered. Please take note.
To Add Holidays from File (Import)
When you press the link of Operation Settings > Holiday Settings > Import Holiday in Settings menu, Import Holiday screen is displayed.
You can add holidays from a file in one batch.
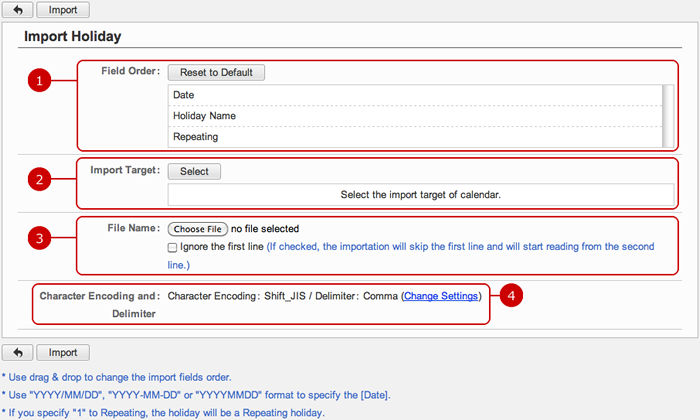
After all entries are completed, when you press "Import" button, importing holidays begins.
To Set Basic Menu Settings
When you press the link of Operation Settings > Holiday Settings > Week Holiday Setting in Settings menu, Week Holiday Setting screen is displayed.
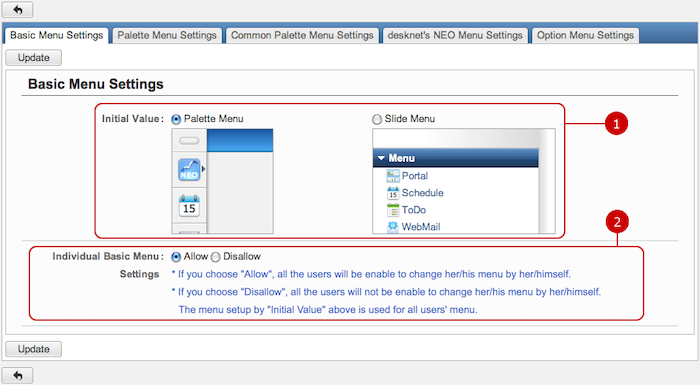
-
Choose an initial menu setting.
-
Choose whether to allow users to use the basic menu settings.
* If you choose "Allow", all users will be able to change their menu individually.
* If you choose "Disallow", all users will not be able to change their menu individually.
The selected menu in "Default Value" above will be applied to all users.
Click "Update" button to save the changes.
To Set Palette Menu Settings
When you press the link of Operation Settings > Menu Settings > Palette Menu Settings in Settings menu, Palette Menu Settings screen is displayed.
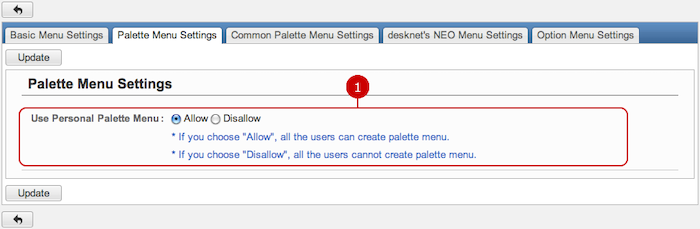
Click "Update" button to save the changes.
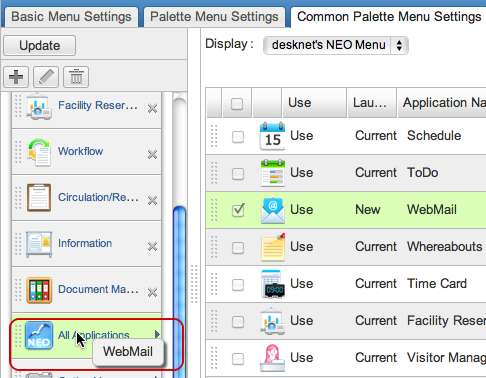
To Set Common Palette Menu Settings
When you press the link of Operation Settings > Menu Settings > Common Palette Menu Settings in Settings menu, Common Palette Menu Settings screen is displayed. You can create the common palette menu by selection and moving menu items to the area on the left.
* This guide describes based on desknet's NEO menu setting screen.
The setting procedure for the option menu and public bookmark is the same.
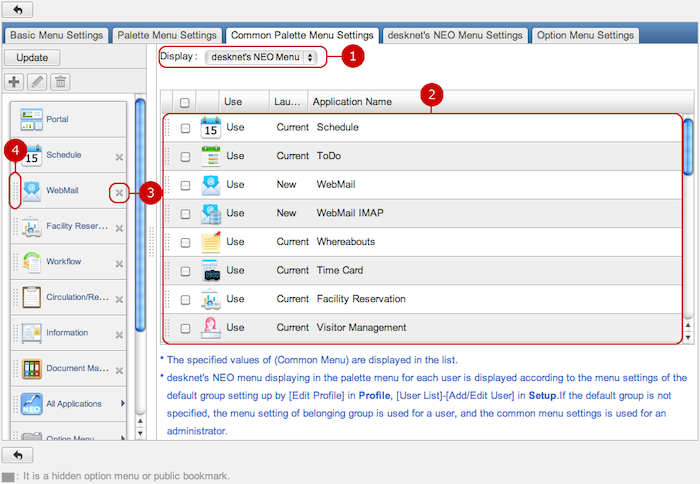
Click "Update" button to save the changes.
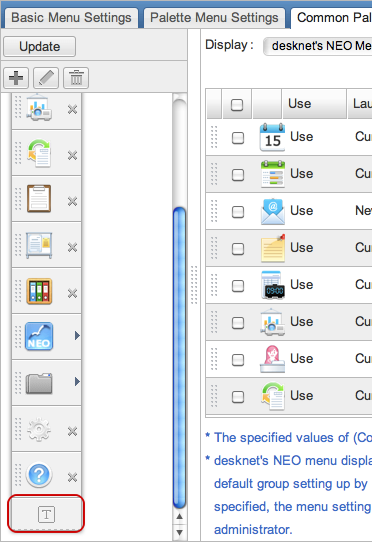
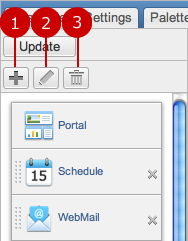
- Switch Palette Menu View
When you press "T" button, the palette menu is switched to display text and icons.
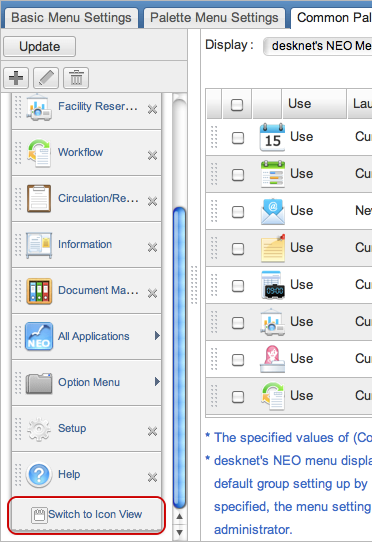
When you press "Switch to Icon View", the palette menu is switched to display icons.
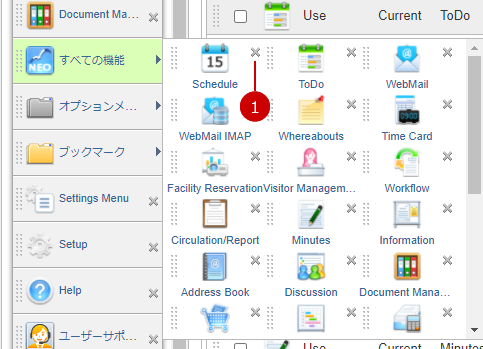
To Manage Menu Groups
You can add, edit and delete menu groups to group menu items.
-
Add a new group.
When you press "Add Menu Group", a new window for the creation of group is displayed.
Enter a name of the group and choose an icon.
-
Edit a menu group name.
When you choose a group you want to change the name and press "Edit Menu Group" button, Edit Menu Group screen is displayed.
Enter a name of the menu group and save it.
-
Delete a menu group.
When you choose a menu group you want to delete and press "Delete Menu Group" button, the menu group is deleted.
* Press and hold down the mouse button over a menu item you want to move and move the mouse and release the mouse button on desired place to change the display order.
- To Move to Menu Group
When you are moving a menu item, if you release the mouse button over a menu group, the menu item is moved to the menu group.
* If you choose a menu item from the list and release the mouse button over a menu group, the menu item is moved in the menu group.
Click "Update" button to save the changes.
To Edit Menu Items in Menu Group
When you press a menu group, menu items in the menu group are displayed.
-
Delete a menu item from the group.
- To Change Display Order of Menu Items
Hold down the mouse button over the grip on the left side of a menu item and release the mouse button over the desired place to change the display order.

Click "Update" button to save the changes.
To Set desknet's NEO Menu Settings
When you press the link of Operation Settings > Menu Settings > desknet's NEO Menu Settings in Settings menu, desknet's NEO Menu Settings screen is displayed.
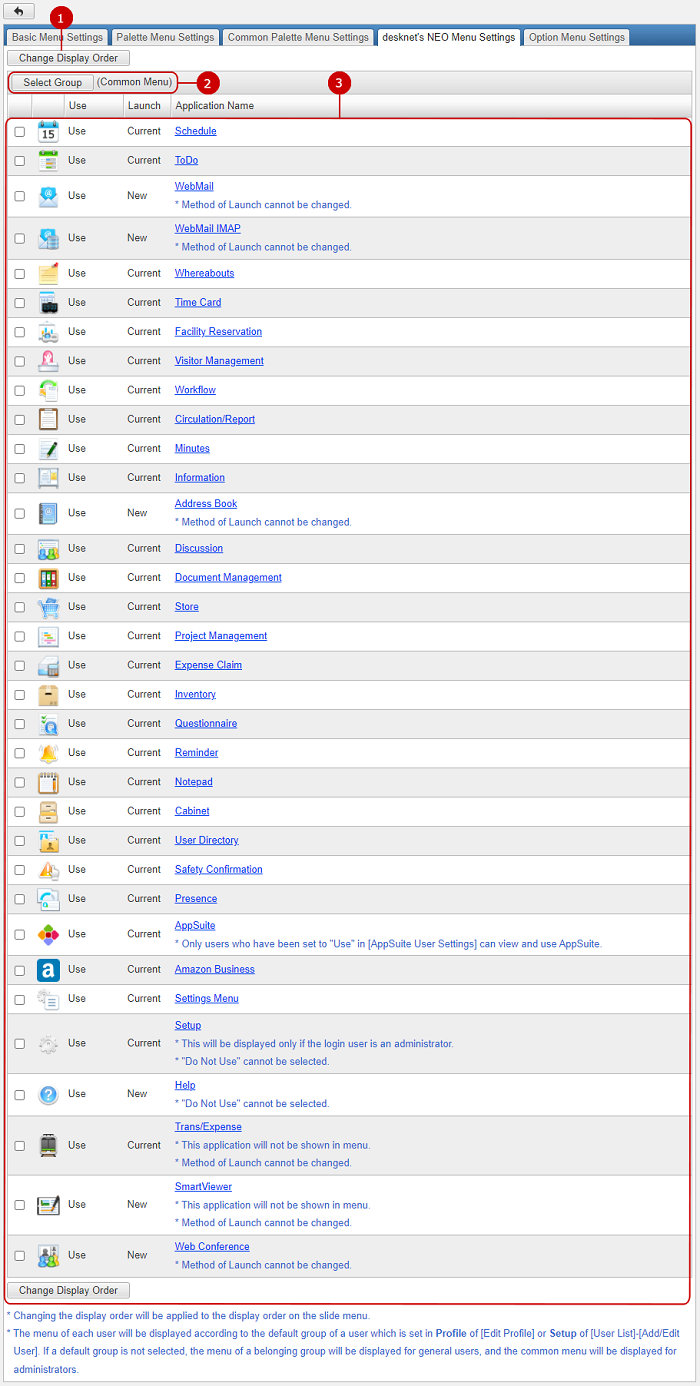
-
Change the display order of applications you selected.
Choose purpose items on the list and then press "Change Display Order" button to switch the screen mode to Change Display Order mode.
In Change Display Order mode, choose the destination of the applications. You can move more than one user at once.
Changing the display order will be applied to the display order on the slide menu.
-
Choose a group you wan to set desknet's NEO Menu Settings.
When you press "Select Group" button, Group Selection window is displayed.
* A group which you have not set desknet's NEO menu settings yet, (Common Menu) applies.
-
Current menu settings are displayed.
The Current menu settings for the group you selected are displayed.
When you press a link of Application Name, Edit Menu screen is displayed.
* The menu of the default group which is set by "Edit Profile" in Profile or "User List" - "Add/Edit User" in Setup for each user is displayed. If default group is not selected, the menu of the belonging group is displayed for general users, and common menu is displayed for administrators.
To Edit desknet's NEO Menu
When you press a link of Application Name, Edit Menu screen is displayed.
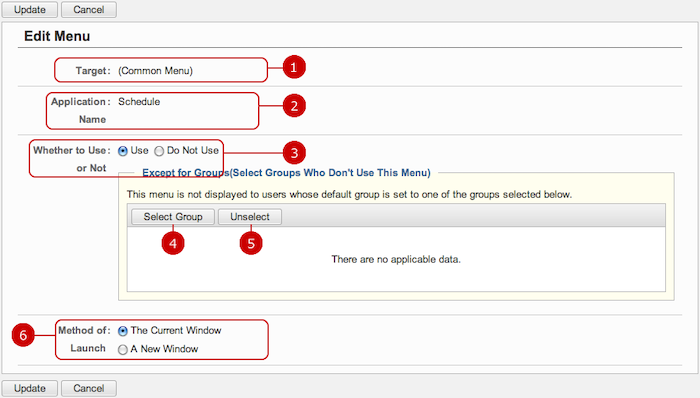
-
The group to be changed is displayed.
The group you selected in desknet's NEO Menu setting screen or (Common Menu) is displayed.
-
The application name is displayed.
-
Choose whether to use this menu.
-
Choose groups you want to exclude to apply the setting.
When you press "Select Group" button, Group Selection window is displayed.
* If you select groups as exceptions, the opposite action applies.
-
If "Use" is selected in Whether to Use or Not,
The menu is not displayed for users whose default group is selected in Except for Groups.
-
If "Do Not Use" is selected in Whether to Use or Not,
The menu is displayed for users whose default group is selected in Except for Groups.
-
Unselect groups.
-
Choose how to launch when the menu link is clicked.
Click "Update" button to save the changes.
To Set Option Menu Settings
When you press the link of Operation Settings > Menu Settings > Option Menu Settings in Settings menu, Option Menu Settings screen is displayed.
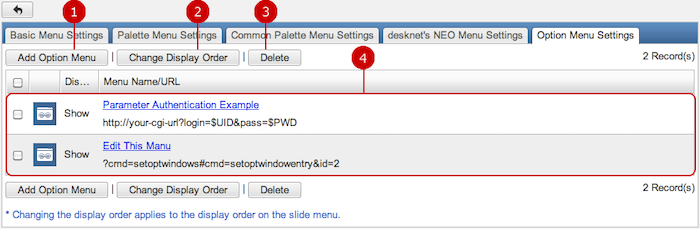
-
Add an option menu.
-
Change the display order of option menus you selected.
Choose purpose items on the list and then press "Change Display Order" button to switch the screen mode to Change Display Order mode.
Choose option menus on the list and then press "Change Display Order" button to switch the screen mode to Change Display Order mode. You can move more than one option menu at once.
-
Delete option menus.
Select option menus you want to delete and press this button to delete them. You can select more than one user.
-
The list of option menus is displayed.
When you press a link of Menu Name/URL, Edit Option Menu screen is displayed.
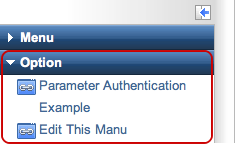
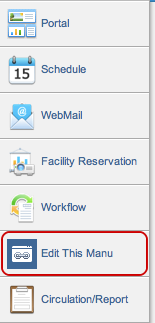
- Using Option Menus
You can use option menus you added in the slide menu, common/personal palette menu.
All option menus are displayed for a slide menu.
For palette menu, option menus which are added to the common/personal palette menu in Common/Personal Palette Menu Design Settings.
* For common palette menu design settings, refer to
To Set Common Palette Menu Settings .
* For personal palette menu design settings, refer to
To Set Personal Palette Menu Settings .
To Add Option Menu
When you press "Add Option Menu" button in Option Menu Setting tab, Add Option Menu screen is displayed.
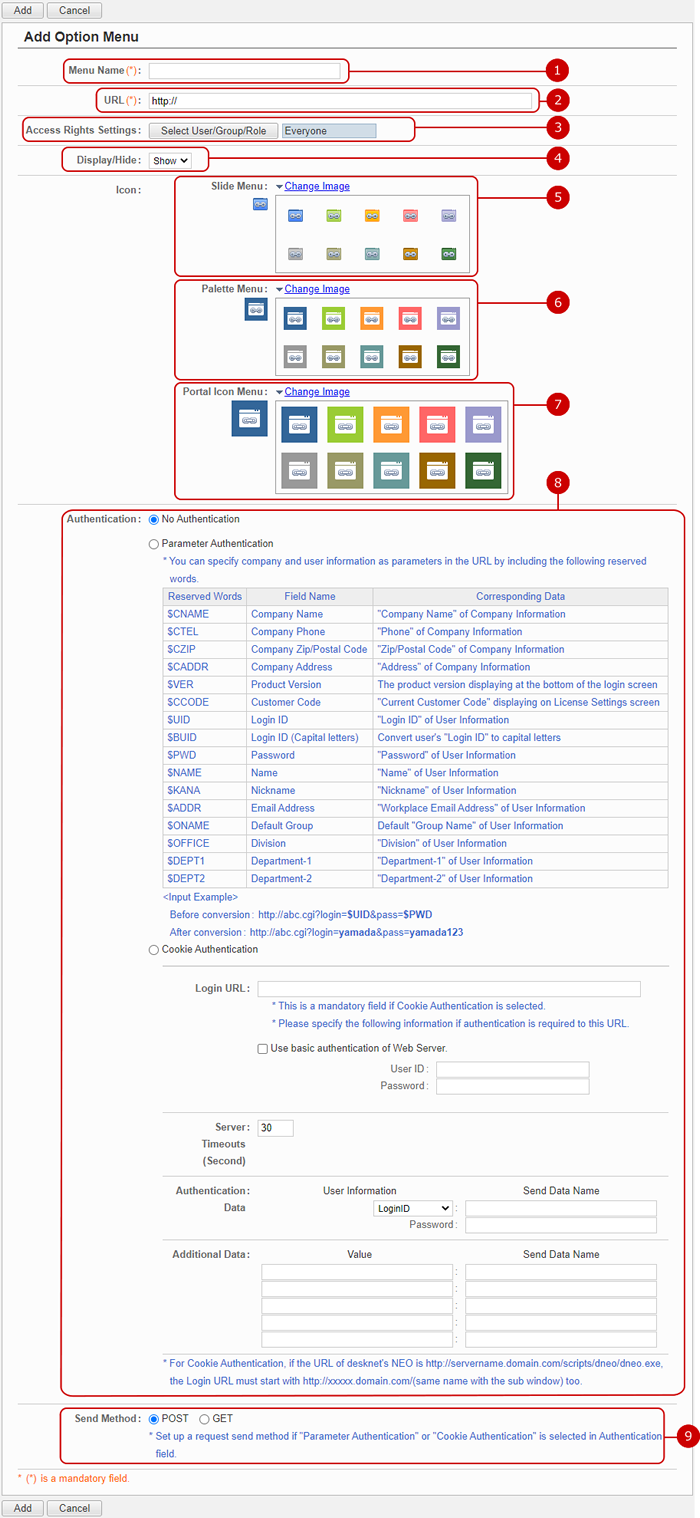
-
Enter a menu name.
-
Enter the URL and set the send method.
When "Authentication" is set to "Parameter Authentication" or "Cookie Authentication", the send method is used to set the method for sending URL requests.
-
Set access rights.
Click "Select User/Group/Role" button to display user, group and role selection window.
The menu is displayed and can be used for users/groups/roles you selected.
-
Choose whether to show or hide the option menu.
-
Choose an icon for the slide menu.
Clicking the link of "Change Image", the following choices will appear.
-
Choose an icon for the palette menu.
Clicking the link of "Change Image", the following choices will appear.
-
Choose an icon for the portal menu.
Clicking the link of "Change Image", the following choices will appear.
-
Set the authentication.
If authentication is required for the site that you specified in URL, you can use either Parameter Authentication or Cookie Authentication.
For Parameter Authentication, you can specify the company and user information by inserting provided reserved words in anywhere in the URL.
If you use Cookie Authentication, a session can be passed by using Cookie.
Please refer to the following for fields required for setting Cookie Authentication.
- Cookie Authentication for Option Menu
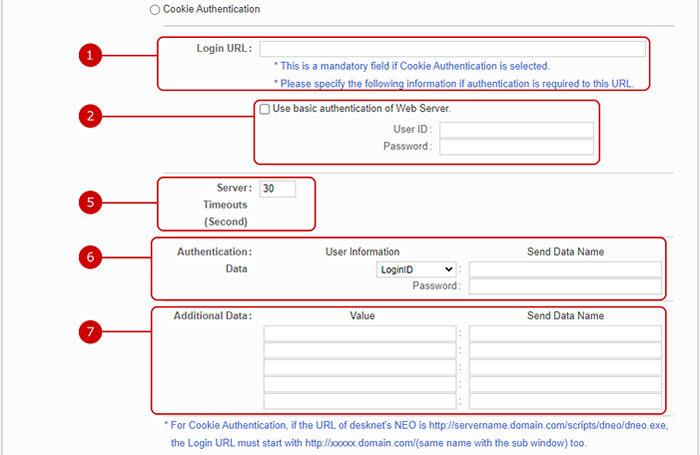
-
When accessing, enter the URL for authentication and set the request send method.
-
Check this option, if Basic Authentication is set to the URL in the Web server.
Enter a user ID and password for the basic authentication.
If you use the basic authentication of a Web server, when you click the option menu first time, "Authentication Dialog" will be displayed.
Enter user ID and password set in the Web server and press "OK" button.
When you click the option menu after the 2nd time, the dialog will not be displayed.
-
Set how long wait until a response is returned when accessing to the login URL.
-
Set user information to be sent to the login URL.
-
Set additional data to be sent to the login URL.URL
Click "Add" button to save the changes.
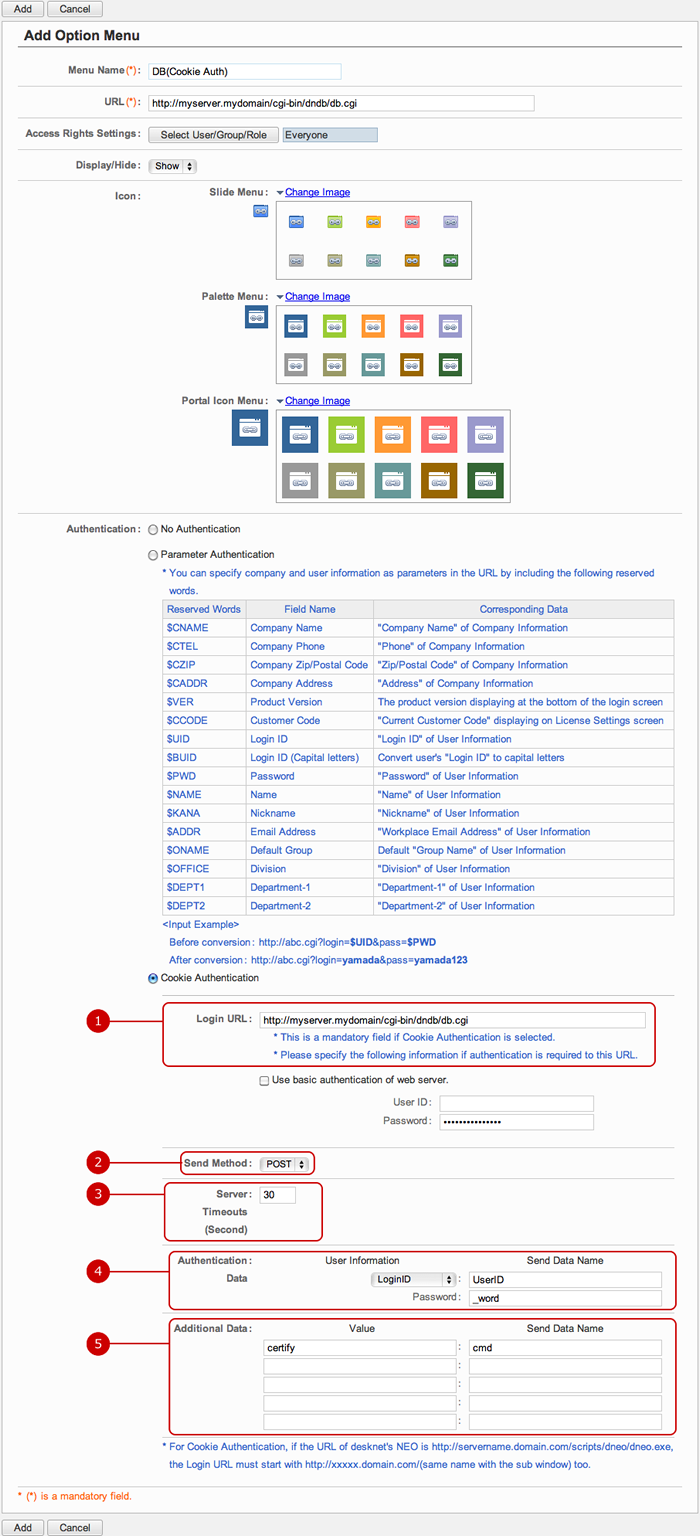
- A setting example for accessing to desknet's DB by using Cookie Authentication
To Edit Option Menu
When you press a link of Menu Name/URL, Edit Option Menu screen is displayed.
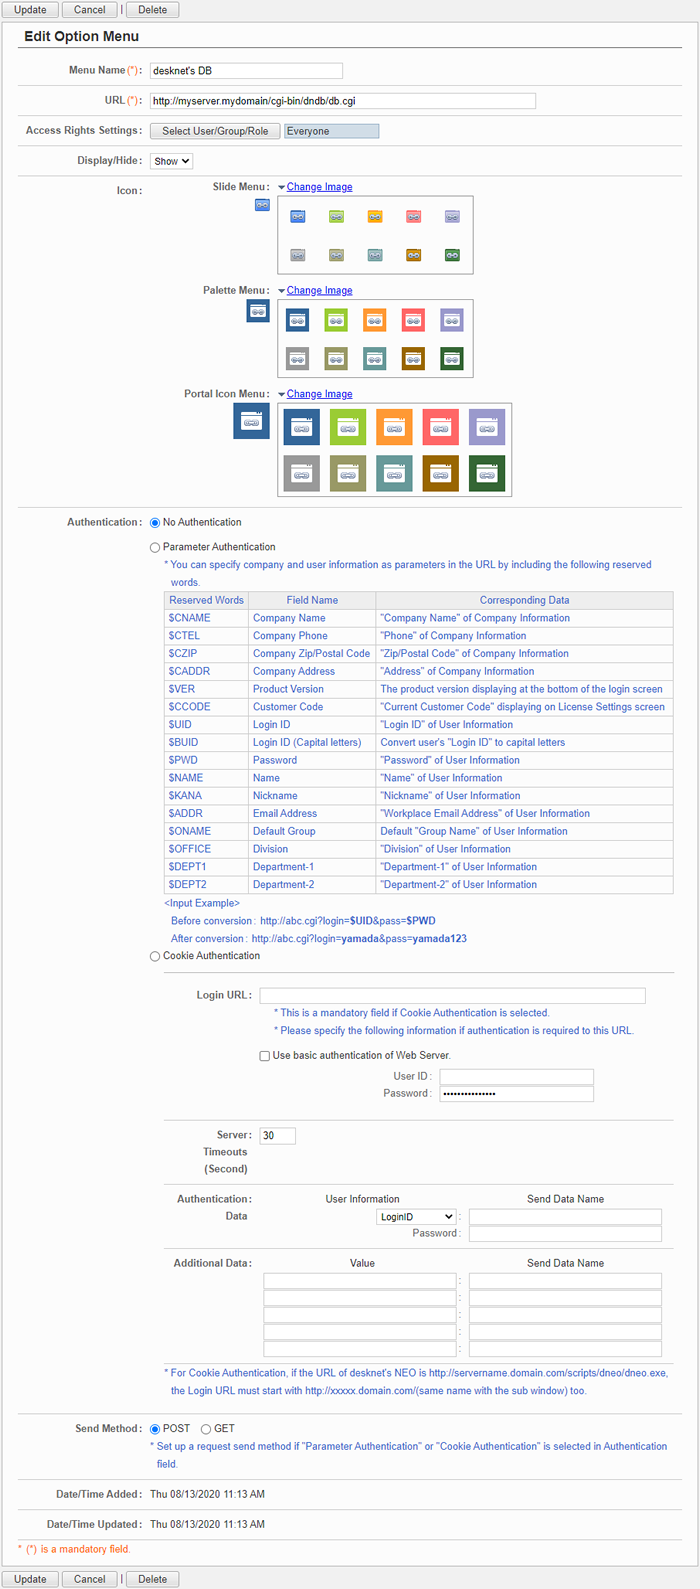
Click "Update" button to save the changes.
To Delete Option Menu
When you press "Delete" button on Recipient Whitelist Settings screen or Update Recipient screen, a confirmation window appears.
When you press "Yes" button, the option menus are deleted. The option menus are permanently deleted and cannot be recovered. Please take note.
To Set Screen Size Settings
When you press the link of Operation Settings > Screen Design Settings > Screen Size Settings in Settings menu, Screen Size Settings screen is displayed.
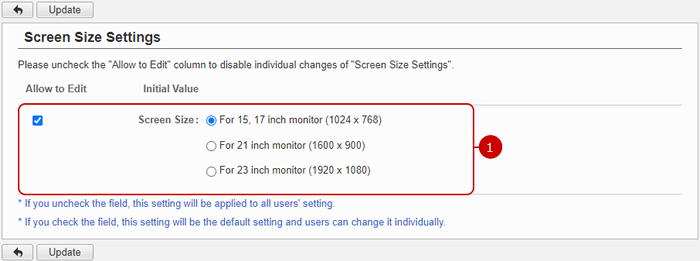
-
Choose a size.
The screen is switched to the size you selected.
* If you uncheck Allow to Edit, this setting cannot be changed by each user individually.
Click "Update" button to save the changes.
To Set Common Design Settings
When you press the link of Operation Settings > Screen Design Settings > Common Design Settings in Settings menu, Common Design Settings screen is displayed.

-
Choose a title color.
A color you selected is used for the initial color setting of the basic color of each application.
Choose a color for portal screens in "Portal Design Settings".
-
Set the initial setting for the email address link.
If "No Hyperlink" is selected, email addresses doesn't convert into links.
If "Launch My Standard EMail Client" is selected, clicking a link of the email address opens the user's default email client.
If "Launch WebMail" is selected, clicking a link of the email address opens the message composing screen of the WebMail application.
If "Launch WebMail IMAP" is selected, clicking a link of the email address opens the message composing screen of WebMail IMAP application.
If this option is selected even though WebMail IMAP application is not enabled, the result is the same as "No Hyperlink".
Links to Email addresses appears on the following screens.
- Each user's profile dialog
- Lists of User Directory application
- Mailto links created by the rich text editor
- Email addresses in other applications
-
Setup the initial value for "Email" link on the Address Book window.
Select whether to use "WebMail" or "WebMail IMAP" in Address Book application.
If "WebMail IMAP" is selected even though WebMail IMAP application is not enabled, the result is the same as "WebMail".
-
Set the initial setting for the email address link.
The destination of "Email" link will be used in the following functions:
- Schedule
- Circulation/Report
- Information
- Cabinet
- Project Management
If you choose "Do not link", "Email" link will not be displayed in each function.
If "Link to "WebMail" application" is selected, message composing screen of WebMail will be displayed when you click an "Email" link.
If "Link to "WebMail IMAP" application" is selected, message composing screen of WebMail IMAP will be displayed when you click an "Email" link.
* If you uncheck Allow to Edit, this setting cannot be changed in the design setting for users.
Click "Update" button to save the changes.
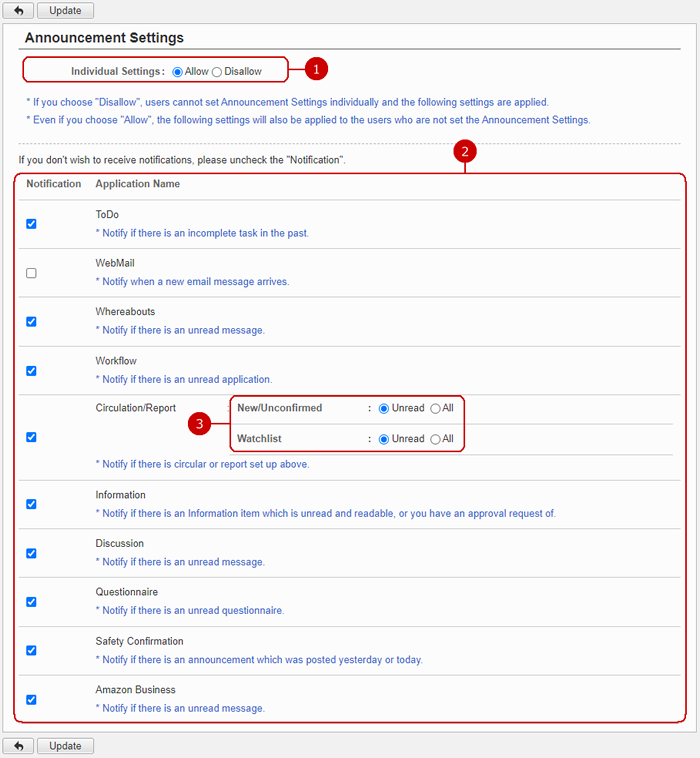
To Set Announcement Settings
When you press the link of Operation Settings > Screen Design Settings > Announcement Settings in Settings menu, Announcement Settings screen is displayed.
You can set the announcement settings for each application.
* The setting fields are displayed according to the display order of desknet's NEO menu items.
-
Choose whether to allow users to change the announcement settings.
* If you choose "Disallow", general users cannot set the Announcement Settings individually.
-
Set the announcement settings for each application.
If you don't wish to receive notifications, please uncheck the "Notification".
-
Choose when to notify me regarding circulars/reports.
-
New/Unconfirmed
Unread: Notify when there's an unread circular/report in the [New/Unconfirmed] list.
All: Notify when there's a circular/report in the [New/Unconfirmed] list.
-
Watchlist
Unread: Notify when there's an unread circular/report in the watchlist.
All: Notify when there's a circular/report in the watchlist.
Click "Update" button to save the changes.
To Set Login Screen Design Settings
When you press the link of Operation Settings > Screen Design Settings > Login Screen Design Settings in Settings menu, Login Screen Design Settings screen is displayed.
You can change the design of the login screen.
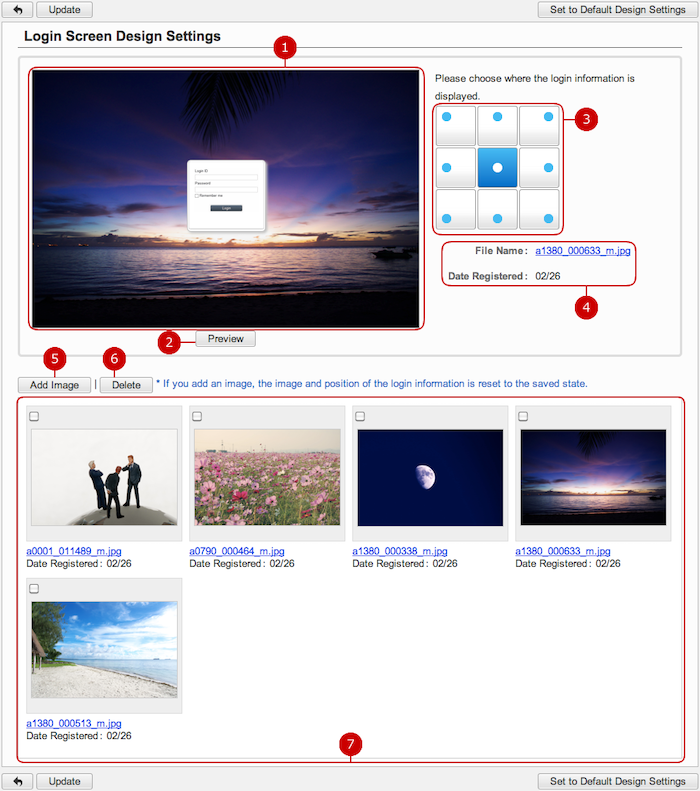
Click "Update" button to save the changes.
To Set Login Logo Settings
When you press the link of Operation Settings > Screen Design Settings > Login Logo Settings in Settings menu, Login Logo Settings screen is displayed.
You can choose a logo for the login screen.
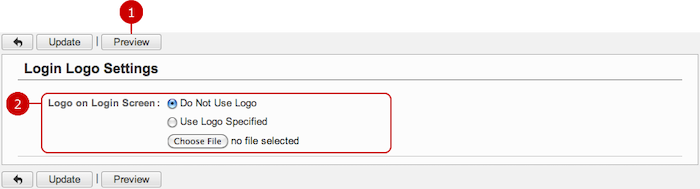
-
Display a preview screen.
When you press the button, a logo is added to the login screen and display in a new window.
You can see how it looks actually.
-
Choose a logo for the login screen.
If "Use Logo Specified" is selected, an image you selected is displayed in the login screen.
Click "Update" button to save the changes.
To Set Mobile Settings
When you press the link of Operation Settings > Mobile Settings > Mobile Login Settings in Settings menu, Mobile Login Settings screen is displayed.
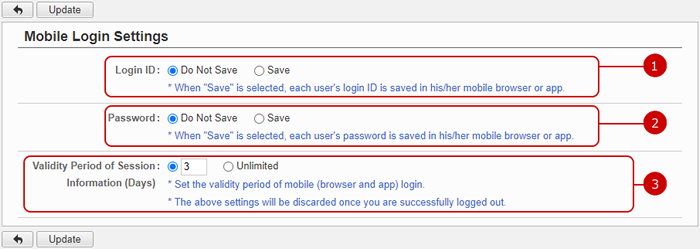
Click "Update" button to save the changes.
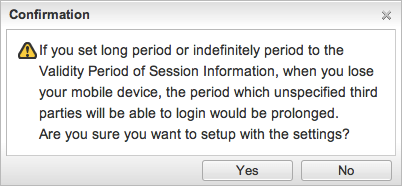
- If you enter greater than or equals 4 days or choose "Indefinite Period", a confirmation screen is displayed.
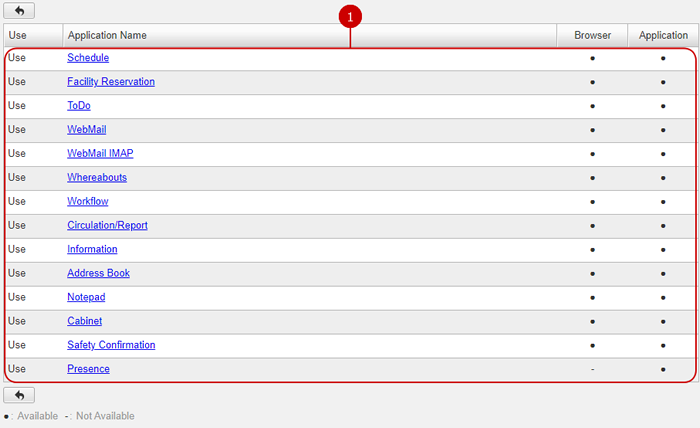
To Set Mobile Menu Settings
When you press the link of Operation Settings > Mobile Settings > Mobile Menu Settings in Settings menu, Mobile Menu Settings screen is displayed.
Set the menu used by the mobile version.
To Edit Mobile Menu
When you press a link of each application name, Edit Menu screen is displayed.
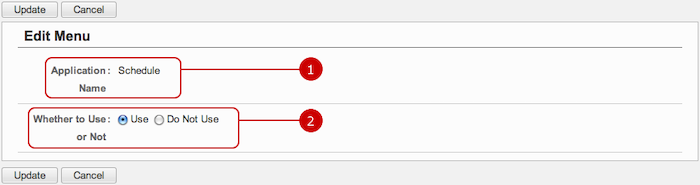
-
The application name is displayed.
-
Choose whether to use this menu.
Click "Update" button to save the changes.
To link Mobile App
When you press the link of Operation Settings > Mobile Settings > Mobile Login Settings in Settings menu, Mobile Login Settings screen is displayed.
Mobile App and Linked App can be selected.

-
Alcohol Check and Linked App can be selected.
Press the [Link Application] button to display the App Selection dialog.
(For more information, please refer to AppSuite User Manual: Common features > Application selection .)
By clicking the x icon, selected applications can be unselected.
Click "Update" button to save the changes.
To Restrict Downloading File
When you press the link of Operation Settings > Mobile Settings > File Download Restriction Settings in Settings menu, File Download Restriction Settings screen is displayed.
Select the applications you want to restrict downloading in the mobile version.
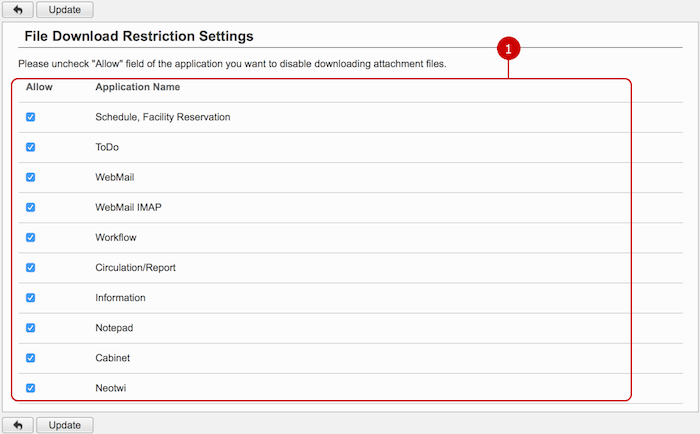
Click "Update" button to save the changes.
To Set Individual Mobile Menu Display Settings
When you press the link of Operation Settings > Mobile Settings > Individual Mobile Menu Display Settings in Settings menu, Individual Mobile Menu Display Settings screen is displayed.
Choose whether to allow users to set the mobile browser menu settings.

Click "Update" button to save the changes.