Create an App from Scratch
Click the [Create App] button to display the Create Application menu dialog.
You can freely configure the application from the beginning by clicking the create link from the beginning.
* Only users with application creation authority can create it.
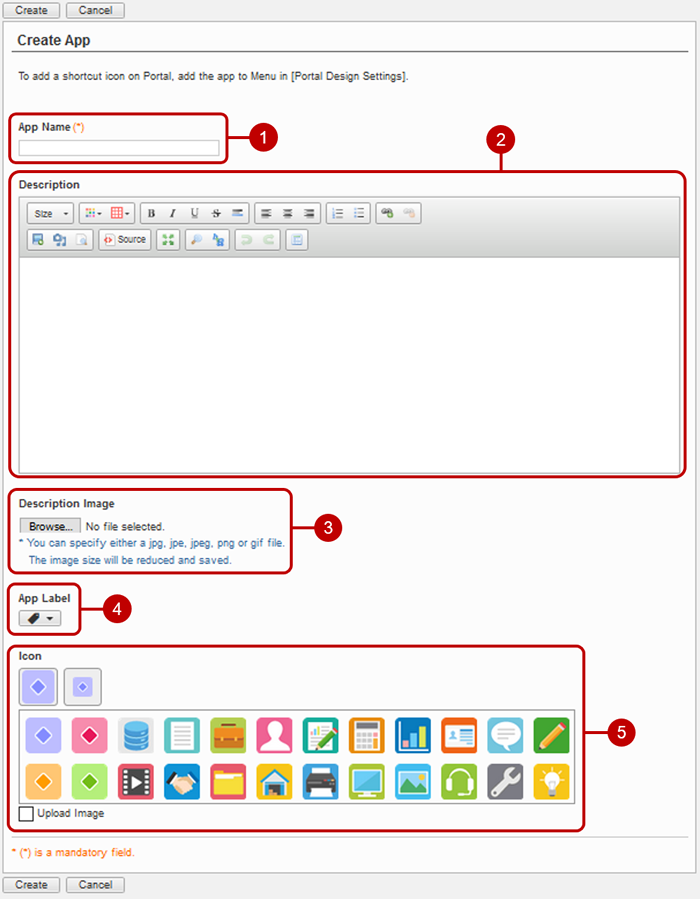
- Enter the application name.
-
Enter a description for your application.
You can use text decoration and images freely.
(For details, see the description of Rich Text Editor Feature in the User's Manual.)
-
Set the image to the description of the application.
* The description image can display up to 735 pixels wide and 735 pixels high.
-
Select an application label.
Select the label you want to set for the application from the label list and click the [OK] button.
* If you select a label on the application list screen and move to the application creation screen, that label will be selected.
* You can set the label displayed in the application list.
-
Set the application icon.
A list of icons will be displayed. Select the icon to use.
* If you check Upload image, it will switch to image selection display.
Upload the image you want to use for each icon.
* Up to 50KB images can be uploaded.
Click "Create" button to save and add the data.
Create an Workflow App from Scratch
Click the [Create App] button to display the Create Application menu dialog.
Click the "Worflow App" which is aside for "Create from scrach" to be able to freely configure the app from the beginning.
Details screen of created workflow app can be used as application form on workflow. And You can manage application data on AppSuite.
* It can be created when [System Management > Rights Settings > Create Workflow App] is set as "Allow".
* It can be created by following users who has app creation right.
- System Administrator
- Workflow Administrator of All Applications
- Application Form/Workflow Administrator
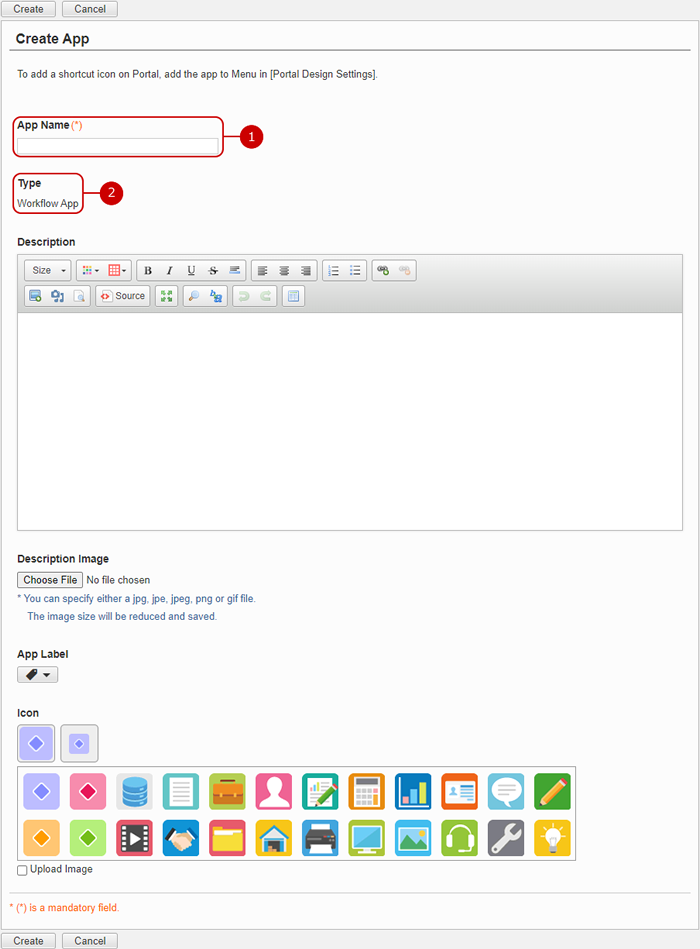
Click "Create" button to save and add the data.
* To users can applicate with workflow app.
- Create workflow app. (Workflow application form is created with same name as workflow app.)
- Create application form on screen design.
- Go to edit application form, and set "Workflow Steps" and set "Form Status" as "Complete".
- Go to AppSuite, activate workflow app.
- Check that you can create application with application form above on workflow.
Copy and create application
Click the [Create App] button to display the Create Application menu dialog.
Duplicate the application and press the create link to duplicate the settings and screens of the already created application and create a new application.
* Only users with application creation authority can create it.
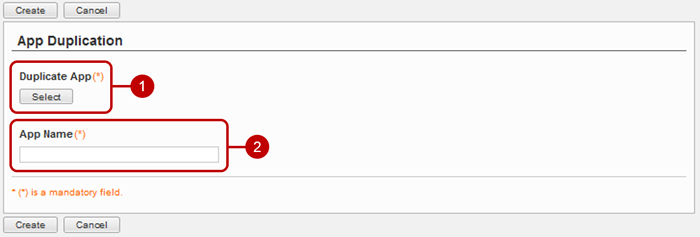
Click "Create" button to save and add the data.
Create an application from a template
Click the [Create App] button to display the Create Application menu dialog.
Click the Create from Template link to bring up the Create from Template menu dialog.
* You can create an application from the template created by the application administrator and your own template file.
* Only users with application creation authority can create it.
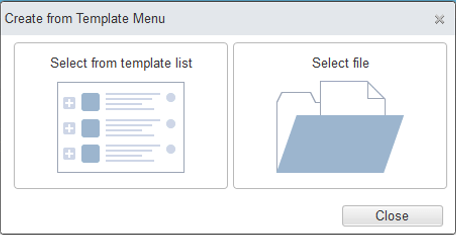 Select from template list
 Click the [Select from template list] button to display the template list screen.
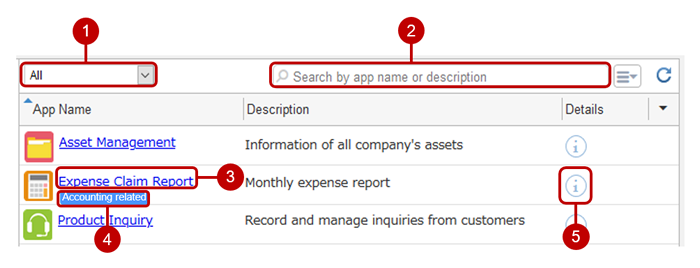 Select File
 Click the [Select File] button to display the template import dialog.

-
Please select a template file.
Click the [Next>] button to display the confirmation dialog for application creation.
Click the [Create] button in the application creation confirmation dialog to save the data.
Create application from Excel/CSV
Click the [Create App] button to display the Create Application menu dialog.
When you click the import link from CSV file, the application creation (Import from Excel/CSV file) dialog is displayed.
* Only users with application creation authority can create it.
Application creation (Import from Excel/CSV file) (1/2) 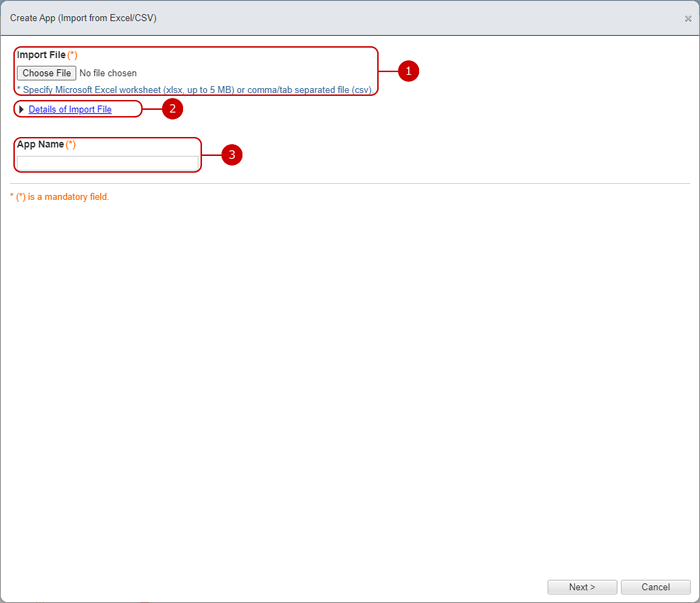
- Choose a file to import.
- Click it to display specification of the file to import.
- Enter the application name.
Click the [Next>] button to display the setting screen for the part to be created.
Application creation (Import from Excel/CSV file) (2/2) 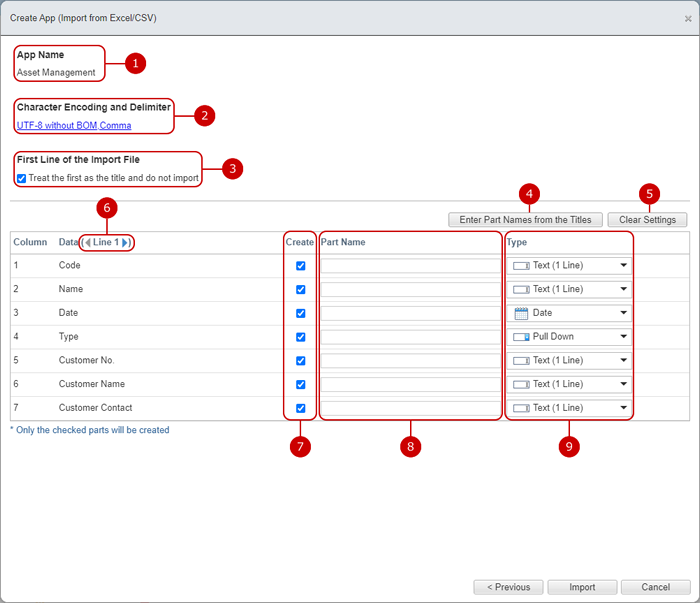 Initial selection of part type
 The data of 1000 cases (from the second line) in the file is sampled, and the optimally considered parts are automatically selected and displayed.
The conditions judged for each part type are as follows.
If the value of the target column (row) does not exist in the data to be sampled, it is determined as "Text (1 Line)" type.
| Parts |
Conditions judged by the component type on the left (when all conditions are met) |
| Date |
-All the values of the target column (column) correspond to any format of "YYYY/MM/DD", "YYYY-MM-DD", or "YYYYMMDD".
|
| Time |
-All target column values correspond to either "hh:mm" or "hhmm" format.
|
| Date/Time |
-All the values of the target column (column) correspond to either "YYYY/MM/DD hh:mm", "YYYY-MM-DD hh:mm", or "YYYYMMDDhhmm" format.
|
| Radio Button |
-None of the conditions of "Date", "Time" and "Date/Time" are met.
-There is no value that includes a line break in the target column.
-The type of the value of the target column is 2 to 5.
-All target column values are 50 characters or less.
|
| Check Box |
-None of the conditions of "Radio Button", "Date", "Time" and "Date/Time" are met.
-There are 2 to 5 types of items obtained by dividing the target column value with a line break.
-All the above items are 50 characters or less.
|
| Pull Down |
-None of the conditions of "Date", "Time" and "Date/Time" are met.
-There is no value that includes a line break in the target column.
-The type of the target column value is 1 or 6 to 10.
-All target column values are 50 characters or less.
|
| List box |
-None of the "Pull Down", "Date", "Time", and "Date/Time" conditions are met.
-There are 6 to 10 types of items obtained by dividing the target column value with a line break.
-All the above items are 50 characters or less.
|
| Number |
-The conditions of "Radio Button", "Check Box", "Pull Down", "List Box", "Date", "Time", and "Date/Time" are not satisfied.
-All the values in the target column are within 15 digits and within 5 digits after the decimal point (the integer part may contain commas every 3 digits).
|
| Text (1 Line) |
-The conditions of "Radio Button", "Check Box", "Pull Down", "List Box", "Date", "Time", and "Date/Time" are not satisfied.
-There is no value that includes a line break in the target column.
-All target column values are 100 characters or less.
|
| Text (Multi Line) |
-None of the conditions of "Text (1 Line)", "Radio Button", "Check Box", "Pull Down", "List Box", "Number", "Date", "Time", "Date/Time" are satisfied.
|
When all the input is completed, click the [Import] button and a confirmation dialog will be displayed.
Click the [Yes] button in the confirmation dialog to start the import.
When the import is completed, the import complete dialog is displayed.
You can check the data in the list format screen by clicking the [Check imported data] button in the import complete dialog.
* If there is data that failed to be imported, a link to download the log file will be displayed in the import completion dialog.
Create an App from App Library
Click the [Create App] button to display the Create Application menu dialog.
Click the [Open App Library] button to display app library list.
* Only users with application creation authority can create it.
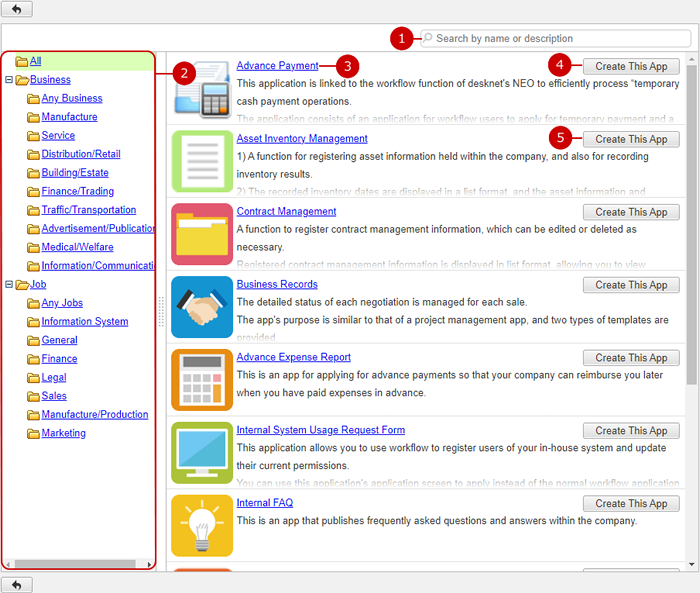
- You can search the apps with the keyword. You can find the apps with matched name or description in specified folder.
-
App category folders are displayed. Click the folder to only apps of the category are displayed.
※The apps are displayed in language which is set in [Setup > Basic Settings > Language and Time Zone Settings].
-
Click app name to display all details and screen samples of the app.
※The apps are displayed in language which is set in [Setup > Basic Settings > Language and Time Zone Settings].
- Click [Create This App] to display app createtion dialog box. Click [Create] in the dialog box to create apps in it.
- Click [Get This App] to display introduction web site of the app on new screen.


