Display application list
When you press the application management link in the setting menu, the application management screen is displayed.
You will see a list of labels that classify your applications and a list of applications that are classified by label.

-
Create a new application.
Click the [Create App] button to display the Create Application menu dialog. There are five ways to create an application.
* Only displayed for users who have permission to create applications.
-
Create from scratch
You can create an application from scratch.
(For more information, please refer to: Create an application from scratch )
-
Create application by copying
Create a new application by copying the already created application.
(For more information, please refer to: Copy and create application )
-
Create from template
Create a new application using the application template created by the application administrator.
(For more information, please refer to: Create an application from a template )
-
Import from CSV file
You can create an application from a CSV file. You can create an application and register (import) all data at the same time.
(For more information, please refer to: Create application from CSV )
-
Open App Library
You can choose and create an application which is provided by NEOJAPAN.
(For more information, please refer to: Create an App from App Library )
-
Only those that match the status of the selected application are displayed in the list.
Toggle between "Active", "Under Maintenance", "Disabled" or "All".
-
Perform a keyword search.
Search for [App Name] or [Description] in the application list that matches all or the selected label conditions.
* If you want to specify more than one keyword, use space to separate keywords.
* Specifying multiple keywords will perform "OR" search. This means the search results contain either one or more keywords that you specified.
-
Categorize applications by label, such as "All" or "My created apps”.
When you press the link of each label, the applications classified by the label are displayed in the list.
-
A list of applications will be displayed.
You can check the icon, application name, set label, number of data, attached file size, access date, application details, etc.
Click the application name link to display the application screen design screen.
Press the details icon to display the application details dialog.
In the application details dialog, application name, label, description image, description, number of data, attached file size, number of aggregation results, storage period, access date and time, administrator, user, creator are displayed.

Manage Label
In the label list of the application list, labels can be added, changed, and deleted.
* Labels can be created up to 2 levels.

・Add/edit/delete label from menu
The menu is displayed by pressing the [▼] button that is displayed when the mouse is placed over the label.

・Move label
You can change the position of the label by holding down the mouse button on the label and moving the mouse up and down and releasing the mouse button at any position.

・Paste from label list

* You can paste the label by holding down the mouse button on the label and then releasing the mouse button on any application in the application list.
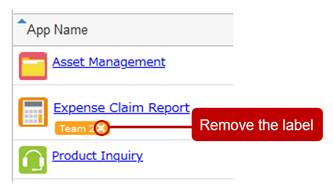
・Peel off the label
Press the X to the right of the label name to remove the label attached to the application.

Set the capacity limit
Press "App"-"Disk Space Settings" from the header menu to display the quota setting screen.

-
Set the period to save data/aggregate results.
-
Set the total size of files that can be attached to one "Attachment Files" part.
Click "Update" button to save the changes.
Save (export) data to a file
When you click "Export to CSV File" of "Operational Management" from the header menu, the Export to CSV file dialog is displayed.

-
Save the selected target data.
If your application uses table part, table part are also displayed as options.
-
Select character code.
-
Choose a delimiter.
-
If you want to output the part name to the first line of the file, click "Output the part name to the first line" and check it.
-
Select the value of "Select Group" part.
-
Select the values for the "Select User", "Added By", and "Updated By" parts.
After all the input is completed, click the [Export] button to display the CSV export completion dialog.
You can save the CSV file by clicking the download link in the CSV export complete dialog.


