To Setup Access Key Usage
When you press the link of External Service Links Settings > Access Key Usage setting in Settings menu, Access Key Usage Settings screen is displayed.

-
To Setup Access Key Usage.
-
Allow - All users can use Access Key.
*If Individual Access Key settings is setup, Individual settings takes priority.
-
Disallow - All users can not use Access Key.
*Even if Individual Access Key settings is setup, this setting takes priority.
-
Restrict by IP Address: Usage of Access Key is restricted with the settings in "Detail Settings".
-
Enter an IP address.
-
Adds the entered IP address.
-
Deletes the selected IP addresses.
-
This is the list of IP addresses you added.
-
Set whether to allow or disallow the usage of Access Key to the added IP addresses.
-
Allow - Access Key can be used only if the source of IP address is match to one of the added IP addresses.
-
Disallow - Access Key cannot be used if the source of IP address is match to one of the added IP addresses.
Click "Update” to save.
To Setup User Access Key Usage
When you press the link of External Service Links Settings > Individual Access Key Usage setting in Settings menu,
Individual Access Key Usage Settings screen is displayed.
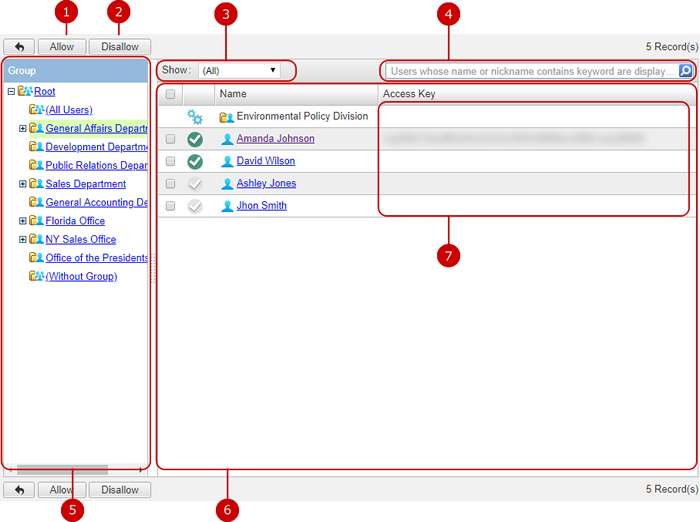
-
To setup Usage of Access Key to allow for the selected user.
-
To setup Usage of Access Key to Disallow for the selected user.
-
Select users from the list.
- “Allow” - Show the users with Usage of Access Key setting set to "allow”.
- “Disallow”’ - Show the users with Usage of Access Key setting set to “Disallow”’.
*Only if ”(All Users)” is selected, Groups will be displayed on the list.
-
Searches users who match the Name and Nickname.
If you want to specify more than one keyword, use space to separate keywords.
Specifying multiple keywords will perform "OR" search. This means the search results contain either one or more keywords that you specified.
If a keyword is specified,Groups will not be displayed on the list.
-
The list of groups is displayed.
-
The list of users and groups is displayed.
Click the “Allow" and “Disallow" icon to change the Access Key Usage setting.
 - The users which can use Access Key
 - The users which cannot use the Access key
For users which haven’t setup the Access Key Settings even once
the value in setup>External Service Links Settings>Access Key Usage Settings[Access Key usage] is used.
When [Restrict by IP Address] is set, it will be the same as when [Allow] is set.
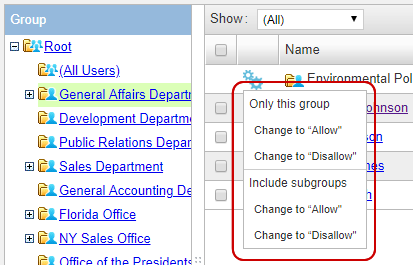
By pressing the [change affiliated user]icon, you can change the usage setting of the access key in organization only or including subordinate organization.
-
The Access Key set for the user is displayed.
In Individual Access Key Setting list, Clicking the user name link will display the detailed settings screen.
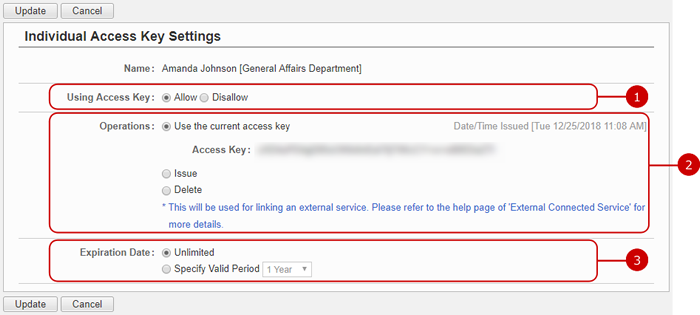
-
To setup Usage of Access Key to allow for the user.
-
Select the operation to be performed when changing the setting.
-
User the current access key - use the Access key as it is.
*It can be selected if the Access Key has already been registered.
-
Issue - Issue Access Key for the user.
*If the Access Key has already been registered, it will be reissued and the current Access key will be disabled.
-
Delete - delete the Access Key for the user.
* If Access Key hasn’t already been registered, nothing will be implemented.
-
To Setup Access Key Expiration Date.
Unlimited is the default setting.
Click "Update” to save.
To Setup ChatLuck Link Settings
When you press the link of External Service Links Settings > ChatLuck Link Settings in Settings menu, ChatLuck Link Settings screen is displayed.
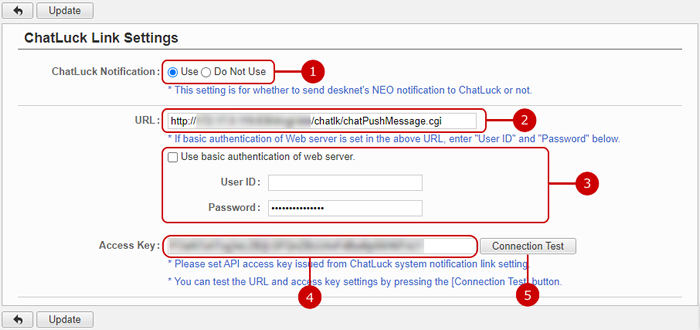
- Choose whether to send a ChatLuck notification or not.
-
Enter ChatLuck URL.
* Windows example : http://servername.com/scripts/chatlk/chatPushMessage.exe
* Linux example : http://servername.com/cgi-bin/chatlk/chatPushMessage.cgi
- If authentication method is set on the ChatLuck server, enter the user ID and password.
- Enter ChatLuck API access key.
- Perform a connection test to check whether the URL and access key is valid.
Click "Update" button to save the changes.
* Please refer to ChatLuck Integration > ChatLuck Notification in the desknet's NEO User's Manual for setting details.
To Setup ChatGPT Link Settings
When you press the link of External Service Links Settings > ChatGPT Link Settings in Settings menu, ChatGPT Link Settings screen is displayed.
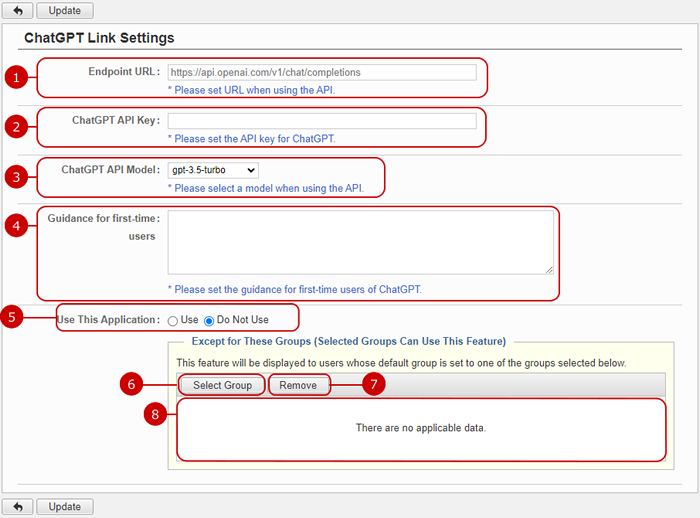
- Enter ChatGPT URL.
- Enter ChatGPT API key.
- Select ChatGPT API model to use.
-
Enter guidance message for first-time users.
This message will be displayed in the ChatGPT dialog to first-time users.
This message will not be displayed after the user has start a conversation.
- Set whether to use ChatGPT integration or not.
-
Select exception for certain groups.
Click to display Group Selection window.
* If you select groups as exceptions, the opposite action applies.
-
If "Use" is selected in Use This Application,
ChatGPT integration is unavailable for users whose default group is selected in Except for These Groups.
-
If "Do Not Use" is selected in Use This Application,
ChatGPT integration is available for users whose default group is selected in Except for These Groups.
- Delete selected group(s) from exception list.
- Group(s) that are selected in exception are listed here.
Click "Update" button to save the changes.
★1.Please enter the URL and API key for ChatGPT by referring to the following.
To Download ChatGPT History
When you press the link of External Service Links Settings > Download ChatGPT History in Settings menu, Download ChatGPT History screen is displayed.

After all entries are completed, click the "Download" button to start downloading ChatGPT history.


 - The users which can use Access Key
 - The users which cannot use the Access key


