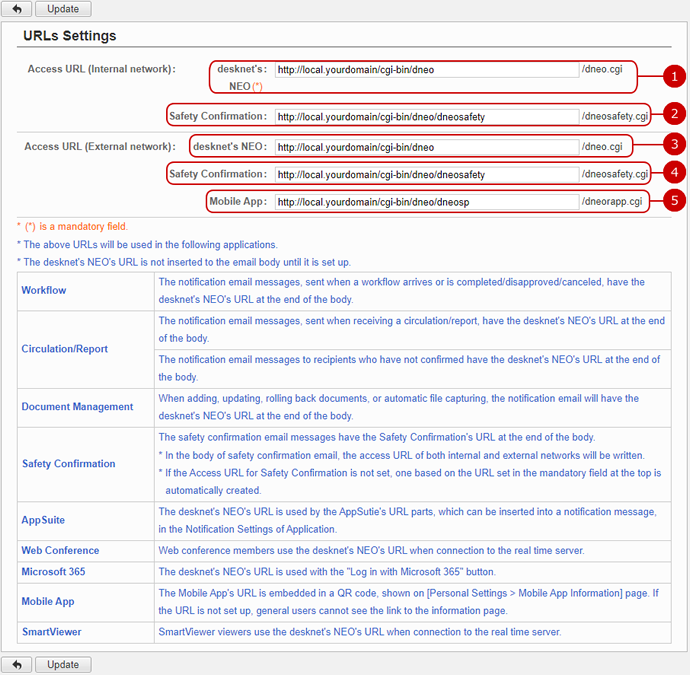
To Setup URL
Go to System Settings > URLs Settings from the settings menu.

* The access URLs is used as a base URL in notification email to redirect to the target applications.
Click "Update" button to save the changes.
To Setup Email Server
When you press the link of System Settings > Mail Server Settings in Settings menu, Mail Server Settings screen is displayed.

-
Enter incoming mail server information.
Enter a name of an incoming mail server, port No., and secure connection option.
These settings are used for the following application.
-
"WebMail" - "Account Settings"
-
"Document Management" - "Email Capturing Settings"
-
Enter outgoing mail server information.
Enter a name of an outgoing mail server, port No., secure connection option, authentication for sending.
When you press the link of Authentication for Sending, input fields are displayed. Choose any one of following authentication methods.
-
No Authentication
-
POP before SMTP
If you choose POP before SMTP, choose "Standard" or "APOP" for authentication option.
-
SMTP Authentication
If you choose "SMTP Authentication", choose any one of "CRAM-MD5", "LOGIN", "PLAIN".
-
XOAUTH2 Authentication
If you choose "XOAUTH2 Authentication", choose an OAuth authorization server.
If you use XOAUTH2 for authentication method for Google or Microsoft 365 mail server please select "XOAUTH Authentication".
OAuth authorization server need to be set by the system administrator.
(For more information, please refer to Setup > System Settings > Setting - OAuth Authorization Server in System Management Manual.)
These settings are used for the following application.
-
"WebMail" - "Account Settings"
-
"Safety Confirmation" - "Mail Server Settings"
-
"File Transfer" - "Outgoing Mail Server Settings"
* These settings are used when "Email Notification" option is set to "Use".
-
Setting up the detail settings during STARTTLS transmission.
This setting is for either one of the following value is selected in "Secure Connection".
- STARTTLS
- STARTTLS (Without Certification Validation)
"Omit some part of authentication" - If this setting is checked, a part of authentication to mail server can be omitted.
This may improve the transmission speed of mail server.
However, depending on the specified mail server, there may be situations in which transmission of email cannot be done.
In that case, do not use this setting.
This setting is not being used in most cases.
-
Enter server timeouts.
This is the setting of how many seconds to wait until a failure occurs after trying to log on to the mail server.
-
Choose whether to use Email Notification function in the applications.
-
Choose any one of following three addresses as sender email address.
- Sender's Workplace Email Address
- Email Address in [Company Information Settings]
- Other Email Address
-
Enter authentication information when sending email.
If you chose "POP before SMTP" "SMTP Authentication", enter user ID and password for authentication.
If you chose "XOAUTH2 Authentication", enter user ID and password for XOAUTH2 authentication and perform authentication on the selected OAuth authorization server by clicking "Authenticate" button.
Clicking "Authenticate" will display Google or Microsoft 365 sign in screen. Please authenticate by signing in into the respective services.
* If you choose any of "POP before SMTP", "SMTP Authentication" or "XOAUTH2 Authentication”, user ID is needed.
* If you are already signed in to Google or Microsoft 365, you will be authenticated using that account. Please check the details of the signed in account.
If you plan to authenticate multiple settings, please sign out from Google or Microsoft 365 for every authentication.
Click "Update" button to save the changes.
Setting - OAuth Authorization Server
When you press the link of System Settings > OAuth Authorization Server Settings in Settings menu, OAuth Authorization Server Settings screen is displayed.
If you use any of the service below for mail server (POP, IMAP), you can manage the OAuth2.0 server setting on this screen.
- Google
- Microsoft
* For this setting, it is required to set the client setting and acquire information for each service.

-
Display Add OAuth Authorization Server screen.
-
Delete the selected OAuth authorization server.
-
The list of OAuth authorization server will appear here.
By clicking [Add OAuth Authorization Server] button, Add OAuth Authorization Server screen will appear.

-
Enter authorization server name.
-
Choose any service.
-
Enter client ID.
-
Enter client secret.
Click "Add" button to save the changes.
To Setup Proxy Server Settings
When you press the link of System Settings > Proxy Server Settings in Settings menu, Proxy Server Settings screen is displayed.

Click "Update" button to save the changes.
Setting - single sign-on
Go to System Settings > URL Settings from the settings menu to display URL Settings screen.
In desknet's NEO setup menu add Chatluck as a single sign-on client
*At the moment the only supported client is Chatluck.
For more information about settings ChatLuck Client, please refer to ChatLuck Integration > Single Sign-on > Single Sign-on Setting in the system management manual.

-
Display create client screen
-
Delete the selected client.
-
the List of the added clients client will appear
By clicking [Add Client] button, Add client screen will appear.

-
Enter a name.
-
Enter the service URL
Click "Add" button to save the changes.
To Set Portal Refresh Settings
When you press the link of System Settings > Portal Refresh Settings in Settings menu, Portal Refresh Settings screen is displayed.

Click "Update" button to save the changes.
To Set Help and FAQ Display Settings
When you press the link of System Settings > Help Settings in Settings menu, Help Settings screen is displayed.

-
Select which Help of desknet's NEO you want to use.
- Local Help
- Online Help
-
Enter a URL of Local Help of desknet's NEO.
Only valid if "Local Help" is selected in Help.
-
Select which Help of AppSuite you want to use.
- Local Help
- Online Help
-
Enter a URL of Local Help of AppSuite.
Only valid if "Local Help" is selected in AppSuite Help.
-
Choose FAQ display availability from these 3 options.
- All Users
- Only System Administrators
- Hide
Click "Update" button to save the changes.
To Set Announcement from NEOJAPAN
When you press the link of NEOJAPAN Announcement Settings in Settings menu, NEOJAPAN Announcement Settings screen is displayed.

-
You can set choose notification targets for announcements from NEOJAPAN from the following 3 options.
- All Users
- Administrator
- Do Not Notify
* Announcements from NEOJAPAN will be retrieved during nighttime from external server if you choose "All Users" or "Administrator".
* Announcements is not retrieved when you choose "Do Not Notify".
* If the server you are using for desknet's NEO hosting does not allow outbound HTTPS connection, please select "Do Not Notify".
* Notifications from NEOJAPAN is displayed to the notification target Announcements list.
- All Users: All levels of users from general users to administrator
- System Administrators: Administrator level users only
Click "Update" button to save the changes.
To Download System Log
When you press the link of Menu Settings > System Settings > Download System Log, the Download System Log screen is displayed.
* This screen is displayed only for the package version.
Before downloading screen
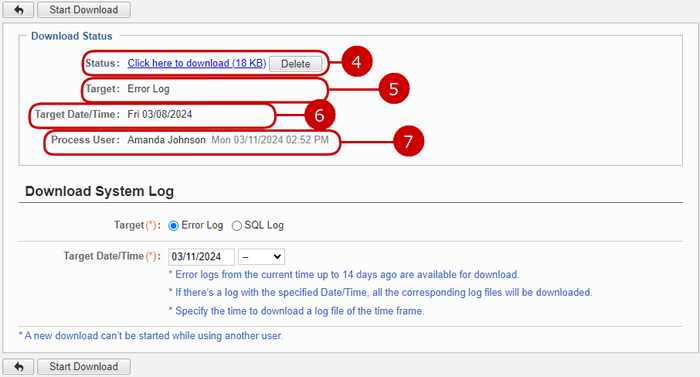
 Ready to download screen

-
The download status is displayed.
When the process has finished, a download link and a "Delete" button is displayed.
- Download link: You can download the file.
- "Delete" button: Delete the file from the server.
-
The selection is displayed.
-
The date selection is displayed.
-
The user who started the download and the staring time is displayed.
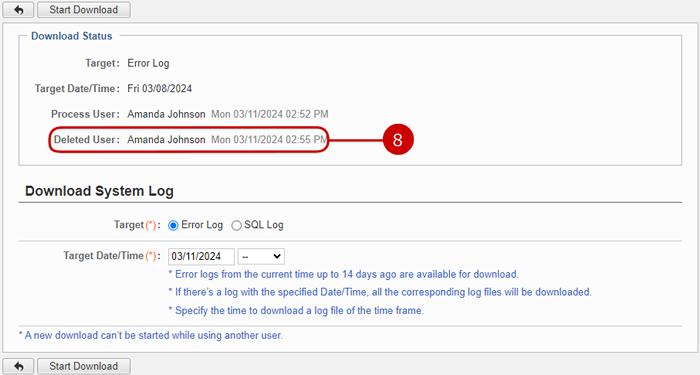
File Deleted Screen


