Rich Text Editor Feature
In rich text editor, you can create and edit images, text, tables by using tool buttons without knowledge of HTML.
You can insert HTML tags manually.
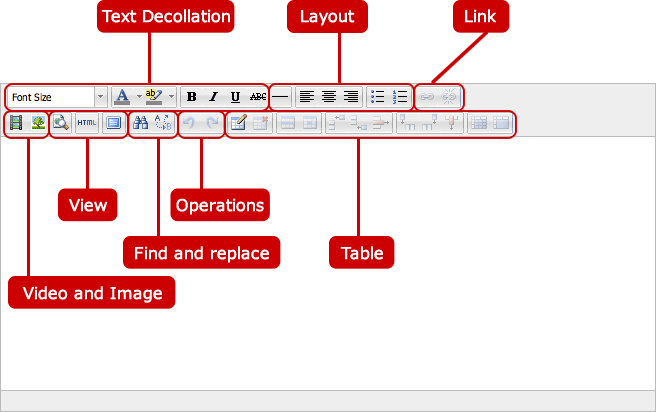 Text Decollation
-
Change the font size of text.
Select text you want to change and choose a font size.
-
Change the color of text.
When you press ▼, the color palette is displayed. Choose a color or press "More Colors" to use a color which is not available in the color palette.
-
Change the background color of text.
When you press ▼, the color palette is displayed. Choose a color or press "More Colors" to use a color which is not available in the color palette.
-
Bold text.
-
Italicize text.
-
Underline text.
-
Strikethrough text.
Layout
-
Insert a horizontal line at the cursor position.
-
Align text or images left.
-
Align text or images center.
-
Align text or images right.
-
Create a bulleted list.
-
Create a numbered list.
Link
-
Insert a link.
When you select text you want to insert a link, and press "Insert/Edit Link" button, Insert/Edit Link window is displayed.
When you enter a URL and title and choose any one of Target, and press "Insert", the link is inserted.
-
Unlink.
When you place the cursor on a linked text and press unlink, the link is removed.
Video and Image
-
Insert an embedded media, such as Flash, video, music.
When you place the cursor where you want to insert a media, and press the button, "Insert/Edit Embedded Media" window is displayed.
Enter a URL, dimensions, etc. and press "OK" button to insert the embedded media.
-
Insert an image.
When you place the cursor where you want to insert an image, and press the button, "Insert/Edit Image" window is displayed.
Enter a URL, description, height, width, border, spaces and choose alignment and press "OK" button to insert the embedded media.
View
-
Display a preview of the rich text.
-
You can view and edit HTML source code of the rich text filed.
When you press "HTML" button, the HTML Source Editor window is open. You can edit the code in the window manually. When you press "Update" button, the changes apply to the rich text filed.
-
Switch to full screen mode.
When you press the button again,
Find and replace
-
Find text.
-
Replace text by another text.
Operations
Table
-
Insert a table.
When you place the cursor where you want to insert a table, and press "Inset/Edit Table" button, "Insert/Edit Table" window is displayed.
Enter properties such as columns, rows, cell padding, width, height, class, table caption and press "Insert" button to insert the table.
-
Delete a table.
Select a table you want to delete, and press "Delete Table" to delete the table.
-
Set table row properties.
When you place the cursor where you want to change table row properties, and press "Table Row Properties" button, "Table Row Properties" window is displayed.
Enter row properties such as row type, alignment, vertical alignment, class, height, and press "Update" to save changes.
-
Set table cell properties.
When you place the cursor where you want to change cell row properties, and press "Table Cell Properties" button, "Table Cell Properties" window is displayed.
Enter cell properties such as alignment, cell type, vertical alignment, scope, width, height, class and press "Update" to save changes.
-
Insert a row before the cursor position.
-
Insert a row after the cursor position.
-
Delete a row at the cursor position.
-
Insert a column before the cursor position.
-
Insert a column after the cursor position.
-
Delete a column at the cursor position.
-
Split a merged table cells.
-
When you press and hold down a cell and move to upwards, downwards, rightwards, or leftwards, and release the button, you can select cells.
When you press "Merge Table Cell", the cells are merged into one cell.
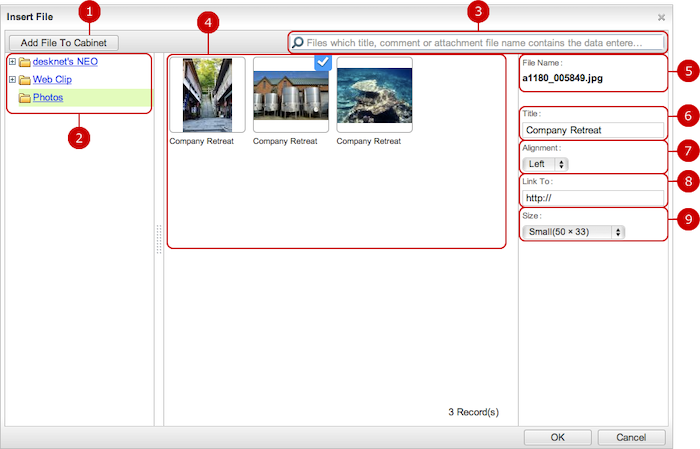
Insert an image from Cabinet.
When you press "Insert File" button at the top of the rich text editor, a window to select and insert an image file from Cabinet is displayed.
Select an image and press "OK" button to insert the image in the rich text editor.
- "Insert Image" button
* "Insert Image" button is displayed at the top of the rich text editor in Information application and Private/Common Portal Design Settings.
* This feature is not available other than the rich text editor in Information application and Private/Common Portal Design Settings.
* "Insert Image" button is not displayed when Cabinet application is set to "Do Not Use" in desknet's NEO Menu Settings.

- Insert File Window
-
Add a file to Cabinet.
When you press "Add File To Cabinet" button, a file selection window is displayed. Choose a file to add.
* A file is added to a folder you selected in the folder list.
* A cabinet file is created for each file.
-
The list of folders in Cabinet is displayed.
When you press the link of a folder, image files in the selected folder are displayed.
* Files other than images files are not displayed. Only GIF, JPEG, PNG files are displayed.
-
You can find files by the keyword search function.
"Title", "Comment", "Attachment File Name" of files in the folder selected are searched.
* If you want to specify more than one keyword, use space to separate keywords.
-
The list of image files in the folder is displayed.
When you press an image, the check mark is displayed.
When you check it, the file name is displayed the setting field on the right.
* You cannot check more than one image.
-
The file name of the selected image is displayed.
-
Enter a title.
-
Choose an alignment.
-
Enter where to link.
Enter where to link when the image is pressed.
-
Choose a size.
You can choose any one of small, medium, large, and original.
* The actual size of small, medium, and large is adjusted automatically.
When you press "OK" button, the selected image is inserted in the rich text editor.
Copyright (C) 2012-2014 NEOJAPAN,Inc. all rights Reserved.
