To Display Personal Email Accounts
when you press the link of Personal Account Settings > Account Settings in Settings menu, the list of personal accounts is displayed.
- List of email accounts
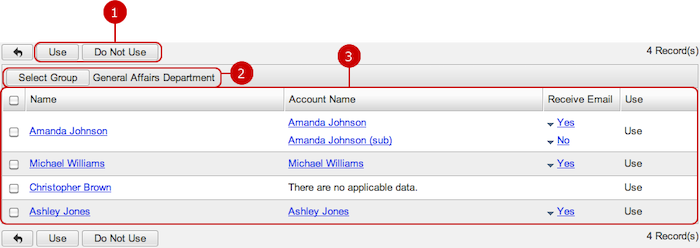
- Receive Email Switching Menu
-
Set whether to use the accounts of selected users.
Select items you want to change and press this button to change. You can select more than one item.
-
Users who belong to the group you selected are displayed.
When you press "Select Group" button, Group Selection window is displayed.
-
Personal accounts of the selected users are displayed.
When you press Name link of a user, the list of accounts screen is displayed.
When you press a link of Account Name, Account Settings screen is displayed.
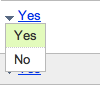
When you press a link of Receive Email, the menu to choose whether to receive email is displayed and you can change the option on the fly.
To Display Users' Personal Accounts
When you press a link of the name, a list of the user's accounts is displayed.
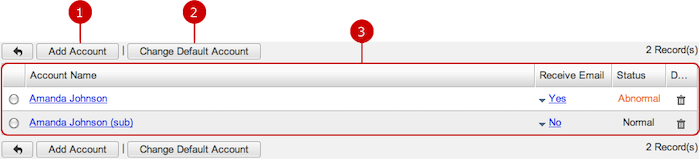
To Add Personal Account to User
When you press "Add Account" button in the list of accounts screen, Add Account screen is displayed.
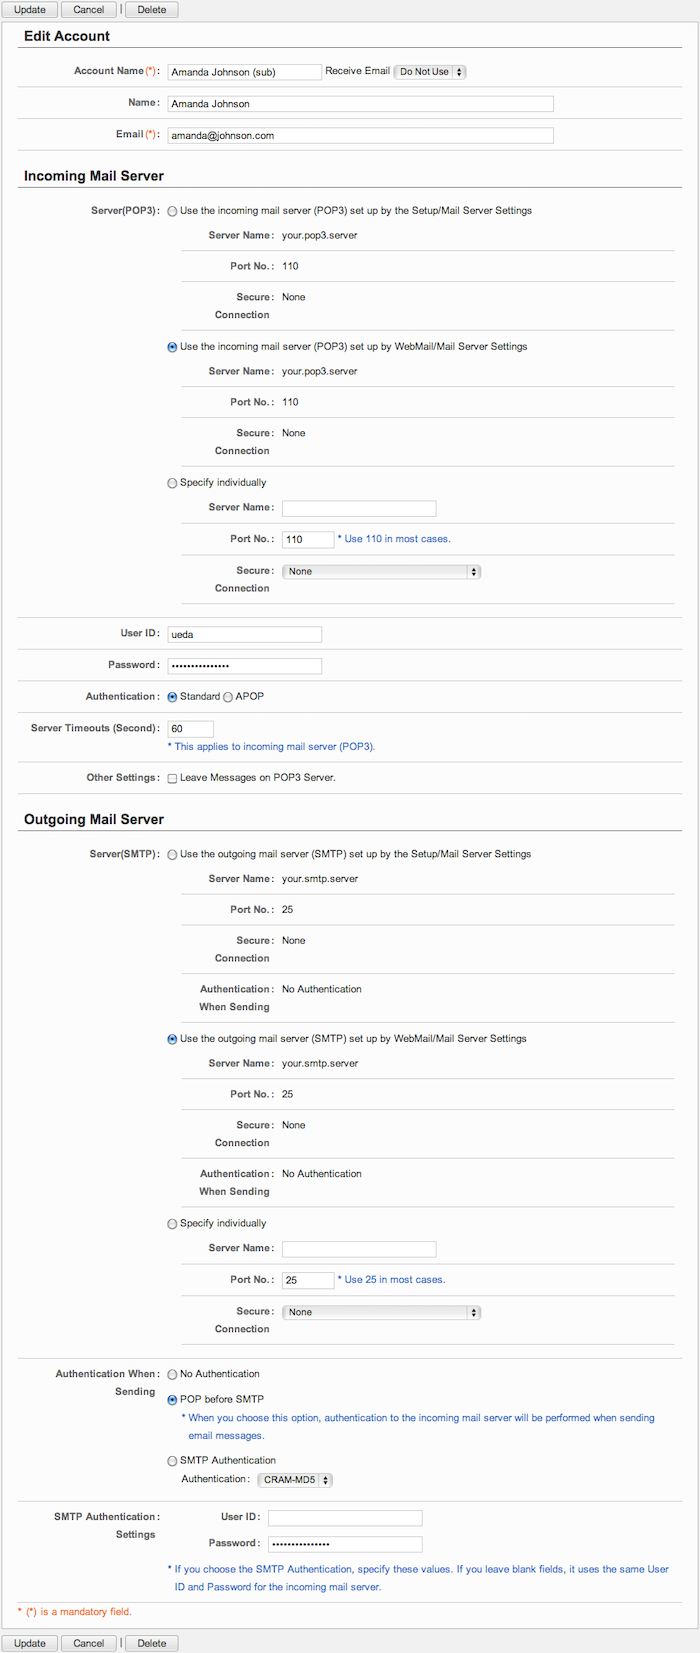
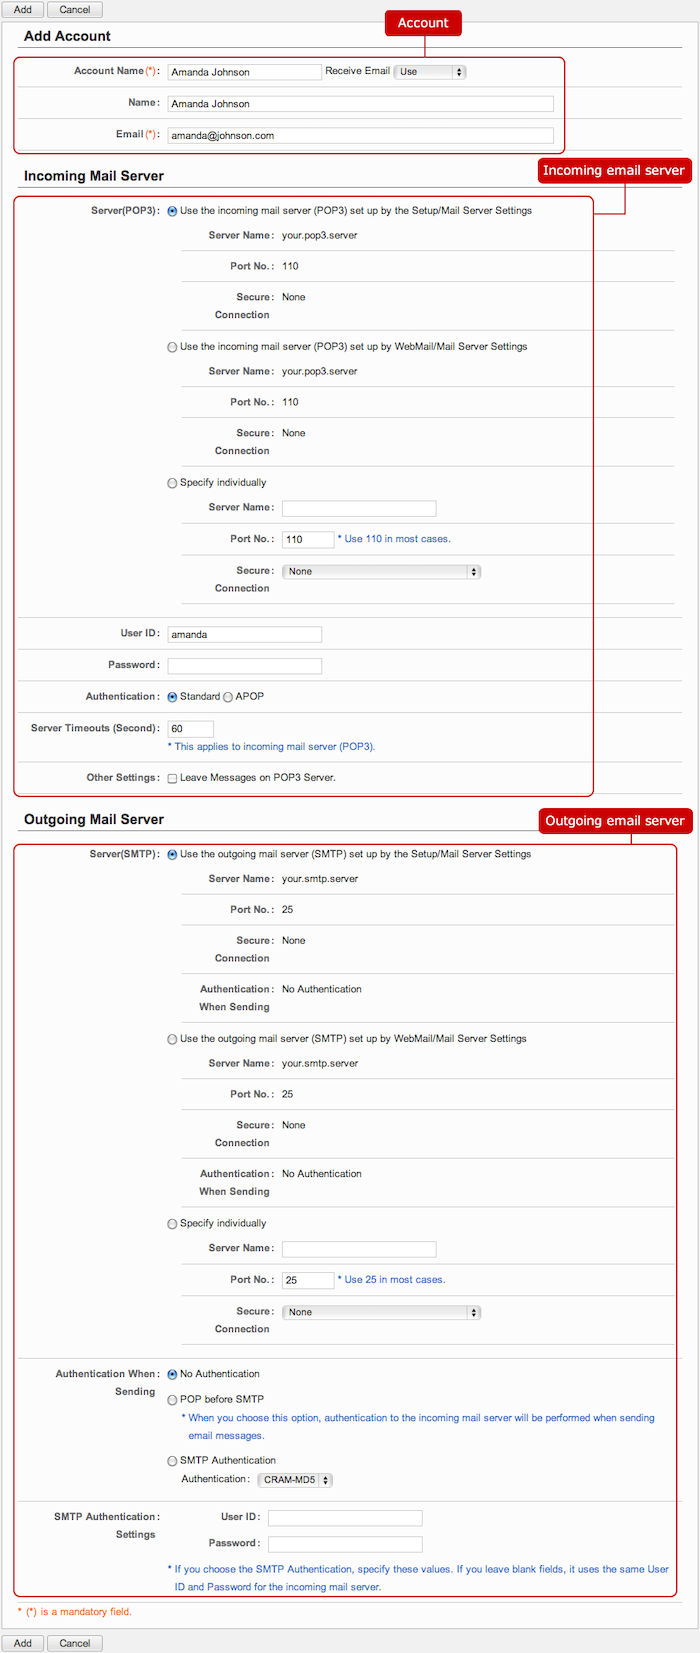 Account
-
Enter an account name.
-
Choose whether to receive email or not.
-
Enter a name.
-
Enter an email address.
The email address you entered is displayed in "Name<Email>" format as a sender's email address.
Incoming email server
-
Choose any one of the following three incoming email server settings.
- Use the incoming mail server (POP3) setup by the Setup/Mail Server Settings.
- Use the incoming mail server (POP3) setup by WebMail/Mail Server Settings.
- Specify individually.
If you choose "Specify individually", enter a server name, port No. and secure connection option of an incoming server.
* POP3 is a protocol for receiving of email (protocol).
-
Enter a user ID of the incoming email server.
-
Enter password of the incoming email server.
-
Choose the authentication method when you log on to the incoming mail server
Choose "Standard", if the incoming mail server is not configured in a special authentication method.
If you choose "APOP", it logs on to the incoming email server with using a secured password.
-
This is the setting how many seconds wait for a failure to log on to the incoming mail server.
-
Choose whether to leave received messages on the incoming email server.
If you check " Leave Messages on POP3 Server" option, received messages are not deleted.
Use this option, if you want to use another email client to receive messages from the incoming email server.
* If you cancel this option (to delete received messages), all the messages in the incoming email server are received when receiving (The messages that have been already received are received again).
Outgoing email server
-
Choose any one of the following three outgoing email server settings.
- Use the outgoing mail server (SMTP) setup by the Setup/Mail Server Settings.
- Use the outgoing mail server (SMTP) setup by WebMail/Mail Server Settings.
- Specify individually.
If you choose "Specify individually", enter a server name, port No. and secure connection option of an outgoing server.
* SMTP is a protocol for receiving of email (protocol).
-
Choose any one of the following three authentication methods.
- No Authentication
- POP before SMTP
- SMTP Authentication
If you choose "SMTP Authentication", choose any one of "CRAM-MD5", "LOGIN", "PLAIN".
-
If you choose "SMTP Authentication", enter a user ID and password for SMTP authentication.
* If it is omitted, the user ID and password of the incoming mail server settings are used .
When the entry is complete, press "Add" button to save the data.
To Edit Personal Account of User
When you press a link of the account name, Edit Account screen is displayed.
When changes are complete, press "Update" button to save the data.
To Delete Personal Account
When you press "Delete" button on the list of accounts or Edit Account screen, a confirmation window is displayed.
When you press "Yes" button, the accounts are deleted.
* Please note that all folders and email messages corresponding to the accounts are deleted.
To Add Accounts from File (Import)
When you press Personal Account Settings > Import Accounts in Settings menu, Import Account screen is displayed.
You can add and update accounts by importing a file in batch.
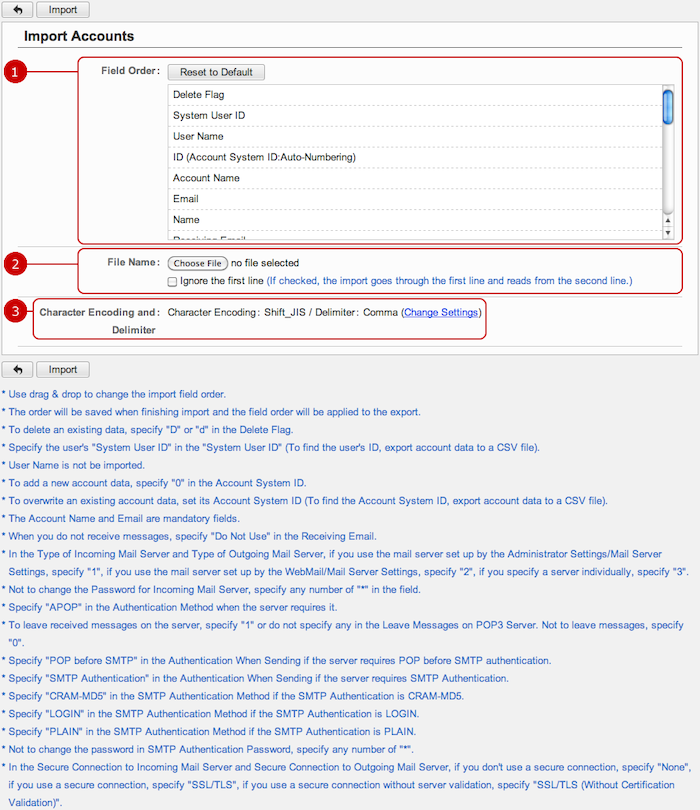
When you press "Import" button, importing accounts is started.
To Save Accounts to File (Export)
When you press Personal Account Settings > Export Accounts in Settings menu, Export Account screen is displayed.
You can save the personal accounts to a file.
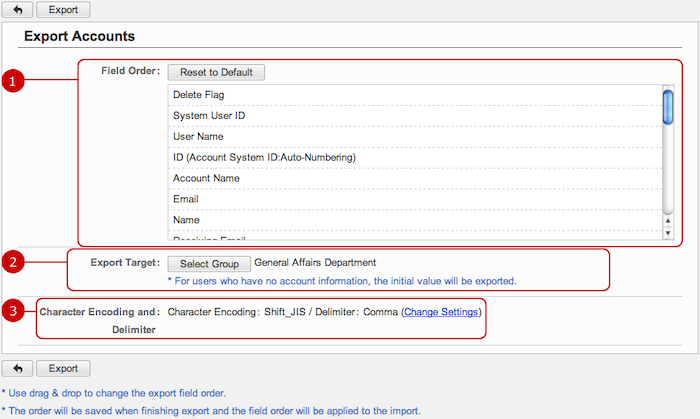
When you press "Export" button, exporting accounts is started.
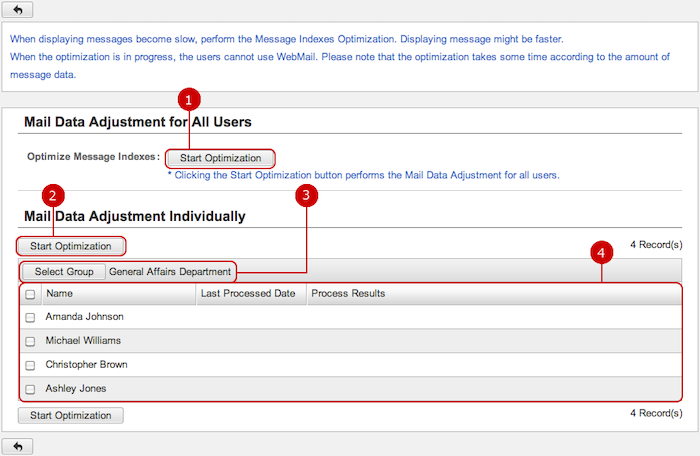
To Optimize Message Indexes of Personal Accounts
When you press the link of Personal Account Settings > Optimize Message Indexes in Settings menu, Optimize Message Indexes screen is displayed.
The optimizing lets to prevent enlargement of the message indexes to minimize reduction of the response.
* Please note that when the optimization is in progress, the users cannot use WebMail.。
* Since the optimization takes some time according to the amount of message data, we recommend that you perform the optimizing when your users are not using email.
To Setup Public Accounts
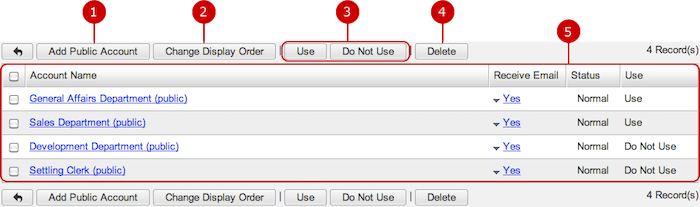
When you press the link of Public Account Settings > Account Settings in Settings menu, the list of public accounts is displayed.
* If Public Account Usage option is set "Disallow" in "Settings" - "Public Account Usage Setting", the tab is not displayed.
-
Add a Public Account
-
Change the display order of accounts you selected.
Choose accounts on the list and then press "Change Display Order" button to switch the screen mode to Change Display Order mode.
In Change Display Order mode, choose the destination of the accounts. You can choose more than one accounts at once.
* Press and hold down the mouse button over data you want to move and move the mouse and release the mouse button on desired place to change the display order.
-
Set whether to use the accounts of selected users.
Select items you want to change and press this button to change. You can select more than one item.
-
Delete public accounts.
Select accounts from the list of public accounts and press this button to delete them. You can delete more than one accounts at once.
* Please note that all folders and email messages corresponding to the accounts are deleted.
-
Accounts of the user is displayed.
When you press a link of the account name, Edit Public Account screen is displayed.
When you press a link of Receive Email, the menu to choose whether to receive email is displayed and you can change the option on the fly.
To Add Public Account
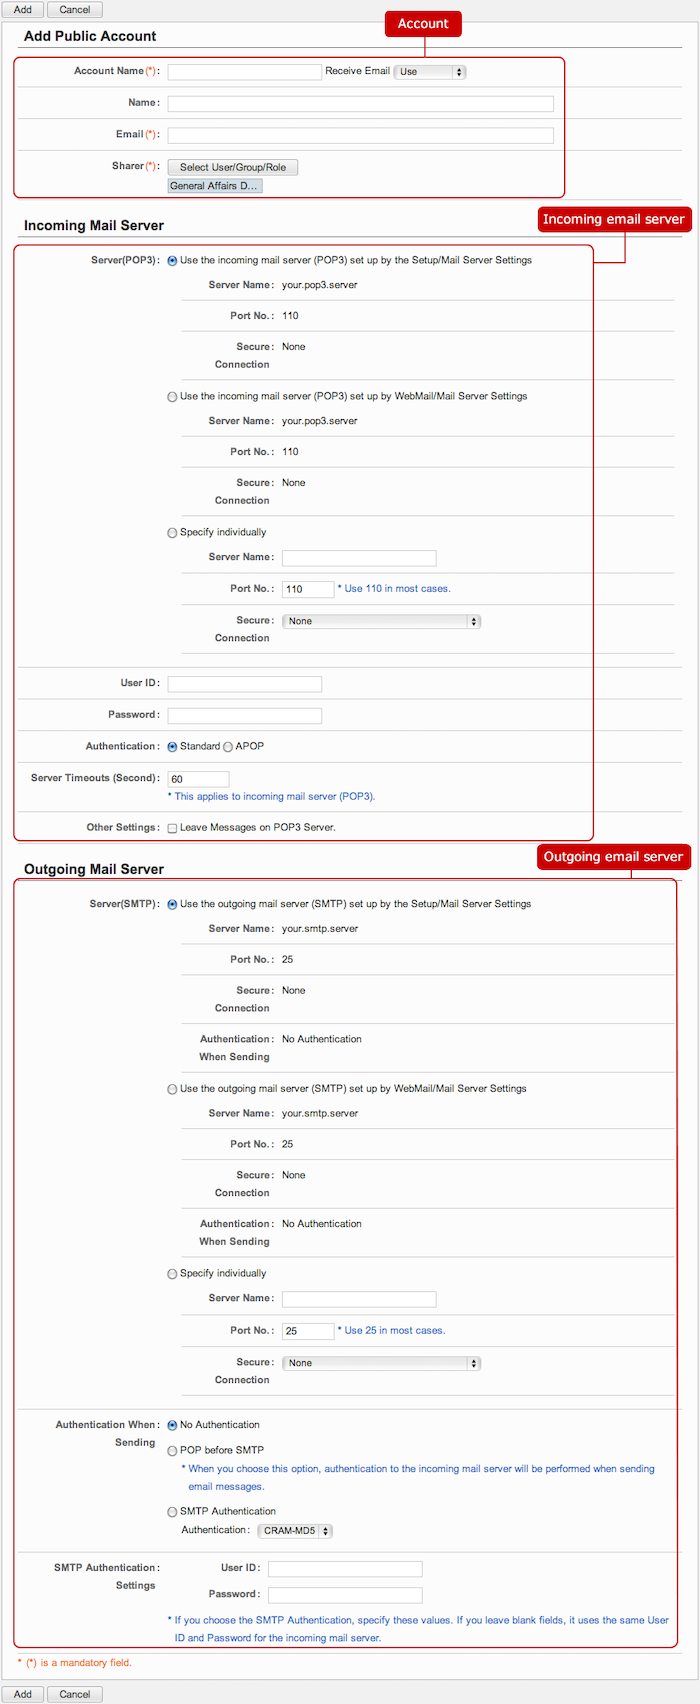
When you press "Add Public Account" button in the list of accounts screen, Add Public Account screen is displayed.
 Account
-
Enter an account name.
-
Choose whether to receive email or not.
-
Enter a name.
-
Enter an email address.
The email address you entered is displayed in "Name<Email>" format as a sender's email address.
-
Select users, groups, and/or roles that share this account.
When you press "Select User/Group/Role" button, the user, group, role selection window is displayed.
Select users, groups, and/or roles that share this account.
(Please refer to the explanation of the user/group/role selection in the user's manual for more details.)
Incoming email server
-
Choose any one of the following three incoming email server settings.
- Use the incoming mail server (POP3) setup by the Setup/Mail Server Settings.
- Use the incoming mail server (POP3) setup by WebMail/Mail Server Settings.
- Specify individually.
If you choose "Specify individually", enter a server name, port No. and secure connection option of an incoming server.
* POP3 is a protocol for receiving of email (protocol).
-
Enter a user ID of the incoming email server.
-
Enter password of the incoming email server.
-
Choose the authentication method when you log on to the incoming mail server
Choose "Standard", if the incoming mail server is not configured in a special authentication method.
If you choose "APOP", it logs on to the incoming email server with using a secured password.
-
This is the setting how many seconds wait for a failure to log on to the incoming mail server.
-
Choose whether to leave received messages on the incoming email server.
If you check " Leave Messages on POP3 Server" option, received messages are not deleted.
Use this option, if you want to use another email client to receive messages from the incoming email server.
* If you cancel this option (to delete received messages), all the messages in the incoming email server are received when receiving (The messages that have been already received are received again).
Outgoing email server
-
Choose any one of the following three outgoing email server settings.
- Use the outgoing mail server (SMTP) setup by the Setup/Mail Server Settings.
- Use the outgoing mail server (SMTP) setup by WebMail/Mail Server Settings.
- Specify individually.
If you choose "Specify individually", enter a server name, port No. and secure connection option of an outgoing server.
* SMTP is a protocol for receiving of email (protocol).
-
Choose any one of the following three authentication methods.
- No Authentication
- POP before SMTP
- SMTP Authentication
If you choose "SMTP Authentication", choose any one of "CRAM-MD5", "LOGIN", "PLAIN".
-
If you choose "SMTP Authentication", enter a user ID and password for SMTP authentication.
* If it is omitted, the user ID and password of the incoming mail server settings are used .
When the entry is complete, press "Add" button to save the data.
To Edit Public Account
When you press a link of the account name, Edit Public Account screen is displayed.
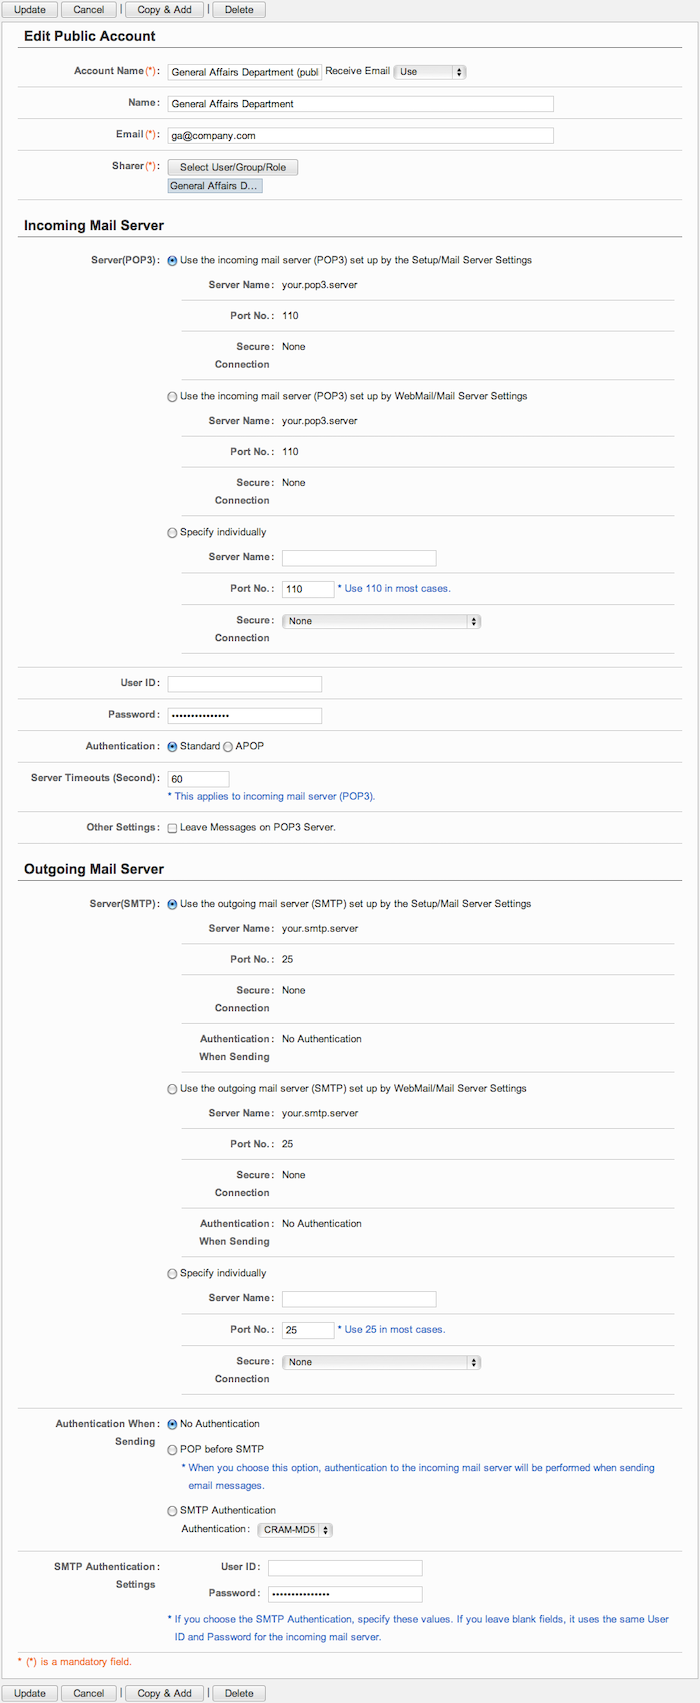
When changes are complete, press "Update" button to save the data.
To Delete Public Account
When you press "Delete" button on the list of accounts or Edit Public Account screen, a confirmation window is displayed.
When you press "Yes" button, the accounts are deleted.
* Please note that all folders and email messages corresponding to the accounts are deleted.
To Optimize Message Indexes of Public Accounts
When you press the link of Public Account Settings > Optimize Message Indexes in Settings menu, Optimize Message Indexes screen is displayed.
The optimizing lets to prevent enlargement of the message indexes to minimize reduction of the response.
* If Public Account Usage option is set "Disallow" in "Settings" - "Public Account Usage Setting", the tab is not displayed.
* Please note that when the optimization is in progress, the users cannot use WebMail.。
* Since the optimization takes some time according to the amount of message data, we recommend that you perform the optimizing when your users are not using email.

Copyright (C) 2012-2014 NEOJAPAN,Inc. all rights Reserved.


